QuickVault
This page describes the QuickVault solution and provides high level information about each of the registration options. The purpose of the page is to highlight the key features of each option so that you can compare the methods and choose the right option for your business.
In addition to this page, provide you with separate implementation guides for each registration option. These guides provide detailed technical information as well as step-by-step instructions to help you implement the solution.
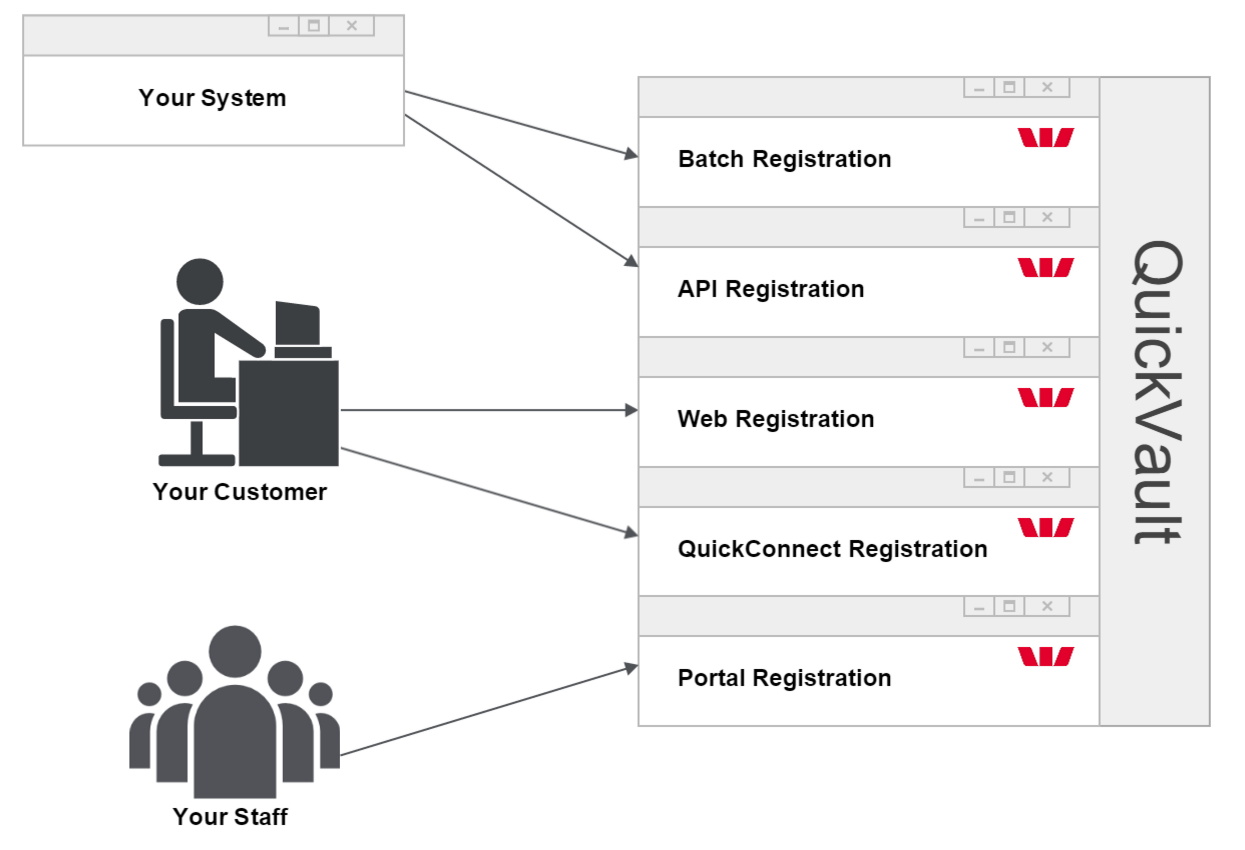
You can register customer accounts using these methods:
- Batch registration - A file based solution that allows you to preregister customer account details with Westpac
- Web registration - A Westpac hosted service that captures customer account details and stores them securely inside QuickVault.
- QuickStream REST API - An all-in-one solution for both card and bank account payments. Our complete and developer focused REST API is designed to maximise the ability to receive payments via multiple channels.
- QuickStream Portal - Your staff enter account details manually using QuickStream Portal.
What is QuickVault?
QuickVault is a Westpac service that allows you to store a customer's card details or bank account details securely outside your system. This process is commonly referred to as preregistering account details. QuickVault offers a range of solutions to register these account details. The range includes a file based solution, an API solution and a variety of web based solutions
The primary purpose of QuickVault is to help your card solution become PCI DSS compliant. The term PCI DSS stands for Payment Card Industry Data Security Standard. It is a security standard that has a number of requirements for processing, transmitting and storing card details. QuickVault has attained Level 1 PCI DSS compliance - the highest level achievable. To learn more about PCI DSS visit https://www.pcisecuritystandards.org/security_standards/pci_dss.shtml.
The benefit of using QuickVault is that your system is not required to store account details. Instead, you only need to store an account token for each account. An account token is a unique identifier for a particular account. It is a shared identifier, meaning your system and QuickVault will both agree to use this value when referring to the account. The value for the token will be agreed upon at the time of registration. Then, at the time of payment, your system will provide this token to your Westpac payment solution and the corresponding account details will be used to make the payment.
High level steps for both the registration process and the payment process follow.
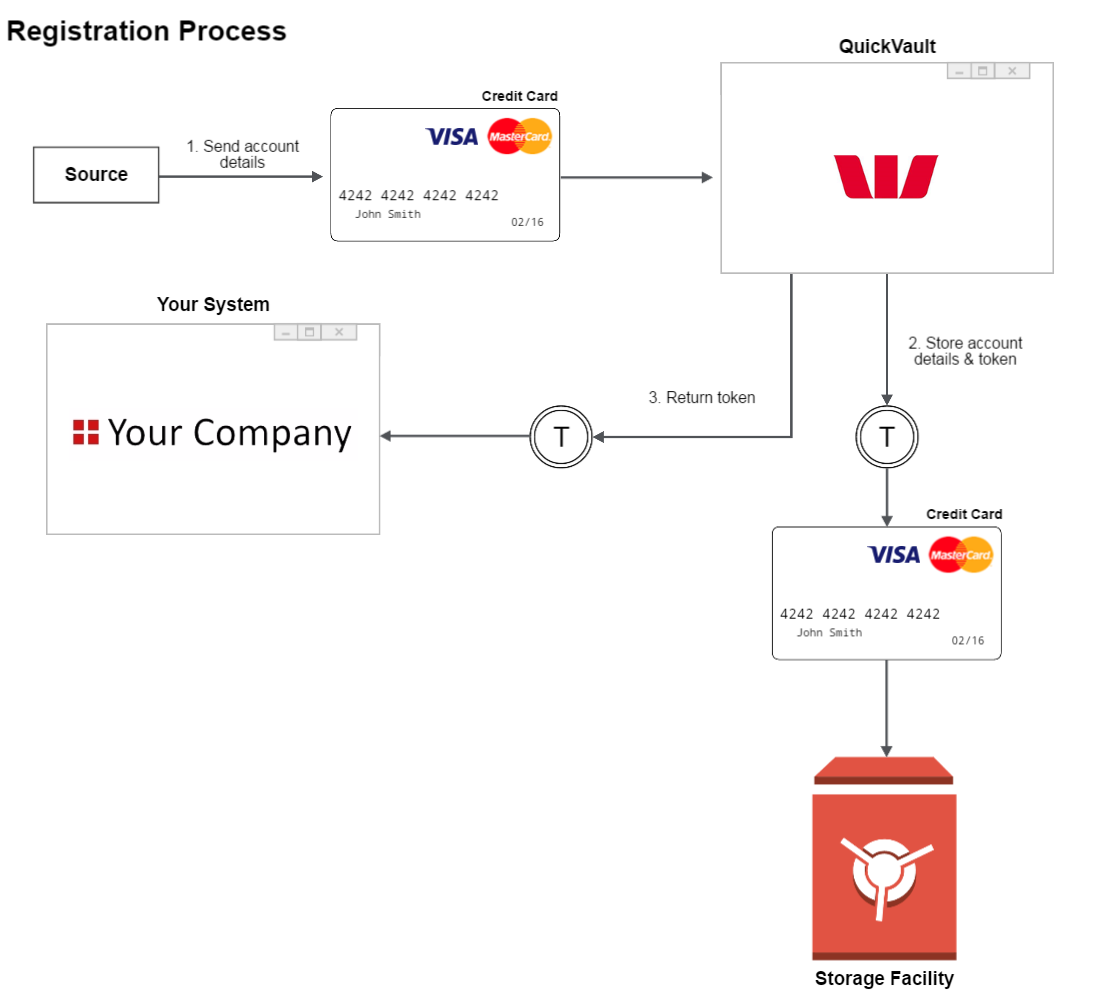
The high level steps for registering an account are as follows:
-
The source will provide account details to QuickVault. The term 'source' is a generic concept. It is different for different registration solutions. The source will either be your staff, your customer or your system.
-
QuickVault will store the account details alongside an account token. There are two ways the token can be generated. You can choose either a client generated token or a QuickVault generated token.
- A client generated token is a value created by your system. It uniquely identifies your customer's account. For example, your customer's reference number or member ID. Your system will provide this value to QuickVault at the beginning of the registration process.
- A QuickVault generated token is a value created by QuickVault. It is created during step 2 of the registration process. We recommend using this type of token if your system doesn't have a unique ID for each account or if it is difficult to provide the ID to QuickVault. QuickVault can format the token in a number of ways. You can select your preferred format during the implementation process.
- QuickVault will notify your system about the registered account. A copy of the token will be included in the notification. Your system will make sure the token is stored alongside the customer's details.
Registration is complete. Payments can now be made using the preregistered account.
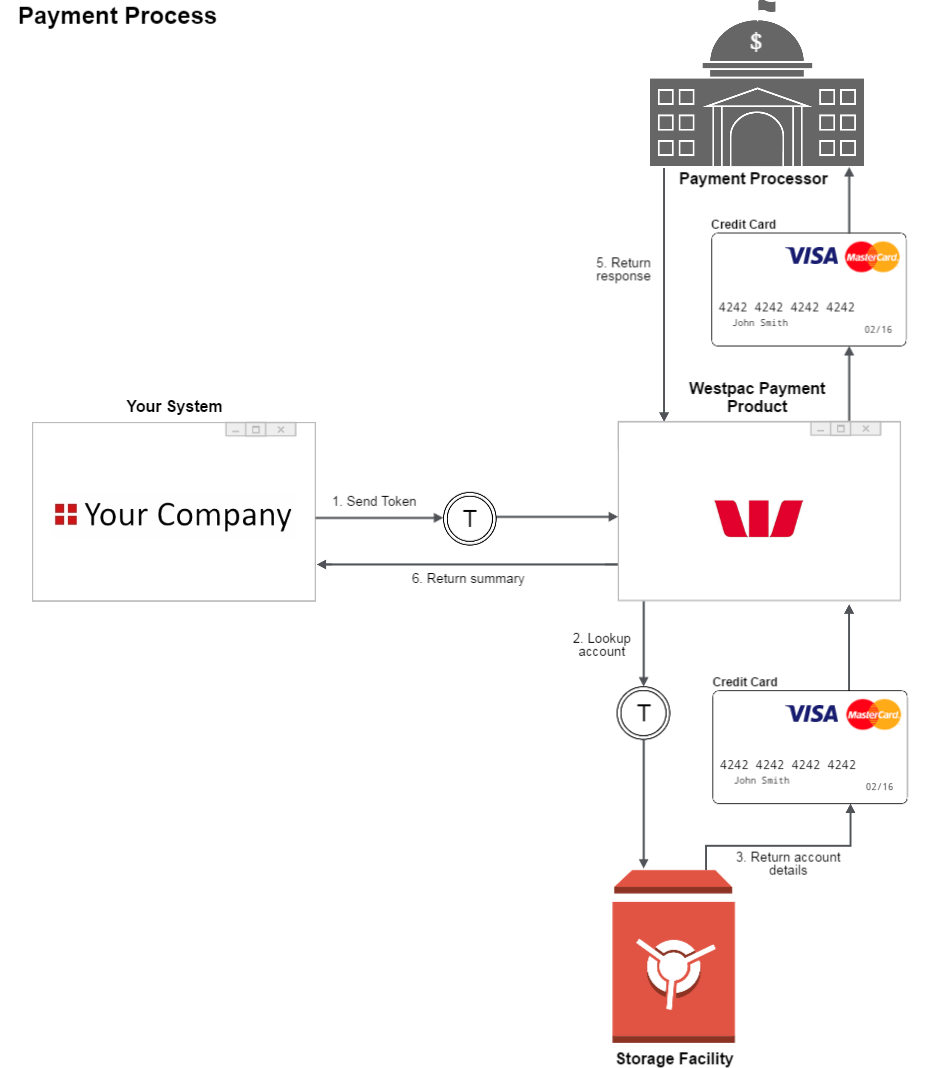
The high level steps for making a payment are as follows:
- Your system provides the account token to your Westpac payment product (for example QuickBatch or QuickGateway).
- The Westpac payment product searches for the account that was registered with the token.
- The account details are located and returned to the Westpac payment product.
- The Westpac payment product attempts to make a payment (using the account details located in the previous step).
- A response is returned to indicate whether the payment was successful.
- The Westpac payment product will provide a payment summary to your system.
Registration solutions
QuickVault has different solutions that allow you to register account details.
For a RESTful API solution, see QuickStream REST API.
The methods described in this guide are:
- Batch Registration
- Web Registration
- Connect Registration
- Classic API Registration
- QuickStream Portal Registration
Summary
The following table provides a high level comparison of the different QuickVault registration solutions.
| Description | Batch Registration | Classic API Registration | Web Registration | Connect Registration | QuickStream Portal Registration | QuickStream REST API |
|---|---|---|---|---|---|---|
| Solution | See Batch Registration | See Classic API Registration | See Web Registration | See Connect Registration | See QuickStream Portal Registration | See QuickStream REST API |
| Can the solution migrate existing accounts? | Yes | No | No | No | No | No |
| Can the solution register new accounts? | No | Yes | Yes | Yes | Yes | Yes |
| Can the customer register their own account? | No | Yes | Yes | Yes | No | Yes |
| Can the solution register card accounts? | Yes | Yes | Yes | Yes | Yes | Yes |
| Can the solution register bank accounts? | Yes | No | Yes | Yes | Yes | Yes |
Batch registration
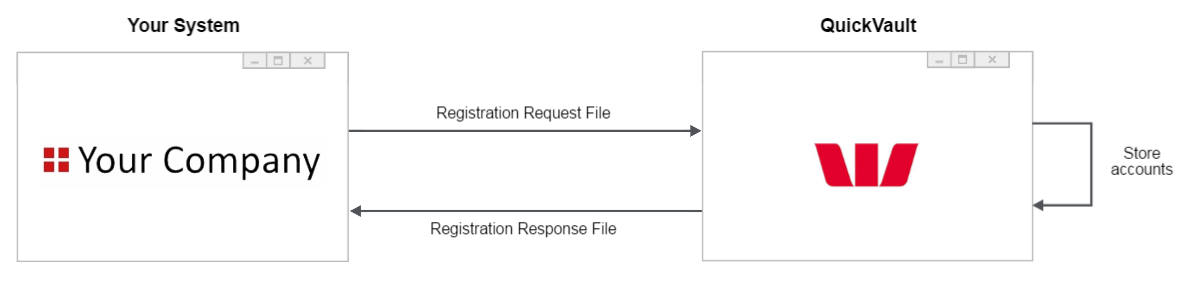
Batch registration is a file based solution. It allows you to register many accounts at once. This makes it an ideal solution for migrating existing accounts from your system.
To register account details, your system will provide a Registration Request File to QuickVault. This file contains details about every card or bank account you wish to register. QuickVault will process the file and store the account details. Once all the accounts have been processed a Registration Response File will be provided back to your system. This file will contain a summary of all the registration attempts. You will then process this file and remove the customers' account details from your system.
To transfer files to and from QuickVault you can choose to either:
Key features of batch registration:
- Many accounts can be registered at once
- It can register both card accounts and bank accounts
- It is the fastest and most effective way to migrate accounts
Limitations of batch registration:
- It is not suitable for registering new accounts
For more information about implementing this solution, read the QuickVault (Batch Registration) Technical Implementation Guide.
Classic API registration
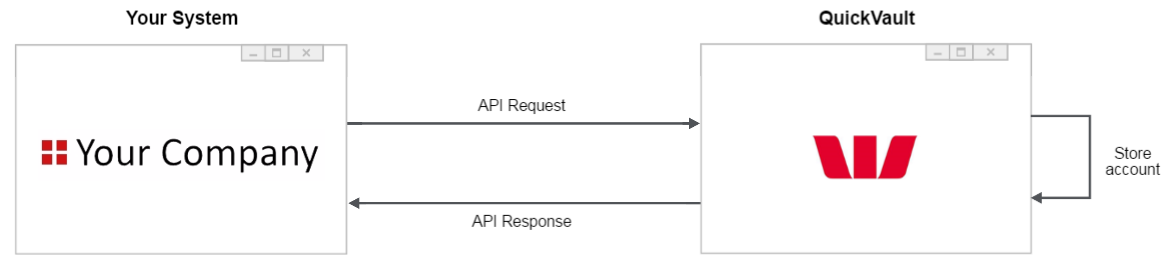
Classic API registration is an Application Programming Interface (API) based solution.
To register an account your system will send an API Request to QuickVault. This request contains details about a single account you wish to register. QuickVault will save the account details then send an API Response back to your system. The response will indicate whether the account was successfully registered.
The key feature of Classic API registration is its ability to provide a real-time, synchronous response. This removes the complexities of issuing a request then having to process a separate response message sometime in the future. With Classic API registration, your system will send the request then receive a response back in the same call, all in real-time.
Classic API registration is typically used as part of a webpage registration process. To register an account, the customer will log onto your website and enter their account details into one of your webpages. Your server will then use Classic API registration to send these details to QuickVault. The steps for this process are shown in below.
The problem with using Classic API registration is that it requires the account details to be sent from your server. This means sensitive account details will enter your system, therefor increasing your PCI DSS responsibilities. For this reason we recommend you consider using one of our other web based registration solutions. Web registration and Connect registration for details.
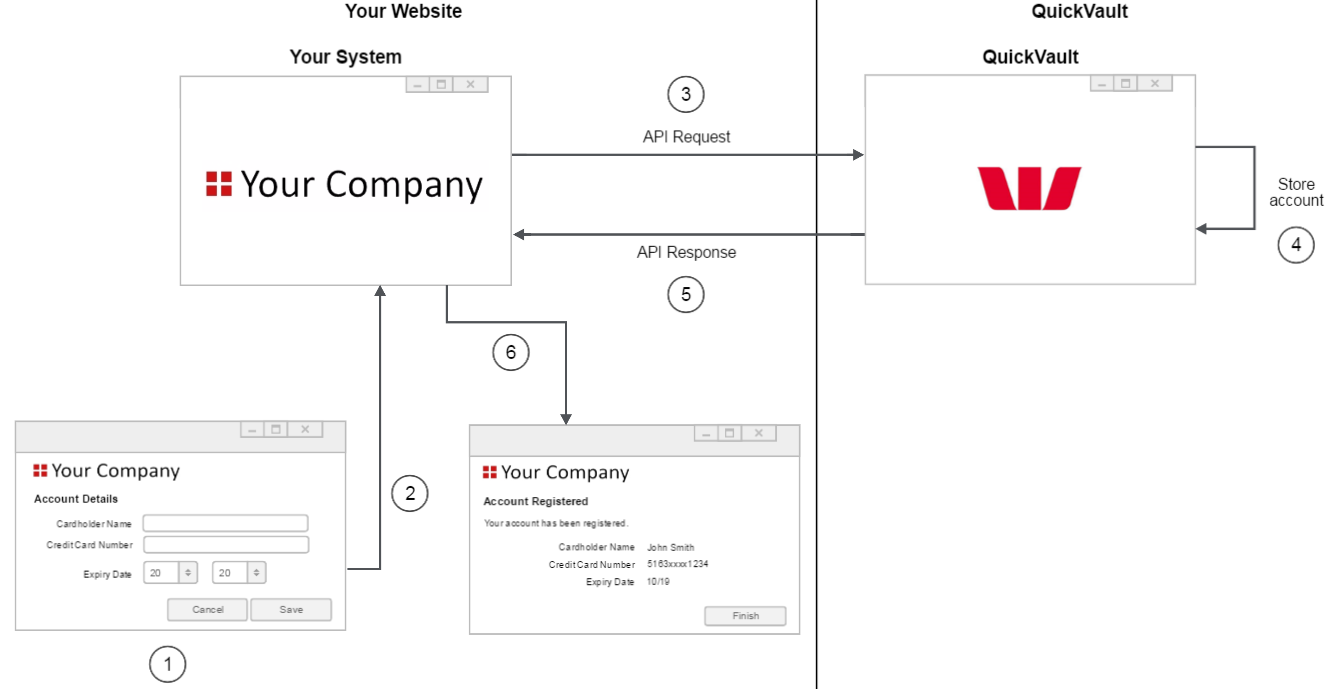
The steps for the above diagram are as follows:
- The customer visits your website and enters their account details into your 'Account Details' page.
- When the 'Save' button is clicked the customer's browser posts the account details to your server.
Classic API registration begins here.
- Your server sends an API Request to QuickVault. The request contains the customer's account details.
- QuickVault stores the customer's account details.
- QuickVault returns an API Response to your server. The response indicates whether the account was successfully registered. Classic API registration ends here.
- Your server builds the html for the 'Account Registered' page (or your preferred page) then returns the html to the customer's browser.
Web registration
Web registration is a webpage based solution that combines your website and QuickVault's website. The key to web registration is that account details are entered into a Westpac hosted webpage, meaning sensitive account details never enter your system. This makes it an ideal solution if you wish to minimise your PCI DSS responsibilities.
To register an account, the customer will first log onto your website. Then, at the appropriate time, your website will redirect the customer's browser to a QuickVault webpage. The customer will enter their account details and the account will be stored securely within QuickVault. Once registration is complete, QuickVault will redirect the customer's browser back to your website.

The steps in the above diagram are as follows:
-
The customer visits your website. One of your webpages will include a button to begin the registration process.
-
When the customer clicks the button your website will redirect the browser to QuickVault. This transition is known as the 'handoff'.
-
QuickVault displays the 'Account Details' page. This page asks the customer to enter their card details or bank account details. The look and feel of this page can be customised to match your website.
-
QuickVault stores the account.
-
QuickVault displays the 'Account Registered' page. The page includes a button linking back to your website.=
Important
QuickVault can also provide a registration notification directly to your server at this point. This is known as the server-to-server postback. The purpose of this message is to:
- Let you know the account was successfully registered
- Provide you with a summary of the account (eg, cardholder name, card scheme)
- Provide you with the unique token registered against the account
- Find the customer in your system
- Store the account summary if necessary
- Store the account token if necessary
-
QuickVault returns the customer back to your website. This is known as the 'passback'.
-
Your website displays the appropriate page to the customer.
For more information about web registration, read the 'QuickVault (Web Registration) Technical Implementation Guide'.
Connect registration
Connect registration is a webpage based solution, where all the webpages are hosted by your system.
To register an account, the customer logs onto your website and enters their account details into one of your webpages. These account details are then submitted directly to QuickVault, meaning sensitive account details never enter your system.
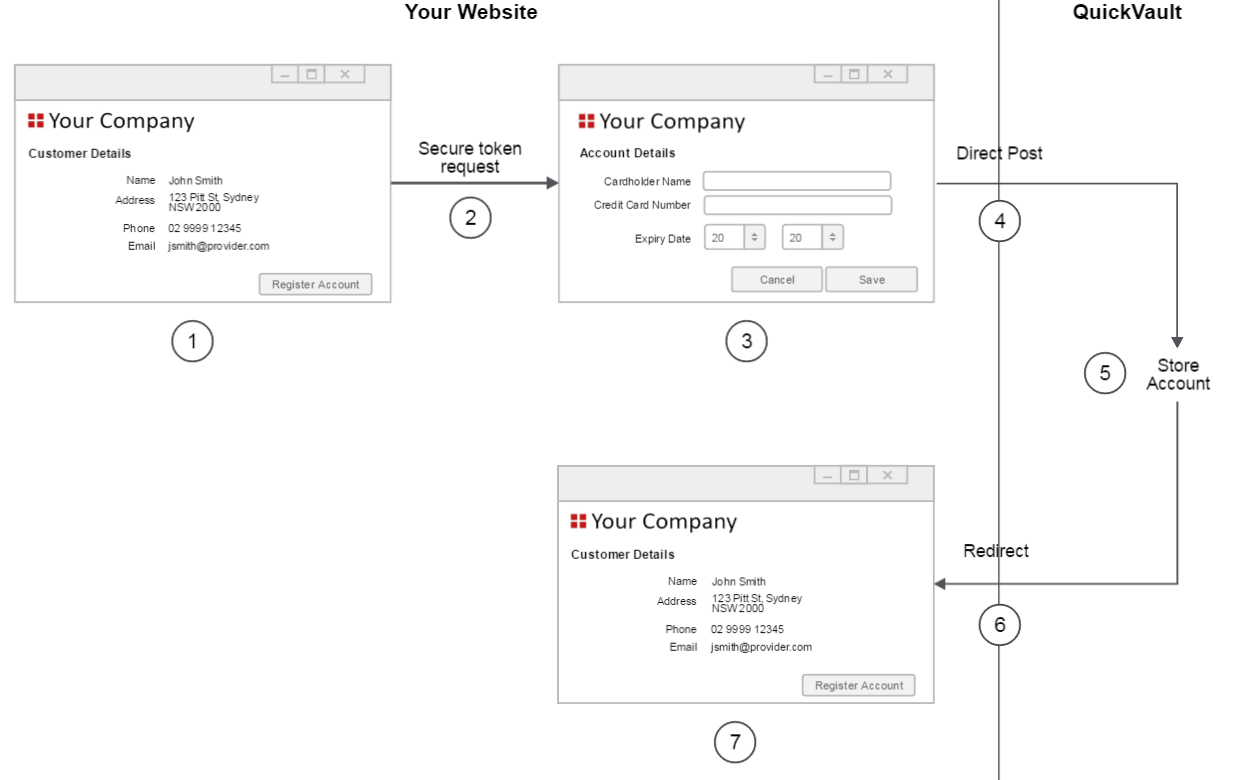
The steps for the above diagram are as follows:
- The customer visits your website. One of your webpages will include a button to begin the registration process.
- When the customer clicks the button your website will prepare the 'Account Details' page. To do this you must first retrieve a security token from QuickVault. You will then include this security token in a hidden field within the page.
- The customer enters their account details into the 'Account Details' page.
- When the 'Save' button is clicked the customer's browser will post the account details directly to QuickVault. The account details will not enter your website.
- QuickVault saves the account details.
- QuickVault redirects the customer's browser back to your website.
Important
QuickVault can also provide a registration notification directly to your server at this point. This is known as the server-to-server postback. The purpose of this message is to:
- Let you know the account was successfully registered
- Provide you with a summary of the account (eg, cardholder name, card scheme)
- Provide you with the unique token registered against the account
- Find the customer in your system
- Store the account summary if necessary
- Store the account token if necessary
- Your website displays the 'Account Registered' page (or your preferred page) to the customer.
For more information about Connect registration, read the 'QuickVault (Connect Registration) Technical Implementation Guide'.
QuickStream Portal registration
QuickStream Portal registration is a webpage based solution, where all the webpages are hosted by Westpac. The key to QuickStream Portal registration is that it is only accessible to your staff. This means your customers cannot register their own account details. Instead, customers will communicate their details to a staff user who will then register the account for them. This type of solution is typically used in a call centre environment.
To register an account, a staff user will log on to QuickVault's website and enter the customer's account details. The account will then be stored securely within QuickVault. If necessary QuickVault can also provide a registration summary to your system.
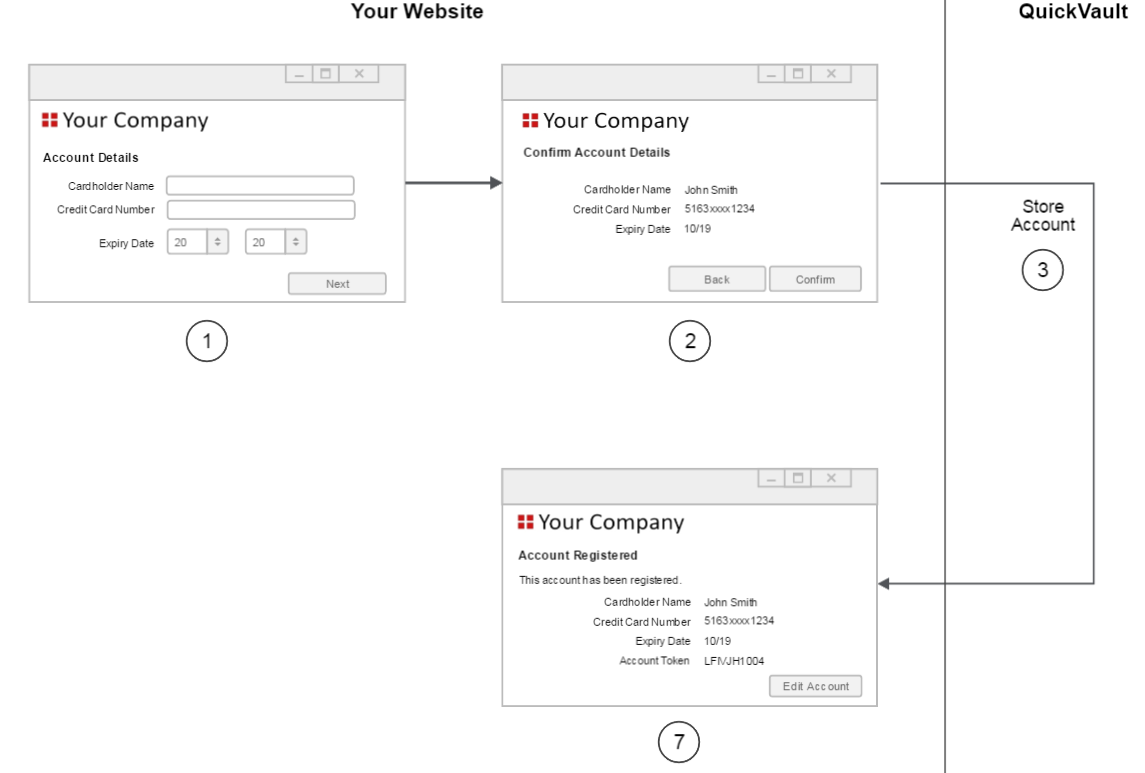
The steps for the above diagram are as follows:
- The staff user logs on to QuickVault's website and enters the customer's account details into the 'Account Details' page.
- When the 'Next' button is clicked the 'Confirm Account Details' page will appear. This page shows the account details that are about to be registered. If any data is incorrect, the user can click the 'Back' button to readjust the details.
- When the 'Confirm' button is clicked QuickVault will save the account details.
Important
QuickVault can also provide a registration notification directly to your server at this point. This is known as the server-to-server postback. The purpose of this message is to:
- Let you know the account was successfully registered
- Provide you with a summary of the account (eg, cardholder name, card scheme)
- Provide you with the unique token registered against the account
- Find the customer in your system
- Store the account summary if necessary
- Store the account token if necessary
- QuickVault will display the 'Account Registered' page.
For more information about QuickStream Portal Registration, read the QuickStream User Guide.
Registered accounts report
At the end of each day QuickVault can provide you with a Registered Accounts Report. The report lists all the accounts that have been registered throughout the day. It can be provided for any of the registration solutions, however it is mainly used for Web registration, QuickConnect registration and Portal registration.
QuickVault will generate the report at 12am each night. You can then upload the report into your system and reconcile the data against notifications you received earlier in the day.
QuickVault offers a standard file format. See Registered accounts report.
Identifying expiring cards
QuickVault's Expiring Cards Report provides you with a list of cards that are due to expire. QuickVault will generate the report at the start of each month. You can then upload the report into your system and notify your customers about their expiring cards.
QuickVault offers a CSV file format containing the expiring card details and account token. See Expiring cards report.
Formats for the QuickVault generated token
This section is relevant if you are using a QuickVault generated token in your solution. QuickVault can format the token in a number of ways. You can choose one of the following options:
- Check digit format
- Numeric account format
- Alphanumeric account format
- Community code format
Check digit format
The check digit format uses a random number combined with a check digit. The check digit is the last digit in the token. It will be calculated using the Luhn algorithm (MOD10V1 formula).
The maximum length of the token is 17 digits.
For example:
- The first account may be assigned a token with the value 1001234564.
- The second account may be assigned a token with the value 1001234608.
- And so on.
Numeric account format
The numeric account format uses a random number followed by the last 4 digits of the account.
For a card the token will consist of a random number followed by the last 4 digits of the card number. For a bank account the token will consist of a random number followed by the last 4 digits of the bank account number.
The maximum length of the token is 17 digits.
Alphanumeric account format
The alphanumeric account format uses a random alphanumeric value followed by the last 4 digits of the account.
For a card the token will consist of a random alphanumeric value followed by the last 4 digits of the card number. For a bank account the token will consist of a random alphanumeric value followed by the last 4 digits of the bank account number.
The maximum length of the token is 17 characters.
Community code format
The community code format uses your Westpac short community code followed by a random numeric value. Your Westpac short community code will be a value that is 1-4 characters long. Every token will begin with this value.
The maximum length of the token is 17 characters.
For example, if we assume your Westpac community short code is ABCD:
- The first account may be assigned a token with the value ABCD100354.
- The second account may be assigned a token with the value ABCD100361.
- And so on.
Requirements checklist
The purpose of this section is to help identify your requirements. Use the checklist as follows:
- Download the requirements checklist and rename it with your company name.
- Complete as much of the checklist as you can before your first meeting with Westpac.
- Use the checklist to understand the steps required to implement this product.