Trusted Frame using QuickStream-API.js
QuickStream-API.js is a JavaScript library containing helper functions for collecting card, bank account and PayTo details, validating these details and obtaining a single-use-token without any sensitive details ever touching your servers. All sensitive data is sent directly from the customer's browser to our QuickStream servers.
Use Trusted Frame to quickly and easily "drop-in" card, bank account or PayTo forms onto your website.
With Trusted Frame, we host the form inside an iframe, and there are lots of options to customise its look-and-feel. You get to fully customise Trusted Frame when your page loads, and on events as your customers fill out your own forms.
View the full QuickStream-API.js JavaScript SDK reference and follow the tutorials.
Cards
Collect card payment accounts using Trusted Frame. To test: enter a name, 4242424242424242 into Card Number and choose an expiry date in the future.
See the Pen XWXbmGe by Westpac QuickStream (@quickstream) on CodePen.
Bank Accounts
Collect bank accounts using Trusted Frame. To test: enter a name, 032-002 into BSB and 123465 into Account Number.
See the Pen Westpac QuickStream REST API - Trusted Frame - Bank account payments by Westpac QuickStream (@quickstream) on CodePen.
PayTo
Collect PayTo details using Trusted Frame. To test: enter a name and enter PayID or account details.
See the Pen Westpac QuickStream REST API - Trusted Frame - PayTo payments by Westpac QuickStream (@quickstream) on CodePen.
Tutorials
Trusted Frame
Use this tutorial to create a web page that takes a one-off credit card payment or stores credit card details in QuickVault. Your server will not store or process credit card details.
It works as follows:
- Your server hosts a web page containing a form and quickstream-api.js.
- You call
initwith your Publishable API key andcreateTrustedFramewhich creates a QuickStream iframe for collecting card details. - The iframe sends card details securely to QuickStream.
- The iframe sends a single use token to your website.
- Your server uses the token in place of the card details when you take a payment or register an account.
Step 1: Host example page
Host this page on your website. Cardholders will enter their details on this page.
New Zealand based users: replace the line <script src="https://api.quickstream.westpac.com.au/rest/v1/quickstream-api-1.0.min.js"> with <script src="https://quickapi.paymentsonline.co.nz/rest/v1/quickstream-api-1.0.min.js">.
<!DOCTYPE html>
<html>
  <body>
    <!-- this form will POST a single use token to your server -->
    <form id="payment-form" action="/process-payment" method="post">
        <div data-quickstream-api="creditCardContainer"></div>
        <input id="make-payment-submit" type="submit" disabled="true"/>
    </form>
    <script src="https://api.quickstream.westpac.com.au/rest/v1/quickstream-api-1.0.min.js">
    </script>
    <script type="text/javascript">
        var submit = document.getElementById('make-payment-submit');
        QuickstreamAPI.init({
          publishableApiKey: "{publishableAPIKey}"
        });
        var trustedFrame;
        var options = {
          config: {
            supplierBusinessCode: "{supplierBusinessCode}"
          }
        };
        QuickstreamAPI.creditCards.createTrustedFrame(options, function(errors, data){
            trustedFrame = data.trustedFrame;
            if(errors){
              submit.disabled = true;
            } else {
              submit.disabled = false;
            }
        });
        var form = document.getElementById("payment-form");
        form.addEventListener("submit", function(event){
          event.preventDefault();
          trustedFrame.submitForm(function(errors, data){
            if(!errors){
              QuickstreamAPI.creditCards.appendTokenToForm(form, data.singleUseToken.singleUseTokenId);
              form.submit();
            }
          });
        });
    </script>
  </body>
</html>
Open the page. You should see this error message in the console log.
QuickstreamAPI: The "Authorization" header contained an unknown API key. You must send your API key as the basic authentication username.
Step 2: Set publishable API key
- Sign in to QuickStream.
- Click on Administration -> Facility Settings in the menu.
- Go to REST API keys
- Click on your publishable key (or add a new one)
- Copy the key.
- In your web page, replace
{publishableAPIKey}with your publishable API key.
You may also change /process-payments to a URL you prefer.
Open the page again. You should see this error message in the console log.
QuickstreamAPI: Invalid supplier business code.
Step 3: Set business
The supplierBusinessCode is a reference to a business in your facility. A business contains a merchant facility that settles funds to a settlement account. It also has a list of accepted card types and any surcharges you have configured.
- Sign in to QuickStream.
- Click on Administration -> Facility Settings in the menu.
- Go to View connection details and then select the REST API tab.
- Copy a value for
supplierBusinessCodefrom the list. - In your web page, replace
{supplierBusinessCode}with this value.
You can also use the REST API to list business that can accept REST API payments.
Step 4: Test page
Load your web page, you should see the credit card form.
Enter these card details:
| Field | Value |
|---|---|
| Cardholder name | Token tutorial |
| Credit card number | 4242 4242 4242 4242 |
| Expiry date | 12/2022 |
| CVN | 123 |
Your browser will POST to /process-payment on your server. The POST includes a parameter like this:
singleUseTokenId: 32500dec-569e-4bca-b3ed-c9596048f658
Step 5: Take payment or register card account
You can now use the single use token to take a payment or register the card in QuickStream.
When you receive a POST to /process-payment you should:
- Read the single use token from the parameter.
- Verify your customer using a session cookie.
- Using your secret API key and the single use token, send a request to take a one-time payment.
If you need to take more than one payment with the card details, you should register the card:
- Find a customer by your customer number or by the
customerId. - If your customer doesn't exist, create one.
- Using the single use token, send a request to register the card.
- You will receive an account token.
You should then take payments using the account token via this API or using batch payment file.
If the customer already has an account token with the same card number, registering it again will update the expiry date and cardholder name and return the same account token.
Step 6: Improve your solution
You may now improve your solution by:
- Avoiding duplicates by using an
Idempotency-Keyheader. - Handling errors.
- Styling the iframe.
- Protecting your site from card testing.
- Adding bank accounts.
- Updating card or bank accounts for an existing customer.
- Handling a service outage.
Tokenisation using Trusted Frame
Tokenisation (or registering a payment account) is a process by which card/bank account details are replaced with a surrogate value called an Account Token. Use the Trusted Frame to collect card/bank account details from a customer, then create a Single use token and send it to your server instead of the payment account details.
The tutorials below illustrate common ways of doing this.
See more about the differences between Account Tokens and Single use tokens.
Find or create the customer and tokenise at the same time
This is a possible scenario where the customer can be known or created after initialising the Trusted Frame to collect account details.
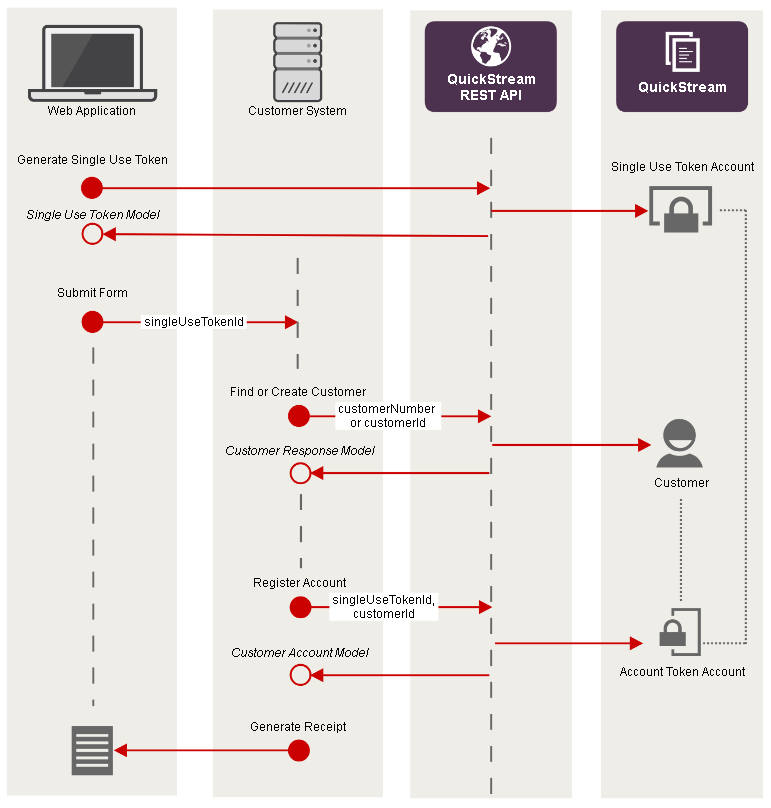
| Step | Description |
|---|---|
| 1 | Your web app initialises the Trusted Frame. |
| 2 | The payer enters account details into the Trusted Frame. |
| 3 | The Trusted Frame generates a Single Use Token. The API responds with a Single Use Token Model. Your web app retrieves it from the Trusted Frame, and adds the singleUseTokenId to your form. |
| 4 | Your web app will submit the singleUseTokenId to your server. |
| 5 | Your server finds a customer using the customerNumber, or by customerId. If the customer does not exist, create one. The API responds with a Customer Model. The customerId property is the unique identifier for the customer. |
| 6 | Use the singleUseTokenId and customerId to register an account for a customer. The API responds with a Customer Account Model. The accountToken property is the permanent token for the account. Use it to take payments later. |
| 7 | Generate a receipt/confirmation for the payer. |
Find or create the customer first, then tokenise
This is a possible scenario where the customer can be known or created prior to initialising the Trusted Frame to collect payment account details.
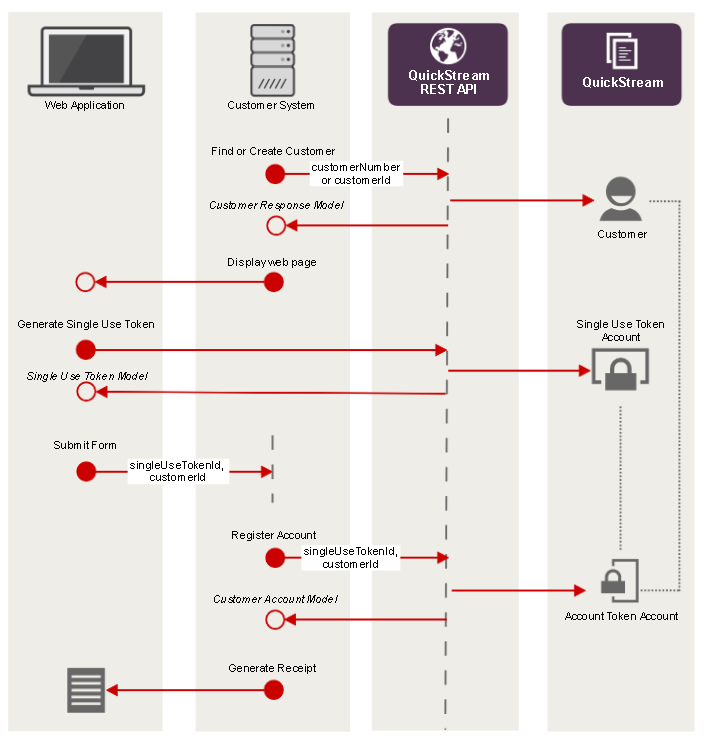
| Step | Description |
|---|---|
| 1 | Your server finds a customer using the customerNumber, or by customerId. If the customer does not exist, create one. The API responds with a Customer Model. The customerId property is the unique identifier for the customer. |
| 2 | Provide the customerId back to your web app or store it for later. |
| 3 | Your web app initialises the Trusted Frame. |
| 4 | The payer enters account details into the Trusted Frame. |
| 5 | The Trusted Frame generates a Single Use Token. The API responds with a Single Use Token Model. Your web app retrieves it from the Trusted Frame, and adds the singleUseTokenId to your form. |
| 6 | Your web app will submit the singleUseTokenId to your server. |
| 7 | Use the singleUseTokenId and customerId to register an account for a customer. The API responds with a Customer Account Model. The accountToken property is the permanent token for the account. Use it to take payments later. |
| 8 | Generate a receipt/confirmation for the payer. |
Tokenisation using Trusted Frame without customer details
This is a possible scenario where your system stores your customer details. This tutorial creates the same entities in the above tutorials, but removes the call to create a customer.
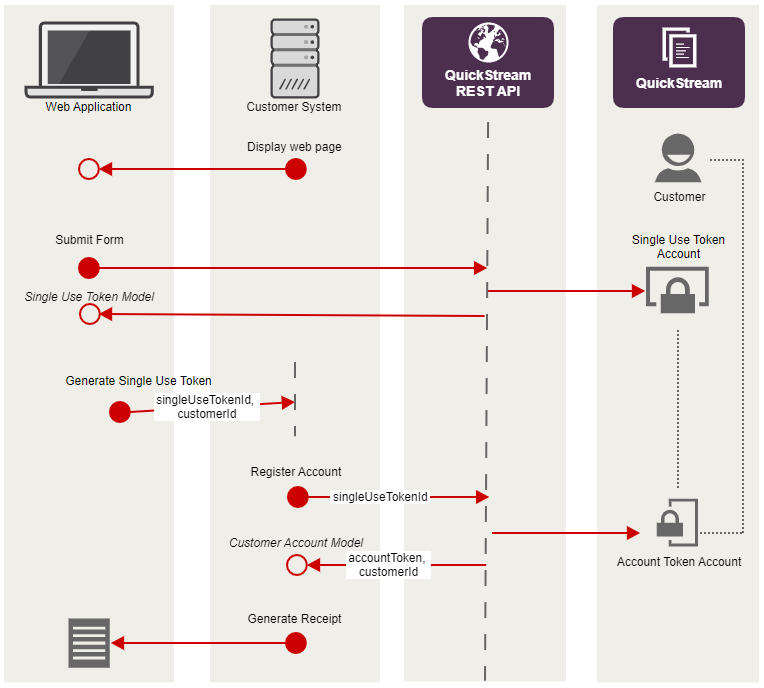
| Step | Description |
|---|---|
| 1 | Your web app initialises the Trusted Frame. |
| 2 | The payer enters account details into the Trusted Frame. |
| 3 | The Trusted Frame generates a Single Use Token. The API responds with a Single Use Token Model. Your web app retrieves it from the Trusted Frame, and adds the singleUseTokenId to your form. |
| 4 | Your web app will submit the singleUseTokenId to your server. |
| 5 | Use the singleUseTokenId to register an account without customer details. |
| 6 | The API responds with a Customer Account Model. The accountToken property is the permanent token for the account. Use it to take payments later. The customerId property is the unique identifier for the customer that this API has generated for this account. |
| 7 | Generate a receipt/confirmation for the payer. |
Take payments using Trusted Frame
This is a common scenario where you want to take a one-off payment from a web application.
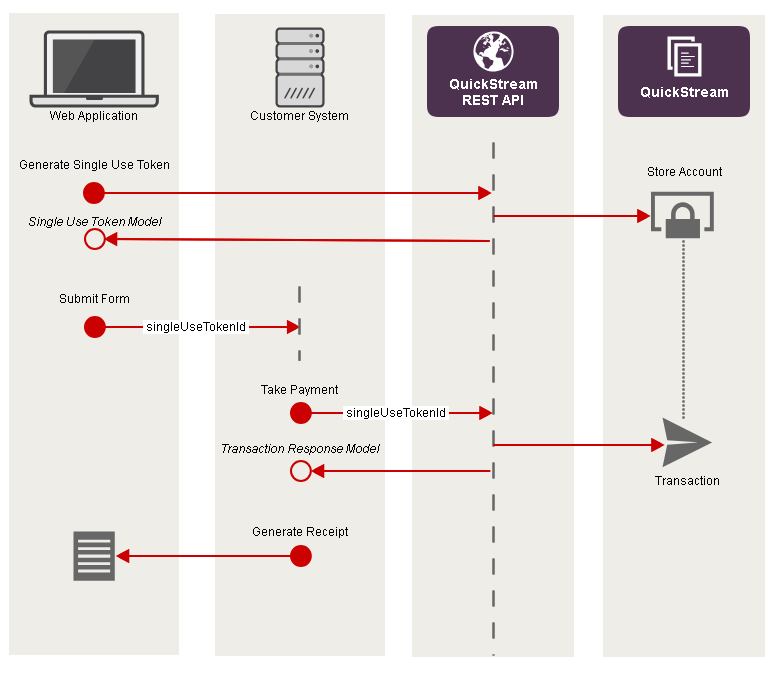
| Step | Description |
|---|---|
| 1 | Your web app initialises the Trusted Frame. |
| 2 | The payer enters account details into the Trusted Frame. |
| 3 | The Trusted Frame generates a Single Use Token. The API responds with a Single Use Token Model. Your web app retrieves it from the Trusted Frame, and adds the singleUseTokenId to your form. |
| 4 | Your web app will submit the singleUseTokenId to your server. |
| 5 | Your server takes a payment using the singleUseTokenId. The API responds with a Transaction Response Model. The receiptNumber property is the unique identifier for a transaction. |
| 6 | Determine if the transaction was successful using the status property. |
| 7 | Generate a receipt/confirmation for the payer. |