Secure token request
The secure token request is the recommended method for sending parameters to QuickStream with non-repudiation. It allows the parameters to be validated on your server and then sent directly from your server to QuickStream. Use a secure token request with QuickWeb or QuickConnect, to perform payments or register details into QuickVault.
HTTPS POST request with parameters to QuickStream through your proxy and firewall.
To perform a secure token request you will require:
- your allowed IP addresses whitelisted in the QuickStream portal.
- your credentials from the QuickStream portal.
- the URLs for the secure token request and handoff in each environment.
The secure token handoff has two steps:
- Secure token request. Your server requests a Security Token from QuickStream.
- Handoff. Your website uses the Secure Token to hand off your customer to QuickWeb or QuickConnect, to perform payments or register details into QuickVault.
Example secure token request from your server
POST /CommunityTokenRequestServlet HTTP/1.1
Host: ws.qvalent.com
Accept: text/plain
Content-Type: application/x-www-form-urlencoded
cancelUrl=https%3A%2F%2Fyoursite.com.au%2Fcancelled
&connectionType=QUICKWEB
¤cyCode=AUD
&errorEmailToAddress=errors%40yoursite.com.au
&password=<YOUR_FACILITY_PASSWORD>
&product=RECURRING
&returnUrl=https%3A%2F%2Fyoursite.com.au%2Fthankyou
&serverReturnUrl=https%3A%2F%2Fyoursite.com.au%2FreceiveRequest
&supplierBusinessCode=<YOUR_SUPPLIER_BUSINESS_CODE>
&username=<YOUR_FACILITY_USERNAME>Example response from QuickStream to your server
token=OicksakIMkD3OiZpyE7MadwJkZSrSqgjviXCEomVD3ZzEmZ6VlxecgExample handoff from a web page
<form action="https://quickweb.westpac.com.au/OnlinePaymentServlet3" method="POST">
    <input type="hidden" name="token" value="OicksakIMkD3OiZpyE7MadwJkZSrSqgjviXCEomVD3ZzEmZ6Vlxecg"/>
    <input type="hidden" name="communityCode" value="<YOUR_COMMUNITY_CODE>"/>
    <input type="submit" value="Make Payment"/>
</form>
QuickStream validates the IP address of a secure token request. Whitelist your allowed IP addresses in the QuickStream portal.
A security token is valid for 1 hour after it is created and can only be used once.
Parameters for the secure token request
Common parameters
Sign in to QuickStream Portal to get these values in each environment. See View your connection details.
| Parameter name | Format | Required | Description |
|---|---|---|---|
username |
string |
Yes | Your username. See View your connection details. |
password |
string |
Yes | Your facility password. See View your connection details. |
supplierBusinessCode |
string |
Yes | Your supplier business code indicates the merchant facility you wish to settle funds to. See View your connection details. |
connectionType |
string |
Yes | One of QUICKWEB , QUICKCONNECT. |
product |
string |
Yes | One of QUICKWEB, QUICKVAULT, RECURRING, INVOICING, QUICKCONNECT. |
accountType |
string |
No | Restrict a payer to card or bank account payments or tokenisation when both options are configured for a supplierBusinessCode. Choose CREDIT_CARD, DIRECT_DEBIT, DIRECT_DEBIT_NZ. |
returnUrl |
string |
No | Provide the HTTPS URL to redirect the customer from the receipt page or to by-pass the receipt page and host your own. |
cancelUrl |
string |
No | Provide the HTTPS URL to redirect to when the payer cancels the process. |
serverReturnUrl |
string |
No | Send the server to server notifications to this HTTPS URL. Override the value set in your QuickStream security settings. |
errorEmailToAddress |
string |
No | Receive an email when the server to server notification fails. Override the value set in your QuickStream Portal security settings. |
Parameters for product=QUICKWEB
| Parameter name | Format | Required | Description |
|---|---|---|---|
currencyCode |
string |
No | The currency code determined which currency to use when making the payment. Defaults to AUD. |
principalAmount |
money |
No | Provide monetary amounts in requests as numeric values to two decimal places. When blank, the payer can enter this amount. Configured surcharges on a supplierBusinessCode are calculated and added to this amount. |
customerReferenceNumber |
string |
No | A reference number for your customer. When blank, the payer enters this value. |
paymentReference |
string |
No | A reference number for the payment. When blank, the payer enters this value. |
registerPaymentAccount |
boolean |
No | Set to true to register the payment account in QuickVault when enabled. |
receiptEmailAddress |
string |
No | Provide an email address to send a receipt. When blank, the payer enters this value. |
custom<Custom name> |
string |
No | Send one or more custom parameters. The parameter name must start with "custom" followed by an uppercase letter. For example, customTitle. Maximum 100 characters per parameter. |
merchantName |
string |
No | This field is only relevant for card payments for Aggregators and Staged DWO merchants. Refer to Soft descriptors for Aggregators for field specifications. |
merchantStreetAddress |
string |
No | This field is only relevant for card payments for Aggregators and Staged DWO merchants. Refer to Soft descriptors for Aggregators for field specifications. |
merchantLocation |
string |
No | This field is only relevant for card payments for Aggregators and Staged DWO merchants. Refer to Soft descriptors for Aggregators for field specifications. |
merchantState |
string |
No | This field is only relevant for card payments for Aggregators and Staged DWO merchants. Refer to Soft descriptors for Aggregators for field specifications. |
merchantCountry |
string |
No | This field is only relevant for card payments for Aggregators and Staged DWO merchants. Refer to Soft descriptors for Aggregators for field specifications. |
merchantPostCode |
string |
No | This field is only relevant for card payments for Aggregators and Staged DWO merchants. Refer to Soft descriptors for Aggregators for field specifications. |
subMerchantId |
string |
No | This field is only relevant for card payments for Aggregators and Staged DWO merchants. Refer to Soft descriptors for Aggregators for field specifications. |
Parameters for connectionType=QUICKCONNECT
| Parameter name | Format | Required | Description |
|---|---|---|---|
errorUrl |
string |
No | Note: We recommend you use a HTTPS URL for this parameter. The URL that QuickConnect will redirect to if an error occurs. For example, if invalid card details are provided or the payment has been found to be a duplicate. If an errorUrl is not included, QuickConnect will redirect to the returnUrl instead. |
Parameters for product=INVOICING
| Parameter name | Format | Required | Description |
|---|---|---|---|
secondaryIdentifier |
string |
No | Provide a secondary identifier to bypass the account verification step. |
invoiceNumber |
string |
No | Provide an invoice number to bypass the choose invoice step. |
disablePartialPayments |
boolean |
No | Provide true to disable partial payments. |
registerPaymentAccount |
boolean |
No | Set to true to register the payment account in QuickVault when enabled. |
Parameters for product=RECURRING
| Parameter name | Format | Required | Description |
|---|---|---|---|
phoneNumber |
string |
No | Provide a phone number to Pre-fill the Enter customer details step and set the mobile phone number for SMS notifications. |
secondaryIdentifier |
string |
No | Provide a secondary identifier to bypass the account verification step. |
recurringScheduleCode |
string |
No | Provide a unique recurring schedule code to set the recurring payment identifier in the creation flow. When not provided, QuickWeb will generate one for you. |
recurringScheduleFirstDate |
Date in dd MMM yyyy |
No | Provide the schedule start date to Pre-fill the Enter schedule details step. For example, 01 Jan 2017. |
recurringScheduleFrequency |
string |
No | Provide the frequency to Pre-fill the Enter schedule details step and restrict the schedule frequency a payer can choose. One of: DAILY, WEEKLY, FORNIGHTLY, MONTHLY, QUARTERLY, SIXMONTHLY, YEARLY. See Payment schedule frequencies. |
recurringSchedule |
string |
No | Provide a the schedule type to Pre-fill the Enter schedule details step and restrict the schedule frequency a payer can choose. One of: CONTINUE_UNTIL_FURTHER_NOTICE, CONTINUE_UNTIL_DATE, STOP_AFTER_SET_NUMBER_OF_PAYMENTS, STOP_AFTER_SET_AMOUNT, ONE_OFF. See Payment schedule types. |
allowRecurringManagement |
boolean |
No | Set to true to allow access to the management flow. |
allowRecurringCreation |
boolean |
No | Set to false to disable access to the creation flow. Access can only be disabled when allowRecurringManagement is true. |
Parameters for product=QUICKVAULT
| Parameter name | Format | Required | Description |
|---|---|---|---|
customerReferenceNumber |
string |
No | A reference number for your customer. |
custom<Custom name> |
string |
No | Send one or more custom parameters. The parameter name must start with "custom" followed by an uppercase letter. For example, customTitle. Maximum 100 characters per parameter. |
Parameters for 3D Secure
Token request parameters that may be provided to authenticate the cardholder with EMV 3D Secure.
Send these parameters:
- Purchase Information: the amount and frequency of intended payments
- Merchant Risk Indicator: parameters to allow the risk of the transaction be to calculated
- Cardholder Contact Details: email and phone numbers for your customer
- Billing Address: your customer's billing address
- Shipping Address: the address where you will ship physical goods
- Cardholder Account: information about the cardholder's account on your website
Purchase Information
If you will conduct a recurring series of payments, send these fields.
| Parameter name | Format | Required | Description |
|---|---|---|---|
threeDS2RecurringExpiry |
string |
No | The date after which no further payments shall be performed. Format YYYYMMDD. |
threeDS2RecurringFrequency |
string |
No | The minimum number of days between authorisations. e.g. 28. Max 9999. |
threeDS2PurchaseInstalData |
string |
No | Required if you and Cardholder have agreed to instalment payments. The maximum number of authorisations permitted for instalment payments. Max 999. |
Merchant Risk Indicator
Information about the specific purchase by the cardholder.
| Parameter name | Format | Required | Description | ||||||||||||||
|---|---|---|---|---|---|---|---|---|---|---|---|---|---|---|---|---|---|
threeDS2DeliveryEmailAddress |
string |
No | For electronic delivery, the email address to which the merchandise will be delivered. Max 254 characters. | ||||||||||||||
threeDS2DeliveryTimeframe |
string |
No |
Your delivery timeframe.
|
||||||||||||||
threeDS2GiftCardAmount |
string |
No | For prepaid or gift card purchases, the purchase amount total of prepaid or gift cards in whole dollars (e.g. AUD 123.45 is 123). Max 15 characters. | ||||||||||||||
threeDS2GiftCardCount |
string |
No | For prepaid or gift card purchases, the total count of individual prepaid or gift cards/codes purchased. (e.g. 2 is 02). Exactly 2 digits. |
||||||||||||||
threeDS2GiftCardCurr |
string |
No | For prepaid or gift card purchases, the ISO-4217 three-digit currency code of the gift card. E.g. 036 for AUD. |
||||||||||||||
threeDS2PreOrderDate |
string |
No | For a pre-ordered purchase, the expected date that the merchandise will be available. Format YYYYMMDD. |
||||||||||||||
threeDS2PreOrderPurchaseInd |
string |
No |
Indicates whether the cardholder is placing an order for merchandise with a future availability or release date.
|
||||||||||||||
threeDS2ReorderItemsInd |
string |
No |
Indicates whether the cardholder is reordering previously purchased merchandise.
|
||||||||||||||
threeDS2ShipIndicator |
string |
No |
Indicates the shipping method chosen for the transaction. You must choose the Shipping Indicator code that most accurately describes the cardholder's specific transaction, not your general business. If one or more items are included in the sale, use the Shipping Indicator code for the physical goods, or if all digital goods, use the Shipping Indicator code that describes the most expensive item.
|
Cardholder Contact Details
Use international format for phone numbers. e.g. +61499999999.
| Parameter name | Format | Required | Description |
|---|---|---|---|
threeDS2Email |
string |
No | The email address associated with the account that is either entered by the cardholder, or that you have on file. Max 254 characters. |
threeDS2HomePhone |
string |
No | The home phone number provided by the cardholder. Max 15 characters. |
threeDS2MobilePhone |
string |
No | The mobile phone number provided by the cardholder. Max 15 characters. |
threeDS2WorkPhone |
string |
No | The work phone number provided by the cardholder. Max 15 characters. |
Billing Address
These fields contain the billing address associated with the card. The billing address is required if you will use the token to conduct a payment, and recommended if you will use the token to store the card details.
| Parameter name | Format | Required | Description |
|---|---|---|---|
threeDS2BillAddrLine1 |
string |
No | First line of the street address or equivalent local portion. Max 50 characters. |
threeDS2BillAddrLine2 |
string |
No | Second line of the street address or equivalent local portion. Max 50 characters. |
threeDS2BillAddrLine3 |
string |
No | Third line of the street address or equivalent local portion. Max 50 characters. |
threeDS2BillAddrCity |
string |
No | The city of the billing address. Max 50 characters. |
threeDS2BillAddrPostCode |
string |
No | ZIP or other postal code of the billing address. Max 16 characters. |
threeDS2BillAddrState |
string |
No | The state or province. Max 3 characters. Use the ISO 3166-2 country subdivision code. e.g. NSW. |
threeDS2BillAddrCountry |
string |
No | Use the ISO 3166-1 numeric three-digit country code. e.g. 036. |
Shipping Address
Send these fields if you will ship physical goods to the cardholder:
| Parameter name | Format | Required | Description |
|---|---|---|---|
threeDS2AddrMatch |
string |
No | Y is Shipping Address matches Billing Address, otherwise N. |
threeDS2ShipAddrLine1 |
string |
No | First line of the street address or equivalent local portion. Max 50 characters. |
threeDS2ShipAddrLine2 |
string |
No | Second line of the street address or equivalent local portion. Max 50 characters. |
threeDS2ShipAddrLine3 |
string |
No | Third line of the street address or equivalent local portion. Max 50 characters. |
threeDS2ShipAddrCity |
string |
No | The city of the shipping address. Max 50 characters. |
threeDS2ShipAddrPostCode |
string |
No | ZIP or other postal code of the shipping address. Max 16 characters. |
threeDS2ShipAddrState |
string |
No | The state or province. Max 3 characters. Use the ISO 3166-2 country subdivision code. e.g. NSW. |
threeDS2ShipAddrCountry |
string |
No | Use the ISO 3166-1 numeric three-digit country code. e.g. 036. |
Cardholder Account
These fields contain optional information about the cardholder account on your website. Fields used to define a time period can be included as either the specific date, or an approximate indicator for when the action occurred. You can use either format.
If the cardholder has not signed in to your website, send these fields:
| Parameter name | Format | Required | Description | ||||||||||
|---|---|---|---|---|---|---|---|---|---|---|---|---|---|
threeDS2ChAccAgeInd |
string |
No |
The length of time that the cardholder has had the account with you.
|
||||||||||
threeDS2PaymentAccInd |
string |
No |
The length of time that the payment account was enrolled in the cardholder's account with you.
|
If the cardholder has signed in to your website, send these fields:
| Parameter name | Format | Required | Description | ||||||||||
|---|---|---|---|---|---|---|---|---|---|---|---|---|---|
threeDS2AcctID |
string |
No | Cardholder Account Identifier. Additional information about the account optionally provided by you. Max 64 characters. | ||||||||||
threeDS2ChAccAgeInd |
string |
No |
Indicates the length of time that the cardholder has had the account with you.
|
||||||||||
threeDS2ChAccChange |
string |
No | The date that the cardholder's account with you was last changed, including Billing or Shipping address, new payment account, or new user(s) added. Format YYYYMMDD. |
||||||||||
threeDS2ChAccChangeInd |
string |
No |
The length of time since the cardholder's account information with you was last changed, including Billing or Shipping address, new payment account, or new user(s) added.
|
||||||||||
threeDS2ChAccDate |
string |
No | The date that the cardholder opened the account with you. Format YYYYMMDD. |
||||||||||
threeDS2ChAccPwChange |
string |
No | The date that cardholder's account with you had a password change or account reset. Format YYYYMMDD. |
||||||||||
threeDS2ChAccPwChangeInd |
string |
No |
Indicates the length of time since the cardholder's account with you had a password change or account reset.
|
||||||||||
threeDS2NbPurchaseAccount |
string |
No | The number of purchases with this cardholder account during the previous six months. Max 9999. |
||||||||||
threeDS2PaymentAccAge |
string |
No | The date that the payment account was enrolled in the cardholder's account with you. Format YYYYMMDD. |
||||||||||
threeDS2PaymentAccInd |
string |
No |
Indicates the length of time that the payment account was enrolled in the cardholder's account with you.
|
||||||||||
threeDS2ProvisionAttemptsDay |
string |
No | The number of Add Card attempts in the last 24 hours. Max 999. |
||||||||||
threeDS2ShipAddressUsage |
string |
No | The date when the shipping address used for this transaction was first used with you. Format YYYYMMDD. |
||||||||||
threeDS2ShipAddressUsageInd |
string |
No |
Indicates when the shipping address used for this transaction was first used with you.
|
||||||||||
threeDS2ShipNameIndicator |
string |
No |
Indicates if the Cardholder Name on the account is identical to the shipping Name used for this transaction.
|
||||||||||
threeDS2SuspiciousAccActivity |
string |
No |
Indicates whether you have experienced suspicious activity (including previous fraud) on the cardholder account.
|
||||||||||
threeDS2TxnActivityDay |
string |
No | The number of transactions (successful and abandoned) for this cardholder account across all payment accounts in the previous 24 hours. Max 999. |
||||||||||
threeDS2TxnActivityYear |
string |
No | The number of transactions (successful and abandoned) for this cardholder account across all payment accounts in the previous year. Max 999. |
Parameters for handoff
Send the token received from the Secure token request to QuickStream with your communityCode value to initiated the hosted session.
| Parameter name | Format | Required | Description |
|---|---|---|---|
communityCode |
string |
Yes | Your community code. See View your connection details. |
token |
string |
Yes | The token received as a response to the Secure token request. |
Linking from your website
To help explain how the handoff process works we will use the following example using QuickWeb. Your solution may have different webpages, however the actual handoff steps will be the same.
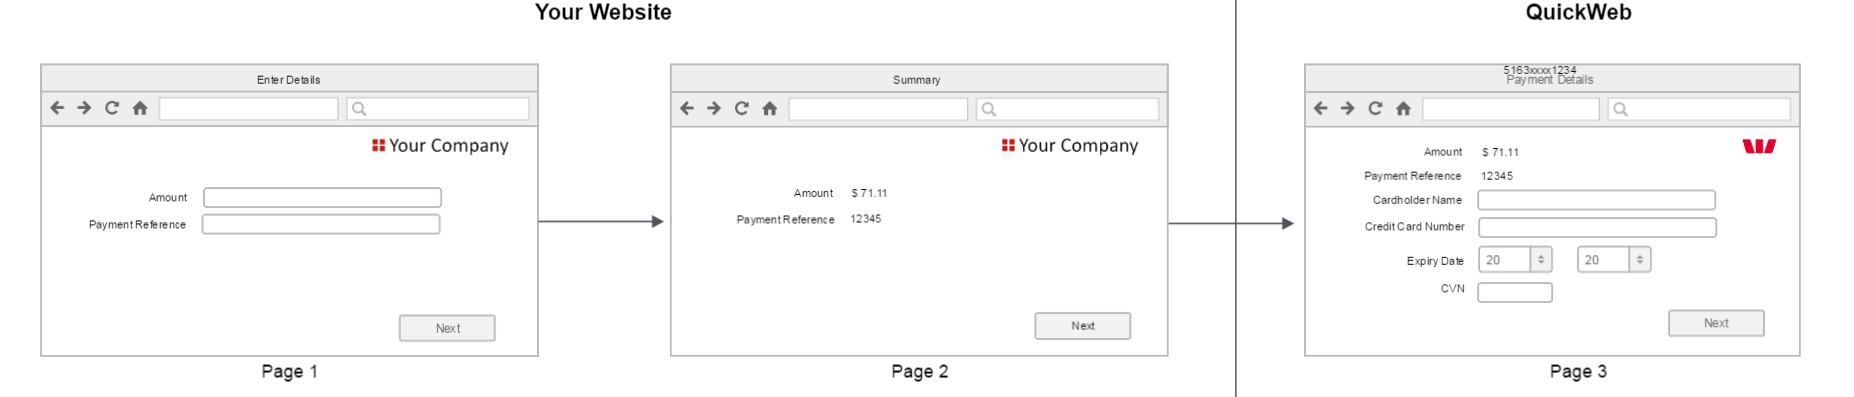
This example has three pages. The first two pages are an example of what your website may display to the customer before you handoff to QuickWeb. The third page is an example of what QuickStream may display to the customer after the handoff.
| Page | Description |
|---|---|
| 1 | The 'Enter Details' page instructs the customer to enter their amount and payment reference. When the customer clicks the 'Next' button your website validates the data. |
| 2 | The 'Summary' page displays the amount and payment reference as read only fields. When the customer clicks the 'Next' button your website will handoff to QuickWeb. The amount and payment reference are passed to QuickWeb during the handoff. |
| 3 | The 'Payment Details' page displays the amount and payment reference as read only fields. Additional fields are also provided for the customer to enter their card details. |
The following sequence diagram shows how the handoff works using the secure token request.
Note:
- The section highlighted shows the handoff steps. They begin when the customer clicks the last button (or link) on your website.
- Additional steps have been included before and after the grey box. These steps are specific to this particular example. They are not part of the handoff. They have been included to help demonstrate how the handoff can fit into the overall solution.
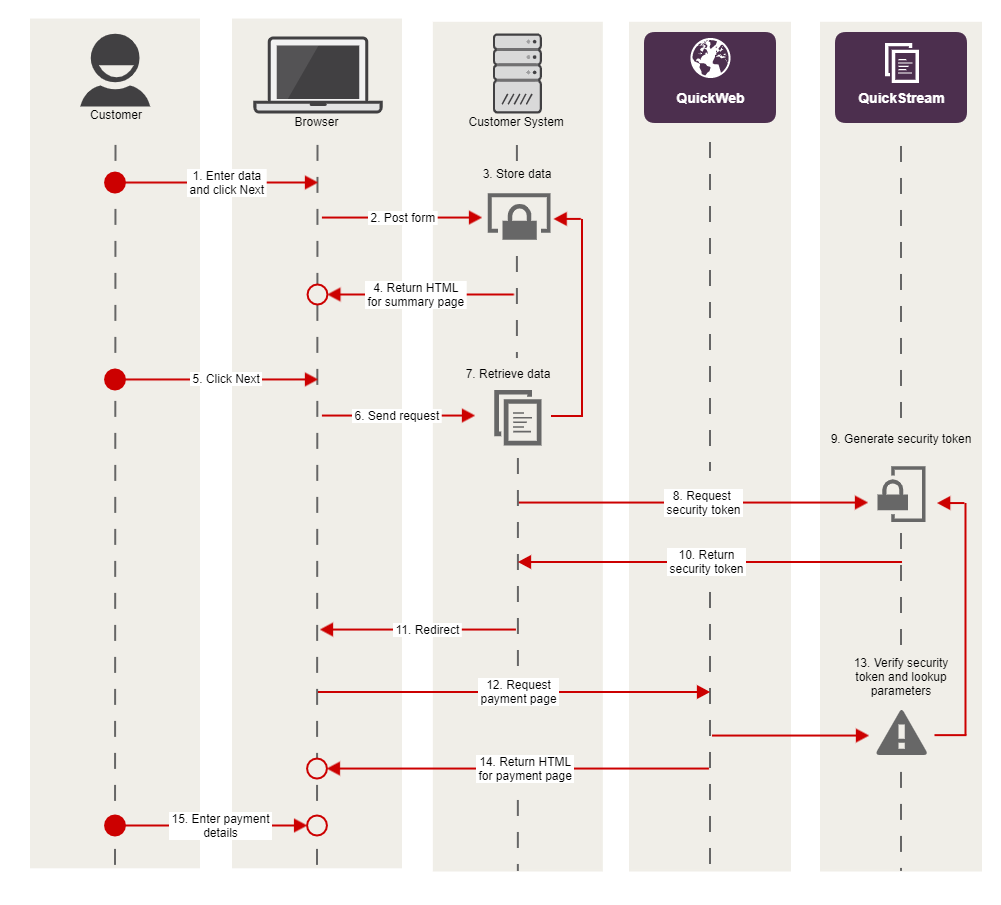
The steps for the sequence diagram are as follows:
| Step | Name | Description |
|---|---|---|
| 1 | Enter data & click 'Next' | Your website displays the 'Enter Details' page to the customer. The customer enters their amount and payment reference then clicks the 'Next' button. |
| 2 | Post form | The customer's browser posts the form to your server. |
| 3 | Store data | Your server validates the amount and payment reference. It then stores the data appropriately so that it can be retrieved later for the handoff. |
| 4 | Return html for summary page | Your server produces html for the 'Summary' page. The summary page includes the amount and payment reference as read only data. This data is not included as hidden fields. Your server sends the html to the customer's browser. |
| 5 | Click 'Next' | The 'Summary' page is displayed to the customer. The customer checks to make sure the data is correct then clicks the 'Next' button. The handoff begins here. |
| 6 | Send request | The customer's browser sends the request to your server to initiate handoff. |
| 7 | Retrieve data | Your server builds the parameter list that will be sent to QuickWeb as part of the secure token request. |
| 8 | Request security token | Your server makes an outbound HTTPS connection to the QuickWeb server. The parameter list is included in the token request. |
| 9 | Generate security token & store parameters | QuickWeb generates a security token and stores your parameter list. A unique token is created for every token request. For example: token=m378813qtvOtylVTvVvpWA7PT14QHltr-AqX2gZ-RFM. Note, the security token is valid for 1 hour after it is created and can only be used once. |
| 10 | Return security token | QuickStream returns the security token to your server. |
| 11 | Redirect | Your server tells the customer's browser to redirect to QuickWeb. A list of parameters is included in the redirect. |
| 12 | Request payment page | The customer's browser redirects to QuickWeb. The list of parameters is included in the redirect. |
| 13 | Verify security token & lookup parameters | QuickStream verifies the security token to make sure it has not been tampered with. It then uses the token to lookup the parameters that your server passed to QuickWeb during the security token request. The token is then destroyed. |
| 14 | Return html for payment page | QuickWeb produces html for the 'Payment Details' page and sends it to the customer's browser. The handoff ends here. |
| 15 | Enter payment details | The 'Payment Details' page is displayed to the customer. The customer enters their card details. |
Sample code
Sample code for the secure token request
package com.qvalent.demo;
import java.io.BufferedReader;
import java.io.BufferedWriter;
import java.io.InputStreamReader;
import java.io.OutputStreamWriter;
import java.net.InetSocketAddress;
import java.net.Proxy;
import java.net.URL;
import java.net.URLDecoder;
import java.net.URLEncoder;
import java.util.HashMap;
import java.util.Map;
import javax.net.ssl.HttpsURLConnection;

public class TokenRequestExample
{
    // This is the HTTP proxy configuration section.
    // To use basic authentication, other options
    // will have to be specified. This example
    // uses Windows domain-based NTLM authentication.
    // To use a direct connection, set USING_PROXY to false.
    private static final String HTTP_PROXY_URL_STRING =
        "proxy.yourdomain.com.au";
    private static final int HTTP_PROXY_PORT = 8080;
    private static final boolean USING_PROXY = true;
    private static final String TOKEN_REQEST_URL_STRING =
        "https://<environment_url>/CommunityTokenRequestServlet";

    // Here we are initialising a java.net.URL object.
    private static final URL TOKEN_REQUEST_URL =
        new URL( TOKEN_REQEST_URL_STRING );

    public static void main( final String[] args ) throws Exception
    {

        // Add username, password and customer reference number parameters
        // to the request.
        final Map<String, String> params =
            new HashMap<String, String>();
        params.put( "username", "username" );
        params.put( "password", "password" );
        params.put( "customerReferenceNumber", "CUSTOMER1" );
        final String content = getQuery( params );

        // Control block to use either proxy or direct connection.
        final HttpsUrlCOnnection connection;
        if( USING_PROXY )
        {
            final Proxy proxy = new Proxy( Proxy.Type.HTTP,
                                               new InetSocketAddress(
                                                   HTTP_PROXY_URL_STRING,
                                                   HTTP_PROXY_PORT ) );
            connection = (HttpsURLConnection)TOKEN_REQUEST_URL.openConnection( proxy );
        }
        else
        {
            connection = (HttpsURLConnection)TOKEN_REQUEST_URL.openConnection();
        }

        // Token request should be a HTTP POST for enhanced security.
        connection.setRequestMethod( "POST" );

        // The parameters are sent using url form encoding.
        connection.setRequestProperty(
            "Content-Type",
            "application/x-www-form-urlencoded" );

        // Add the content length and language.
        connection.setRequestProperty(
            "Content-Length",
            Integer.toString( content.length() ) );
        connection.setRequestProperty(
            "Content-Language",
            "en-au" );

        // We're going to write out post data and get the response (token),
        // so set both output and input.
        connection.setDoOutput( true );
        connection.setDoInput( true );
        // Set up a writer to write the http post data out.
        final BufferedWriter writer =
           new BufferedWriter(
               new OutputStreamWriter( connection.getOutputStream() ) );
        writer.write( content );
        writer.close(); // This will send the content.

        // Set up a reader to get the token result back from
        // the connection. Build it all up into one string.
        final BufferedReader reader =
           new BufferedReader(
               new InputStreamReader( connection.getInputStream() ) );
        String response = "";
        String buff;
        while( ( buff = reader.readLine() ) != null )
        {
            response += buff;
        }
        reader.close();

        // Print the full response.
        System.out.println( "Response: " + response );

        // Print the token, which will occur after "token="
        // and should be the only response parameter parameter.
        final String token =
            URLDecoder.decode(
                response.substring(
                    response.indexOf( "=" ) + 1 ) ,
                "UTF-8" );
        System.out.println( "Token: " + token );
    }

    // Helper method to construct a URL encoded query from
    // a map of string => string.
    private static String getQuery( final Map<String, String> params )
    throws Exception
    {
        String result = "";
        boolean first = true;
        for( final RequestParameter requestParameter : RequestParameter.values() )
        {
            if( first )
            {
                first = false;
            }
            else
            {
                result += "&";
            }
            result += URLEncoder.encode( requestParameter.getLabel(), "UTF-8" );
            result += "=";
            result += URLEncoder.encode(
                params.get( requestParameter.getLabel() ) == null ?
                "" :
                params.get( requestParameter.getLabel() ),
                "UTF-8" );
        }
        return result;
    }
}
using System;
using System.Collections.Generic;
using System.Linq;
using System.Text;
using System.IO;
using System.Net;
using System.Web;
using System.Collections;
namespace TokenRequestExample
{
class TokenRequestExample
{
static void Main(string[] args)
{
byte[] byteArray;
Stream webpageStream;
StreamReader webpageReader;
String webpageContent;
Hashtable parameters = new Hashtable();
parameters.Add("username", "username");
parameters.Add("password", "password");
parameters.Add("customerReferenceNumber", "CUSTOMER1");
HttpUtility.UrlEncode("");
String postData = "";
Boolean first = true;
foreach( String key in parameters.Keys )
{
if(first)
{
first = false;
}
else
{
postData += "&";
}
postData += key + "=" + HttpUtility.UrlEncode(parameters[key].ToString());
}
String URL = "https://<environment_url>/CommunityTokenRequestServlet";
byteArray = Encoding.UTF8.GetBytes(postData);
WebRequest request = WebRequest.Create(URL);
WebProxy proxy = new WebProxy("proxy.yourdomain.com.au", 8080);
proxy.UseDefaultCredentials = true;
proxy.BypassProxyOnLocal = true;
request.Proxy = proxy;
request.Method = "POST";
request.ContentType = "application/x-www-form-urlencoded";
request.ContentLength = byteArray.Length;
webpageStream = request.GetRequestStream();
webpageStream.Write(byteArray, 0, byteArray.Length);
webpageStream.Close();
webpageReader = new StreamReader(request.GetResponse().GetResponseStream());
webpageContent = webpageReader.ReadToEnd();
Console.WriteLine(webpageContent);
Console.ReadKey(true);
}
}
}<?php
$postFields = array( "username" => "username",
"password" => "password",
"customerReferenceNumber" => "CUSTOMER1" );
$postFieldsString = http_build_query( $postFields );
$curlHandle = curl_init();
curl_setopt( $curlHandle, CURLOPT_URL, "https://<environment_url>/CommunityTokenRequestServlet" );
if( array_key_exists( "user", $_POST ) &&
array_key_exists( "pwd", $_POST ) )
{
curl_setopt( $curlHandle, CURLOPT_PROXY, "proxy.yourdomain.com.au:8080" );
curl_setopt( $curlHandle, CURLOPT_PROXYUSERPWD, $_POST["user"].":".$_POST["pwd"] );
}
curl_setopt( $curlHandle, CURLOPT_POST, count( $postFields ) );
curl_setopt( $curlHandle, CURLOPT_POSTFIELDS, $postFieldsString );
curl_setopt( $curlHandle, CURLOPT_RETURNTRANSFER, 1 );
curl_setopt( $curlHandle, CURLOPT_CAINFO, "PCA-3G5.pem" );
curl_setopt( $curlHandle, CURLINFO_HEADER_OUT, 1 );
$result = curl_exec( $curlHandle );
?>
<html>
<head>
</head>
<body>
<p> Header: <?php echo curl_getinfo( $curlHandle, CURLINFO_HEADER_OUT ); ?> </p>
<?php
if( curl_errno( $curlHandle ) )
{
?>
<p> Error: <?php echo curl_error( $curlHandle ); ?> </p>
<?php
}
else
{
?>
<p> Token: <?php echo $result; ?> </p>
<?php
}
?>
</body>
</html>
<?php
curl_close( $curlHandle );
?>