QuickWeb Recurring
QuickWeb Recurring is a set of Westpac hosted payment pages that allow your customers to set up and manage recurring payments online.
Demo Creation Flow Demo Management Flow
This page describes QuickWeb Recurring. Other types of QuickWeb are:
- QuickWeb Standard - Customisable hosted payment pages for payments by card and bank account.
- QuickWeb Invoicing - Your customers view and pay for invoices and bills.
What is QuickWeb?
QuickWeb is a set of Westpac hosted payment pages. Your website directs your customer to pay using QuickWeb by card or bank account.
See QuickWeb Technical Implementation Guide for more.
What is recurring?
QuickStream has four interfaces to standard recurring payment functions:
- Client (you) facing web interface - QuickStream Portal
- Client (you) facing API - QuickStream REST API
- Customer (your customer) facing web interface - QuickWeb Recurring
- Administration interface - QuickStream Portal
The recurring payment functions in QuickStream are collectively known as Recurring.
A recurring payment is a payment made in regular instalments according to a predefined schedule. You can define the regular instalment amount and define a schedule. A schedule has:
- a type, which defines when to conclude the schedule, and
- a frequency which defines how often the regular instalment is taken from your customer.
What is QuickWeb Recurring?
Using QuickWeb Recurring, your customers can set up and manage recurring payments online. The extra benefits are that your customers can:
- Create a recurring payment schedule.
- Modify recurring payment schedule type, frequency and amount.
- Stop an active recurring payment.
- Re-start a stopped recurring payment.
- Change the payment account details or use a new card or bank account.
The product has two flows:
Implementing QuickWeb Recurring
To implement QuickWeb Recurring:
- Define the customisation options and provide those to your Westpac contact.
- Build the ability to consume the Cash Applied File in your systems.
- Define a group email address to send notifications about file processing.
- Define if you will offer only the Creation flow, Management flow or both.
- Build the ability to hand your customer over to QuickWeb Recurring.
- Optionally build the ability to receive your customer back from QuickWeb Recurring.
- Optionally build the ability to consume a server to server response from QuickWeb Recurring.
- Perform testing in our Test environment.
- Provide sign-off on your testing.
- Transition into your Production environment.
- Perform live testing in our Production environment.
- Roll out QuickWeb Recurring into your business processes.
During testing, refer to:
After you have completed testing you must send a sign off email to your Westpac contacts. The email will state that you have successfully tested all aspects of the solution and you are ready for it to be moved into production. See a sample sign-off email.
During production lodgement:
Once production lodgement is complete and you are satisfied with the results of your low value tests in production you are ready to go live. The term "go live" represents the date you will make the solution available to your customers.
At this stage of the implementation process there are only a few tasks left to complete. They are:
- Before the go live date, communicate with your customers to inform them about the new payment process.
- On the go live date, update the appropriate page (or pages) on your website to make the new solution available to your customers.
After you go live, Qvalent and Westpac will closely monitor the solution. This is known as the "monitoring phase" and lasts for two weeks. During this time, if you have any questions or concerns about the solution you should communicate directly with your Qvalent implementation manager.
Once the two week monitoring phase is over the implementation process is officially complete. This is the post implementation period. Your Qvalent implementation manager will hand the solution over to the Qvalent helpdesk. The helpdesk will be responsible for day to day monitoring of the solution and resolving any issues that occur.
If you have any questions or concerns about the solution at this point contact the helpdesk: Technical support and system health.
See also:
Recurring concepts
See Recurring payment schedules for more information about the concepts of recurring payment schedules.
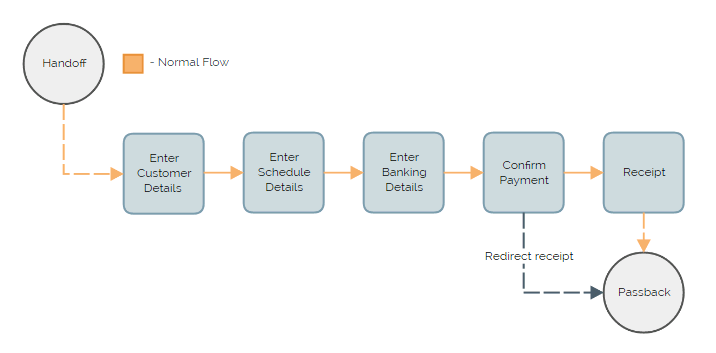
Creation flow
The creation flow below describes the complete set of payment creation functionality available to QuickWeb Recurring. The creation flow has 7 steps.
- Handoff
- Enter Customer Details
- Enter Schedule Details
- Enter Banking Details
- Confirm Payment
- Receipt
- Passback
The steps are described below and refer to the payment flow diagram.
Hand off
The payer is handed-off from your website to QuickWeb Recurring in this step. See Handoff your customer to QuickWeb.
Related sections:
- Pre-fill the 'enter customer details' step.
- Pre-fill the 'enter schedule details' step.
- Provide the regular payment amount.
- Managing your security settings.
- Parameters for the Secure token request.
- Parameters for the Form inputs handoff.
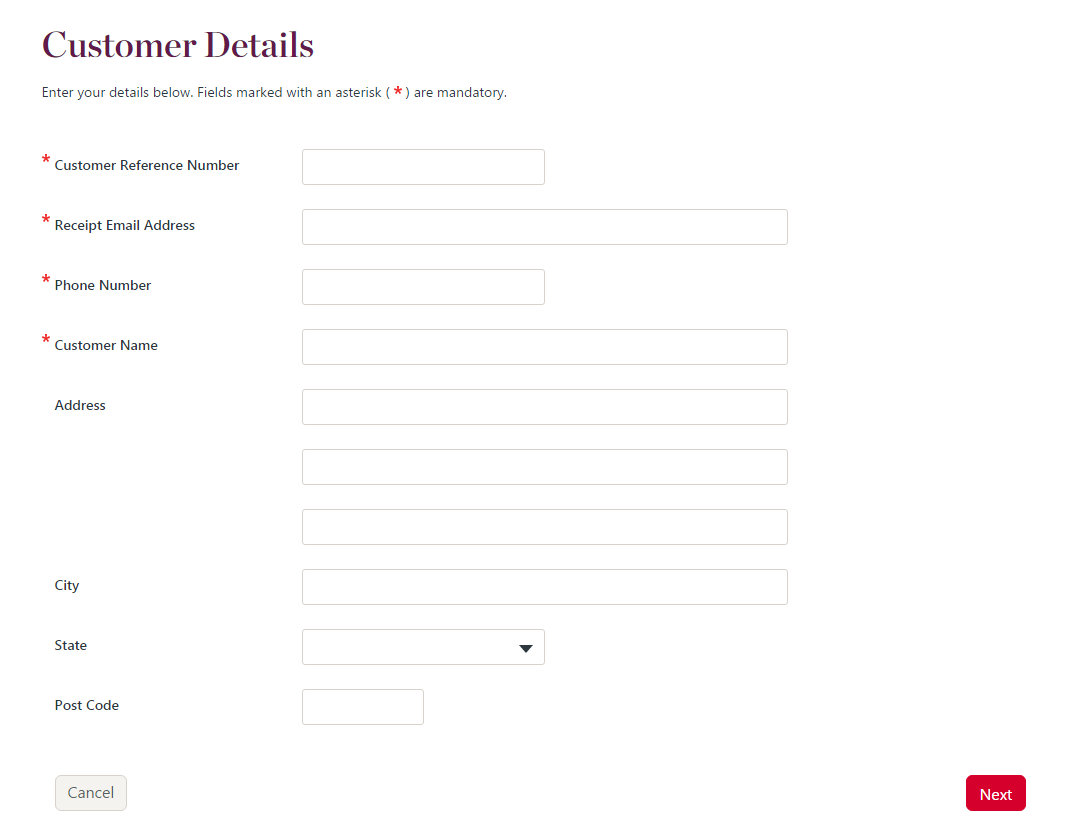
Enter customer details
The payer enters their details. You may choose to collect additional address details. Collecting an email address and/or a mobile phone number allows notifications to be sent to payers for payment events. A customer may have one or more recurring payments.
Related sections:
- Pre-fill the 'enter customer details' step.
- Send notifications on management and payment events.
- Management flow.
- Change the look and feel of the pages.
- Pre-fill the Enter customer details step
- Send notifications on management and payment events.
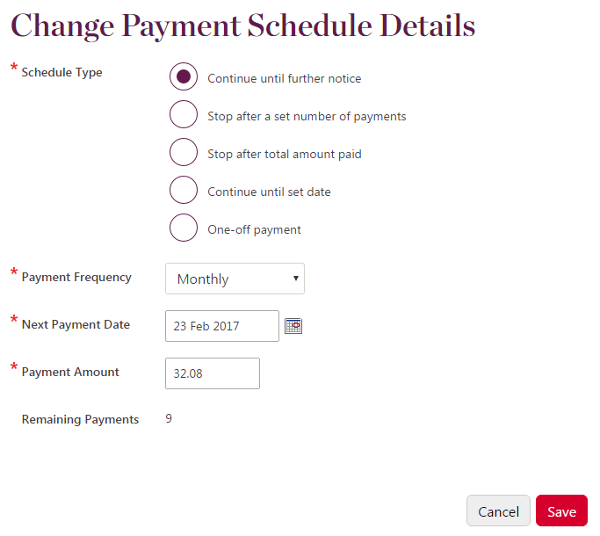
Enter schedule details
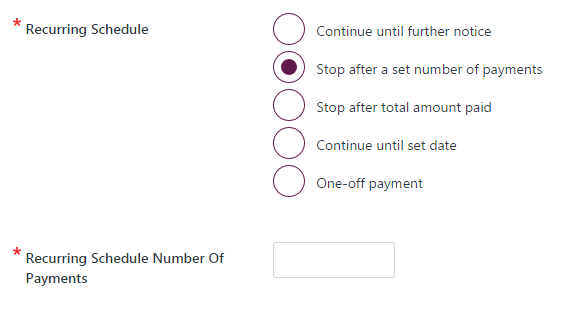
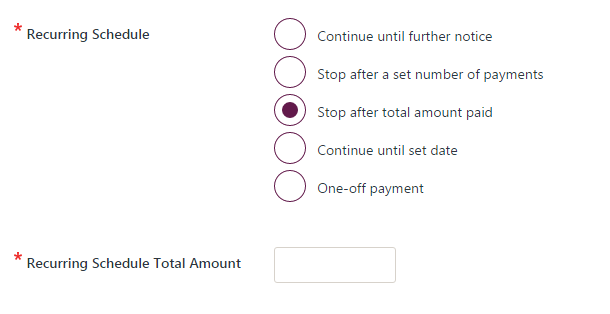
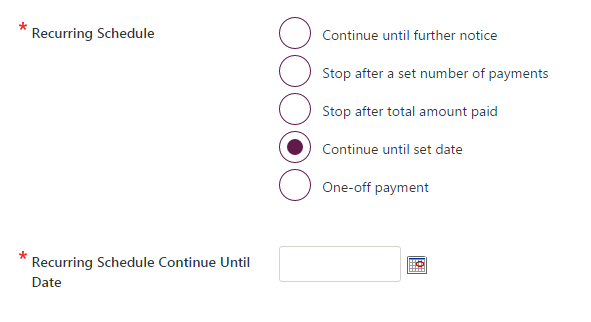
The payer chooses their payment schedule details. See Payment schedule types.
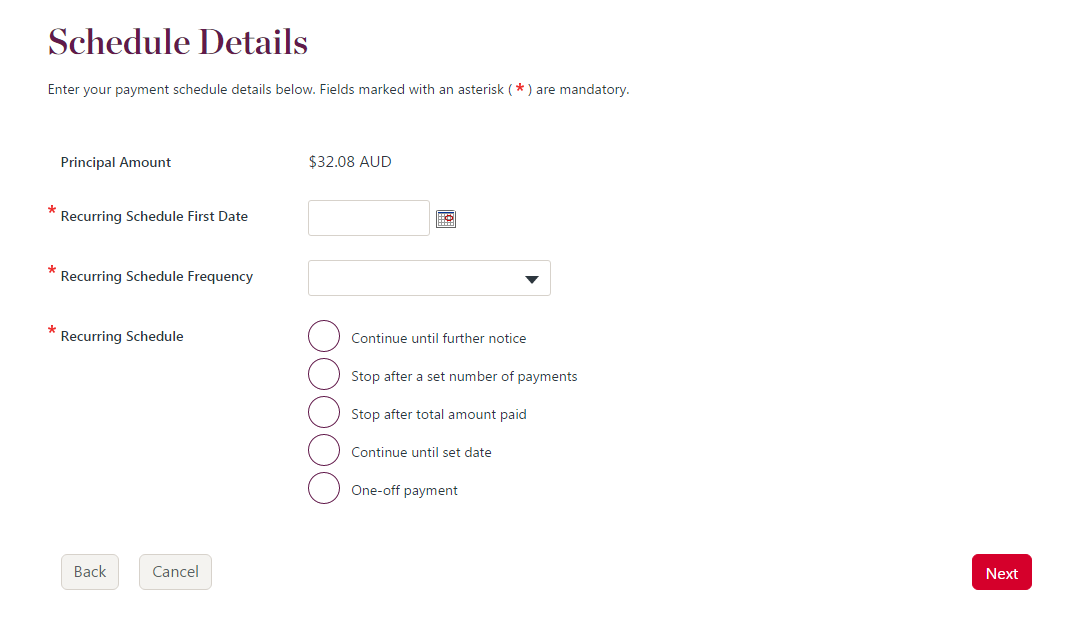
Things to note:
- When the first payment date is today, the payment will be made after the Confirm payment step.
- Choosing Stop after a set number of payments displays a field to enter the number of payments.
- Choosing Stop after a total amount displays a field to enter the total amount of payments.
- Choosing Continue until date displays a field to enter the schedule end date.
Related sections:
- Payment schedule types.
- Change the look and feel of the pages.
- Pre-fill the Enter schedule details step.
- Provide the regular payment amount.
- Management flow.
- Restrict the schedule types and frequencies a payer can choose.
- Send notifications on management and payment events.
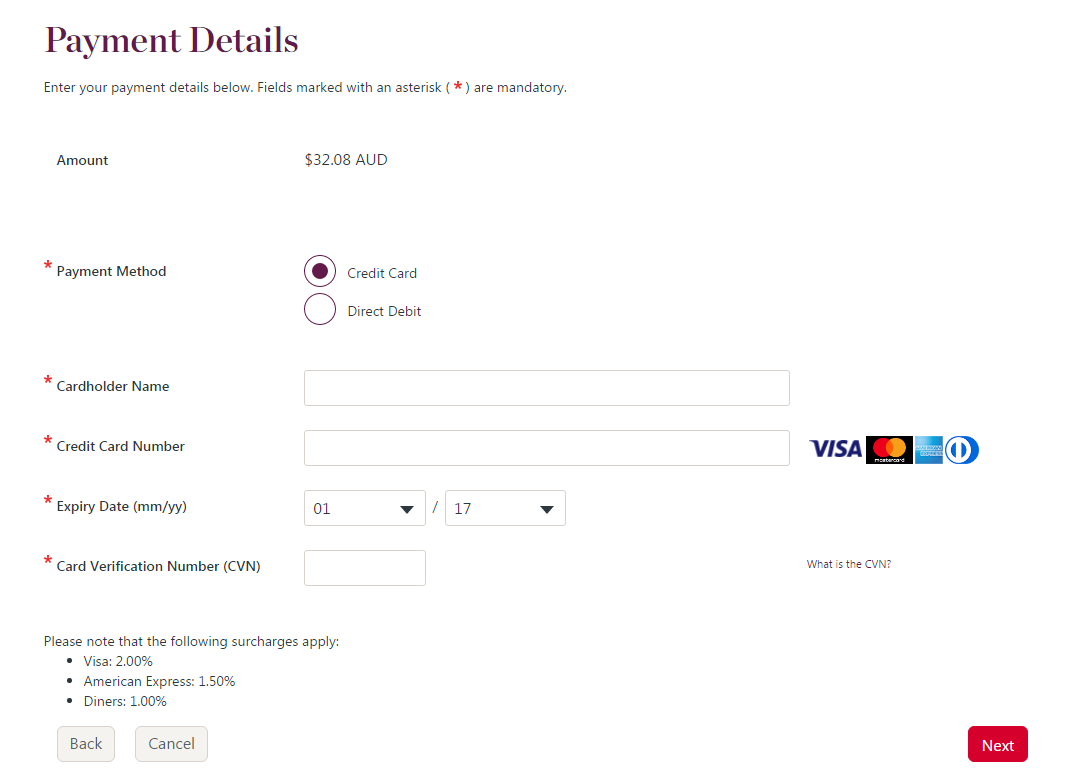
Enter banking details
The payer will enter their card or bank account details. When a surcharge is applicable, the surcharge rates are displayed.
Related sections:
- Change the look and feel of the pages.
- Register the payment account in QuickVault
- Restrict a payer to only card payments or bank account payments
- Management flow.
- Send notifications on management and payment events.
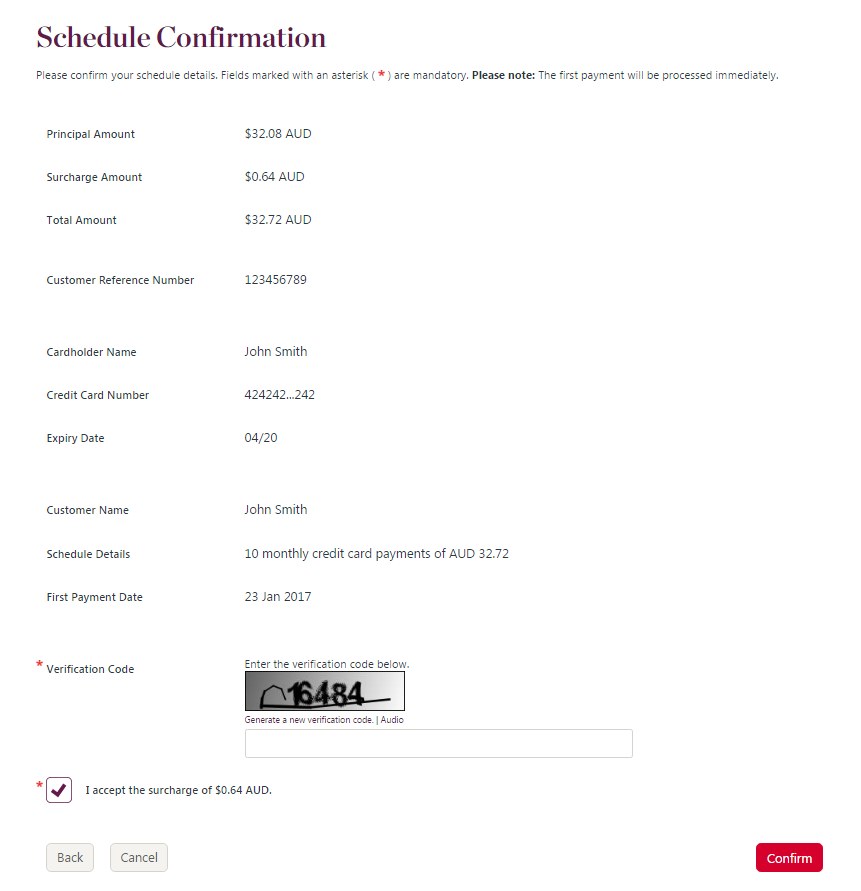
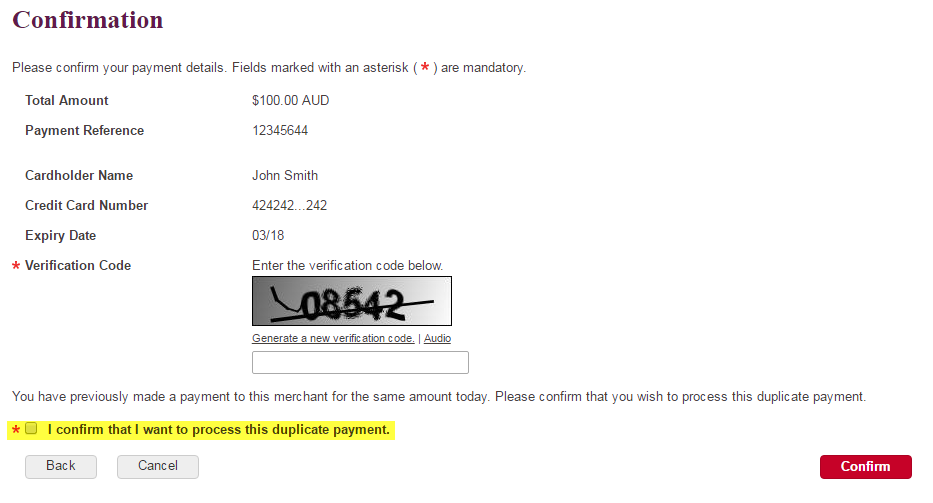
Confirm payment
The payer will confirm their payment details. When a surcharge is applicable, the new amount is displayed and the payer must tick a checkbox to continue.
If the payment is identified as a duplicate, the payer must tick a checkbox to continue.
The payer must complete a CAPTCHA challenge before the payment is made.
Related sections:
- Change the look and feel of the pages.
- Duplicate payment checking
- QuickWeb redirects to your receipt page
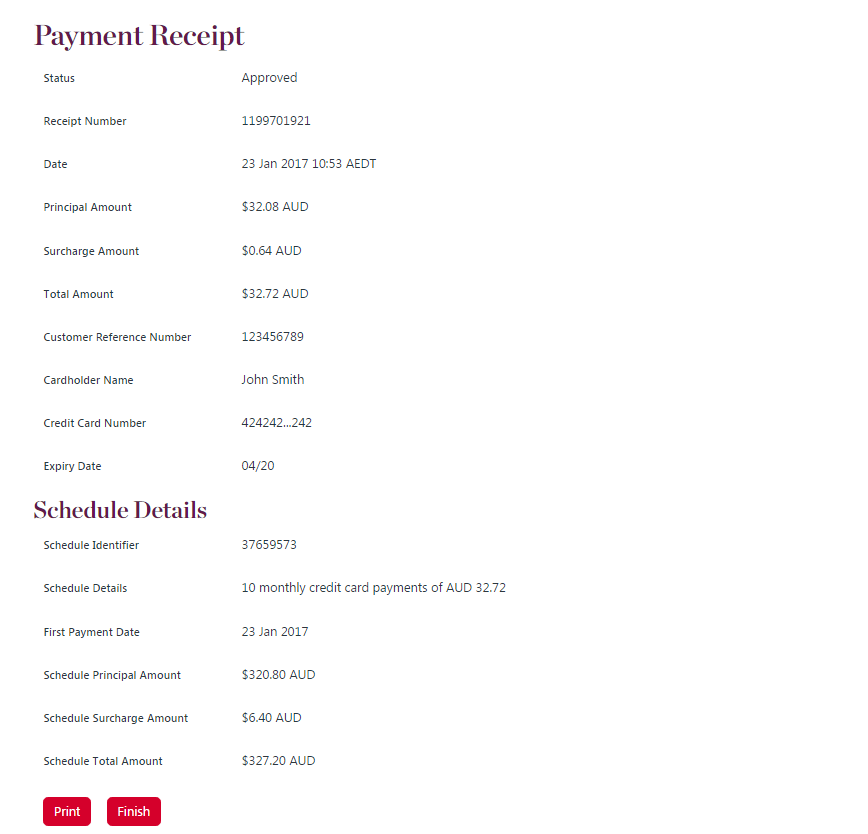
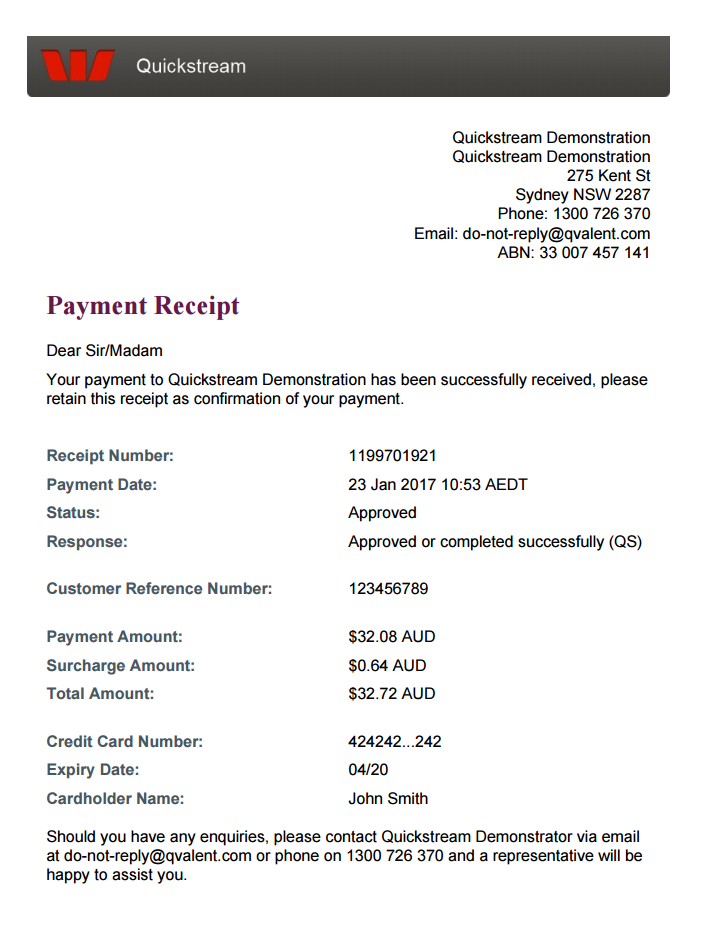
Receipt
The details of the new schedule created for the customer is displayed. If the first payment date was today, a payment will be attempted. The payer will view the details of the successful or declined payment. The payer can enter an email address to send a receipt via email.
Related sections:
- Change the look and feel of the pages.
- Change the look and feel of the payment receipt.
- Register the payment account in QuickVault.
- Management flow.
- QuickWeb redirects to your receipt page.
- QuickWeb receipt page links to your website.
Passback
Your customer is passed back from QuickWeb Recurring to your website in this step. See Handoff your customer back to your website.
Related sections:
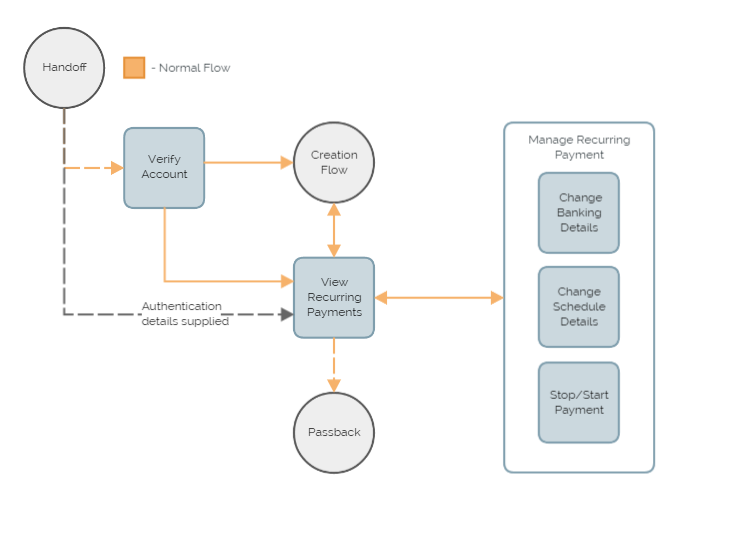
Management flow
The management flow below describes the complete set of management functionality available to QuickWeb Recurring. The management flow has 7 steps.
The steps are described below and refer to the payment flow diagram.
Hand off
The payer is handed-off from your website to QuickWeb Recurring in this step. See Handoff your customer to QuickWeb.
Set the allowRecurringManagement parameter to true in the Secure token handoff to access the management flow.
Related sections:
- Bypass the account verification step.
- Managing your security settings.
- Parameters for the Secure token request.
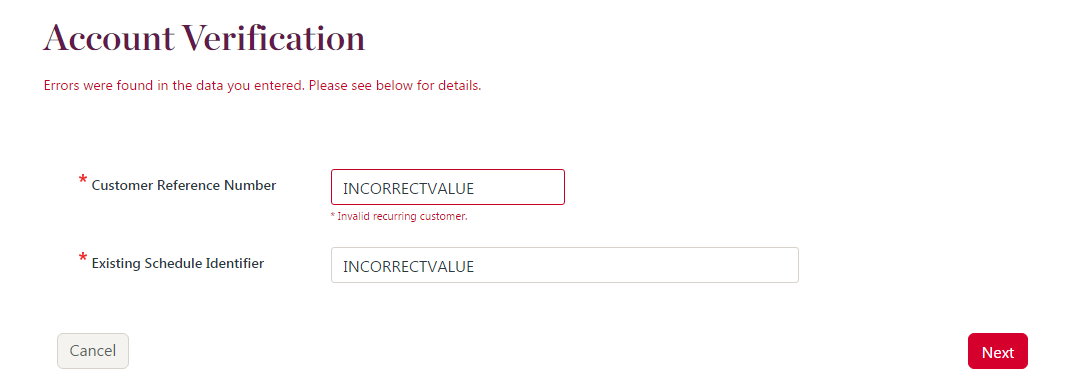
Verify account
The payer must be verified before they can manage recurring payments. There are two pieces of information that must be provided:
- Customer reference number - your unique identifier for a customer. This is provided for new customers via the creation flow, or via Recurring Batch.
- Existing schedule identifier - a unique identifier for a customer's recurring payment schedule. This is provided for customers via the creation flow.
The payer enters both pieces of information correctly and proceeds to the View Recurring Payments step.

Related sections:
- Verify account step failures.
- Change the look and feel of the pages.
- Bypass the Account Verification step.
- Change the Existing schedule identifier in the account verification to a custom lookup.
- See Recurring Batch for more on uploading customer and schedule information.
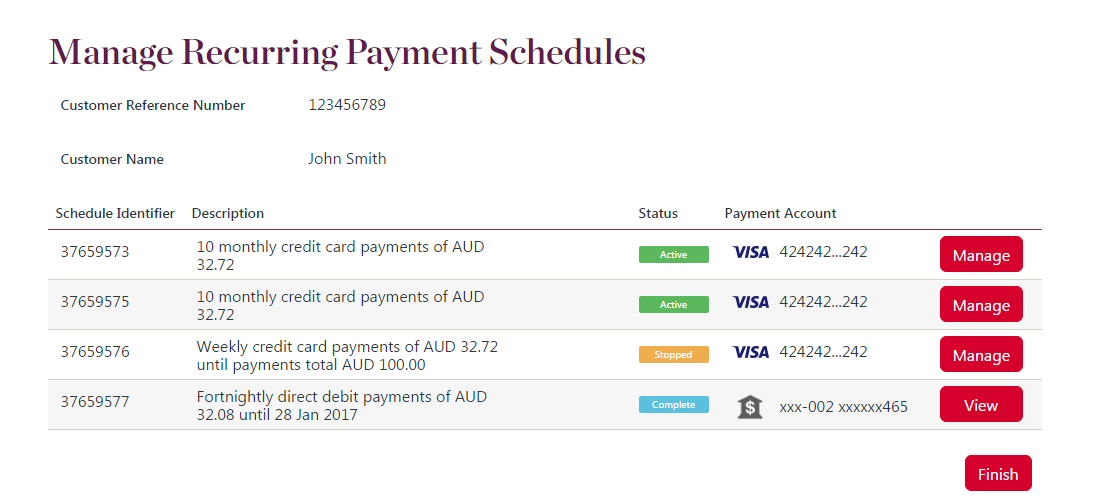
View recurring payments
QuickWeb displays the customer number, name and a list of recurring payments. For each recurring payment, QuickWeb displays the following:
- Schedule identifier. This is a unique identifier generated by QuickWeb.
- Description. An automatically generated description of the recurring payment. The description changes based on the amount, account and Payment schedule type.
- Status. Either
Active,StoppedorComplete. AnActiverecurring payment will take payments on schedule.Stoppedrecurring payments are stopped indefinitely, and do not take recurring payments. ACompleterecurring payment has finished the payment schedule and cannot be re-started. - Payment Account. The masked card or bank account details.
Select Manage to manage the recurring payment. Select View to show details of a completed recurring payment. Select Finish to start the passback.
Related sections:
- Change the look and feel of the pages.
- Restrict the management options a payer can access.
- Send notifications on management and payment events.
- Session timeouts.
Manage recurring payment
QuickWeb displays details of the selected recurring payment. The payer can choose to:
- Change banking details.
- Stop/Start payments.
- Change the schedule details.
- Go back to view recurring payments.

Related sections:
- Change the look and feel of the pages.
- Restrict the management options a payer can access.
- Send notifications on management and payment events.
Change banking details
A payer can change to a new card or bank account. To change an expiry date or account name, a payer will add a new account. A payer can choose existing accounts. QuickWeb displays QuickVault accounts if QuickVault is enabled for your facility.

Related sections:
- Change the look and feel of the pages.
- Restrict a payer to only card payments or bank account payments.
- Send notifications on management and payment events.
Stop/Start payments
A payer can stop an Active recurring payment. Stopping a recurring payment takes effect immediately. A payer can also restart a Stopped recurring payment. The restarted recurring payment will start again on the next calendar day.
Related sections:
- Change the look and feel of the pages.
- Send notifications on management and payment events.
- Recurring concepts.
Change schedule details
A payer can change details of a recurring payment. See Payment Schedule Types for more.
Related sections:
- Change the look and feel of the pages.
- Send notifications on management and payment events.
- Restrict the schedule types and frequencies a payer can choose.
- Recurring concepts.
Customising QuickWeb Recurring
When a test QuickWeb Recurring facility is provided to you, it will have the maximum amount of features the product offers. You can then choose to change or remove some features. This is done during your Westpac implementation project. Customisation options include:
- Change the look and feel of the pages.
- Change the look and feel of the payment receipt.
- Bypass the account verification step.
- Pre-fill the 'enter customer details' step.
- Pre-fill the 'enter schedule details' step.
- Provide the regular payment amount.
- Change the 'existing schedule identifier' in the account verification to a custom lookup (charges may apply).
- Register the payment account in QuickVault.
- Restrict a payer to only card payments or bank account payments.
- Restrict the schedule types and frequencies a payer can choose.
- Restrict the management options a payer can access.
- Send notifications on management and payment events.
Each of these items is explained in the sections below.
Change the look and feel of the pages
The QuickWeb Recurring pages have a default Westpac brand. You may change this to look like your customer-facing website. To accomplish this, provide one or more of the following to your Westpac contact:
- A URL to the brand website.
- Provide style guide and brand documentation.
- Change the look and feel of the QuickWeb Click-through.

Applies to the creation flow and management flow.
Download QuickWeb click-through
Download the QuickWeb click-through, brand the web pages and provide them back to your Westpac contact.
Change the look and feel of the payment receipt
The payment receipt has a default Westpac brand. It includes recurring payment and immediate payment information. You may change this to look like existing payment receipts, and show less information.
Applies to the creation flow only.
Bypass the account verification step
You can partially or fully bypass the account verification step as follows:
- Provide
customerReferenceNumberin a Secure Token Request to remove the Customer Reference Number field from the Account Verification step. - Provide
secondaryIdentifierin a Secure Token Request to remove the Existing Schedule Identifier field from the Account Verification step. - Provide both
customerReferenceNumberandsecondaryIdentifierin a Secure Token Request to skip the page entirely.
The payer will be taken to the View Recurring Payments step. Refer to Parameters for the Secure Token Request.
Applies to the management flow only.
Pre-fill the enter customer details step
To pre-fill the mandatory customer details, provide the following parameters in a Secure Token Request:
customerReferenceNumberreceiptEmailAddressphoneNumber
See Parameters for secure token request.
To skip this step when the mandatory fields are provided in a Secure Token Request, raise this with your Westpac contact.
Applies to the creation flow only.
Pre-fill the enter schedule details step
To pre-fill the mandatory schedule details, provide the following parameters in a Secure Token Request:
recurringScheduleCoderecurringScheduleFirstDaterecurringScheduleFrequencyrecurringSchedule
See Parameters for secure token request.
To skip this step when the mandatory fields are provided in a Secure Token Request, raise this with your Westpac contact.
Applies to the creation flow only.
Provide the regular payment amount
To provide the regular payment amount, provide the principalAmount parameter in a Secure Token Request. The payer will not enter this amount. Surcharges are calculated on top of this amount.
See Parameters for secure token request.
Applies to the creation flow only.
Change the existing schedule identifier in the account verification to a custom lookup
The account verification step requires two pieces of information to verify a payer:
- A customer reference number
- A secondary reference number
The customer reference number uniquely identifies your customer. It is provided via new schedules during the creation flow or Recurring Batch. Recurring payments are allocated to a customer.
The secondary reference number defaults to an Existing Schedule Code. You may wish to change this to another piece of information. You must provide this value for your customer during the creation flow. Discuss this option with your Westpac contact.
Applies to the management flow only.
Register the payment account in QuickVault
QuickWeb Recurring registers any account used for a new recurring schedule in QuickVault when it is enabled for your facility. The preregistrationCode is provided in the passback. It may also be reported in the daily registered accounts report.
See QuickVault Summary and related docs for more on QuickVault.
Applies to the creation flow and management flow.
Restrict a payer to only card payments or bank account payments
You can instruct QuickWeb Recurring to restrict a payer to only card payments or bank account payments. To do this, provide the accountType parameter in a Secure Token Request.
Applies to the creation flow and management flow.
Restrict the schedule types and frequencies a payer can choose
You can instruct QuickWeb Recurring to restrict a payer to a particular frequency for new recurring payments. To do this, provide the recurringScheduleFrequency parameter in a Secure Token Request during the creation flow.
To restrict the list available to a subset of the available frequencies, raise this with your Westpac contact.
Applies to the creation flow and management flow.
Restrict the management options a payer can access
To restrict the available options a payer can access in the management flow, define this with your Westpac contact.
Applies to the management flow only.
Send notifications on management and payment events
QuickStream can send notifications about payment events to your customers on your behalf. These notifications can be sent as an email or an SMS message.
Applies to the creation flow and management flow.
Duplicate payment checking
QuickWeb performs duplicate transaction checks in order to reduce the instances of accidental double payment.
What is a duplicate?
A transaction is considered a duplicate if there is a previous transaction that matches all these criteria:
- has the same card number (but not necessarily expiry date) or bank account BSB and account number
- is for the same merchant
- is for the same amount
- is approved or currently processing
- is not a QuickBatch transaction (but could be QuickVoice, QuickConnect, etc)
- is for the current settlement date
What is displayed to the cardholder?
The card holder is warned of the duplicate and must tick a box in order to continue processing.
Can I disable the duplicate check?
Not directly. The duplicate check may be removed if required. Charges may apply.
Verify account step failures
The account verification step requires two pieces of information to verify a payer:
- A customer reference number
- A secondary reference number
If the payer enters either piece of information incorrectly they will see an error.
If the payer enters either piece of information incorrectly 20 times, their IP address will be blacklisted by the system.
When an IP address is blacklisted, the IP address is blocked from all Qvalent services.
To have an IP address removed, a contact from your company must report this to the QuickStream Technical Support team. A member of the QuickStream Technical Support team must be able to identify you as a user of QuickStream Portal or an approved contact with the team. To update your approved contacts that are not also users in QuickStream Portal, contact the QuickStream Technical Support team when your solution goes live.
Session timeouts
QuickWeb's session lasts for 15 minutes. After 10 minutes of inactivity, QuickWeb displays a pop-up. The pop-up warns the user that their session is about to expire.
This can occur on any page in both the creation flow and the management flow.
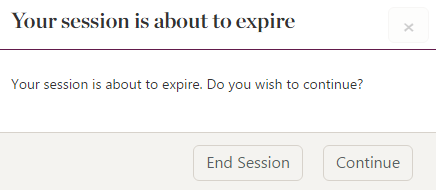
When a user selects:
- End Session, QuickWeb initiates the passback to cancelUrl.
- Continue, QuickWeb extends the users' session for another 15 minutes.
The pop-up displays for 5 minutes of inactivity. If after 15 minutes of inactivity, the user takes an action such as clicking the buttons in the popup or refreshing the page, QuickWeb redirect the user to the Session Timeout page.

This page can be branded if required.
Handoff your customer to QuickWeb
To handoff your customer from your website to QuickWeb, choose one of the following options:
Both options require you to send parameters to QuickWeb that identify you to QuickWeb and serve up your payment pages.
Secure token handoff
The secure token request is Westpac's recommended method for sending parameters. It allows the parameters to be sent directly from your server to QuickWeb. This prevents the customer from being able to tamper with the parameters before they are sent to QuickWeb.
Using the secure token handoff you can:
- Access the management flow.
- Pre-fill the Enter customer details step.
- Pre-fill the Enter schedule details step.
- Provide the regular payment amount.
- Bypass the account verification step.
- Change the Existing schedule identifier in the account verification to a custom lookup.
- Register the payment account in QuickVault.
- Restrict a payer to only card payments or bank account payments.
- Provide additional custom parameters for reporting.
- Receive a server to server payment notification.
Parameters for secure token request
These parameters are passed to QuickWeb in a Secure token request. Sign in to QuickStream Portal to get these values in each environment. See View your connection details.
Mandatory parameters
usernamepasswordsupplierBusinessCodeconnectionType=QUICKWEBproduct=RECURRING
Optional parameters
accountTypeprincipalAmount- The regular payment amount. Credit card surcharges are applied on top of this amount. Send blank to allow the payer to enter the amount.customerReferenceNumber- Provide a customer reference number to bypass the account verification step or Pre-fill the Enter customer details step.receiptEmailAddress- Provide a receipt email address to Pre-fill the Enter customer details step and set the email address for the payment receipt or email notifications.returnUrlcancelUrlerrorEmailToAddresscustom<ParameterName>
In addition, the following optional parameters are specific to QuickWeb Recurring.
phoneNumbersecondaryIdentifierrecurringScheduleCoderecurringScheduleFirstDaterecurringScheduleFrequencyrecurringScheduleallowRecurringManagementallowRecurringCreation
Refer to Secure token request for the full specification.
Parameters for handoff
These parameters are passed to QuickWeb in the redirect after receiving a token from the Secure token request. Sign in to QuickStream to get the communityCode value and URL in each environment. See View your connection details.
communityCodetoken
Form inputs handoff
The form inputs handoff is the second option for sending parameters to QuickWeb. It involves all the parameters being sent directly from the customer's browser to QuickWeb. It is an easier method to implement, however, it does allow the customer to tamper with the parameters before they are sent to QuickWeb. Westpac, therefore, recommends using the secure token handoff method instead.
Form handoff example
<form action="https://quickweb.westpac.com.au/OnlinePaymentServlet3" method="POST">
    <input type="hidden" name="product" value="RECURRING"/>
    <input type="hidden" name="communityCode" value="<YOUR_COMMUNITY_CODE>"/>
    <input type="hidden" name="supplierBusinessCode" value="<YOUR_SUPPLIER_BUSINESS_CODE>"/>
    <input type="hidden" name="currencyCode" value="AUD"/>
    <input type="hidden" name="returnUrl" value="https://yoursite.com.au/thankyou"/>
    <input type="hidden" name="cancelUrl" value="https://yoursite.com.au/cancelled"/>
    <input type="submit" value="Make Payment"/>
</form>
When using a form inputs handoff your customer must proceed through the account verification step.
Parameters for form inputs handoff
These parameters are passed to QuickWeb during the handoff if your website cannot perform a Secure token request. Sign in to QuickStream to get the values and URL in each environment. See View your connection details.
Mandatory parameters
supplierBusinessCodeconnectionType=QUICKWEBproduct=RECURRINGcommunityCode
Optional parameters
returnUrl- Provide the URL to redirect the customer from the receipt page or to by-pass the receipt page and host your own.cancelUrl- Provide the URL to redirect to when the payer cancels the payment process.
Handoff your customer back to your website
This processing is referred to as the passback. The passback involves redirecting your customer to the URL you have specified in the returnUrl or cancelUrl parameters. This redirect has parameters that you can use to display information back to your customer on your website. The redirect is a HTTP GET by default. Raise with your Westpac contact if this should be a HTTP POST to your website.
Before implementing the pass back you must decide when you would like the customer to return to your website after a payment attempt:
- QuickWeb receipt page links to your website specified in
returnUrl. - QuickWeb redirects to your website for you to show the receipt page specified in
returnUrl.
These options are discussed in the sections below.
QuickWeb receipt page links to your website
In this option QuickWeb will display its own receipt page to the customer. The receipt page includes a button that links back to your website. The passback occurs when the customer clicks the button.
QuickWeb redirects to your receipt page
In this option QuickWeb will return the customer to your website immediately after the payment is made. That is, your customer will see the Confirm Payment page and when QuickWeb processes the payment, it will redirect the customer to returnUrl. The QuickWeb receipt page is not displayed.
Your website will then show a receipt page to the customer. QuickWeb will include a number of parameters in the redirect. They will be included as a list of ampersand delimited parameters.
The parameters that QuickWeb will return are listed in Parameters returned in passback.
Payer cancels the payment process
When a payer cancels out of the payment process (usually via a Cancel button), QuickWeb will redirect back to your website. Provide the URL in the cancelUrl parameter.
The redirect will include parameters. The receipt number will not be included as no payment was attempted. See Parameters returned in passback.
Parameters returned in passback
Most of the parameters below are returned in the passback from the creation flow.
communityCodesupplierBusinessCodepaymentAmountsurchargeAmountreceiptNumberpaymentReferencecustomerReferenceNumberresponseCoderesponseDescriptionsummaryCodecreatedDateTimesettlementDatecardholderNamecardSchemeexpiryDateMonthexpiryDateYearaccountNameaccountNumberbsbhmac- Refer to Validating the HMAC.custom<Custom name>
The following passback parameters to are specific to this module.
| Parameter name | Format | Description |
|---|---|---|
recurringScheduleCode |
string |
The unique recurring payment schedule identifier. This value is provided in the Secure token handoff or generated by QuickWeb. |
recurringScheduleFirstDate |
string |
The first date of the recurring payment schedule in yyyyMMdd format. For example, 20170110. |
recurringScheduleFrequency |
string |
The frequency. One of: DAILY, WEEKLY, FORNIGHTLY, MONTHLY, QUARTERLY, SIXMONTHLY, YEARLY. See Payment schedule frequencies. |
recurringSchedule |
string |
The recurring payment schedule type. One of: CONTINUE_UNTIL_FURTHER_NOTICE, CONTINUE_UNTIL_DATE, STOP_AFTER_SET_NUMBER_OF_PAYMENTS, STOP_AFTER_SET_AMOUNT, ONE_OFF. See Payment schedule types. |
recurringScheduleTotalAmount |
string |
The total amount of the schedule. |
recurringScheduleNumberOfPayments |
string |
The number of payments remaining in the schedule. |
recurringScheduleContinueUntilDate |
string |
The last payment date of the schedule. Provided for CONTINUE_UNTIL_DATE schedule types only. |
preregistrationCode |
string |
The QuickVault account token for the registered payment account. |
The passback from the management flow includes only a subset of the passback parameters:
communityCodesupplierBusinessCodecustomerReferenceNumberhmac- Refer to Validating the HMAC.
Receiving payment details
QuickWeb provides two ways to receive payment details:
Server to server notification
This option is also known as the server-to-server postback. It allows you to receive payment summary details after each card payment is made and recurring payment schedule is created via the creation flow. This is done via a HTTPS POST from QuickWeb to your server. QuickWeb can post the payment details as form parameters or as XML.
QuickWeb sends separate server to server notifications for successful payments and recurring payment creation.
A server to server notification is not sent for the management flow.
Parameters in the server to server notification
These parameters are passed from QuickWeb to your server in the Server to server notification:
sourceCodereceiptNumbercommunityCodesupplierBusinessCodepaymentReferencecustomerReferenceNumberpaymentAmountsurchargeAmountcardSchemesettlementDatecreatedDateTimeresponseCoderesponseDescriptionsummaryCodesuccessFlag- Custom fields
These parameters relate to a recurring payment schedule.
recurringScheduleCoderecurringScheduleFirstDaterecurringScheduleFrequencyrecurringSchedulerecurringScheduleTotalAmountrecurringScheduleNumberOfPaymentsrecurringScheduleContinueUntilDate
Refer to Server to server notification for the full specification.
Cash applied file
See Cash applied file for the file format.
The file may be retrieved using iLink or available for download in QuickStream Portal.
To download a Cash applied file from QuickStream Portal:
- Sign into QuickStream Portal
- Click Administration -> Transactions and Reports -> Facility Reports
- Your report will appear on this page.
Select the download icon to retrieve a Cash applied file. Use the date filters to find older files.
Manage your security settings
Refer to QuickStream user guide - Security settings to manage the following security settings in QuickStream:
- Whitelist the IP addresses for the Secure Token Requests
- Whitelist the domain addresses for the Server to server notification
- View your connection details, including your credentials for authentication with QuickStream.
Handling declined payments
Your customer's financial institution may decline transactions. A declined transaction will receive a Summary Code and a Response Code. Find the full list of Response Codes at Response codes.
Each response code may describe a hard decline or a soft decline.
- A hard decline indicates the transaction will not likely be successful if retried. For example, Response Code 14 - Invalid Card Number may not be successful if retried.
- A soft decline indicates the transaction can possibly be retried and by successful. For example, Response Code 51 - Not sufficient funds could be retried at a later day.
Response codes indicating a soft decline
Some response codes may indicate a soft decline. A soft declined transaction may indicate the transaction can be retried successfully at a later date.
See Response codes for details.
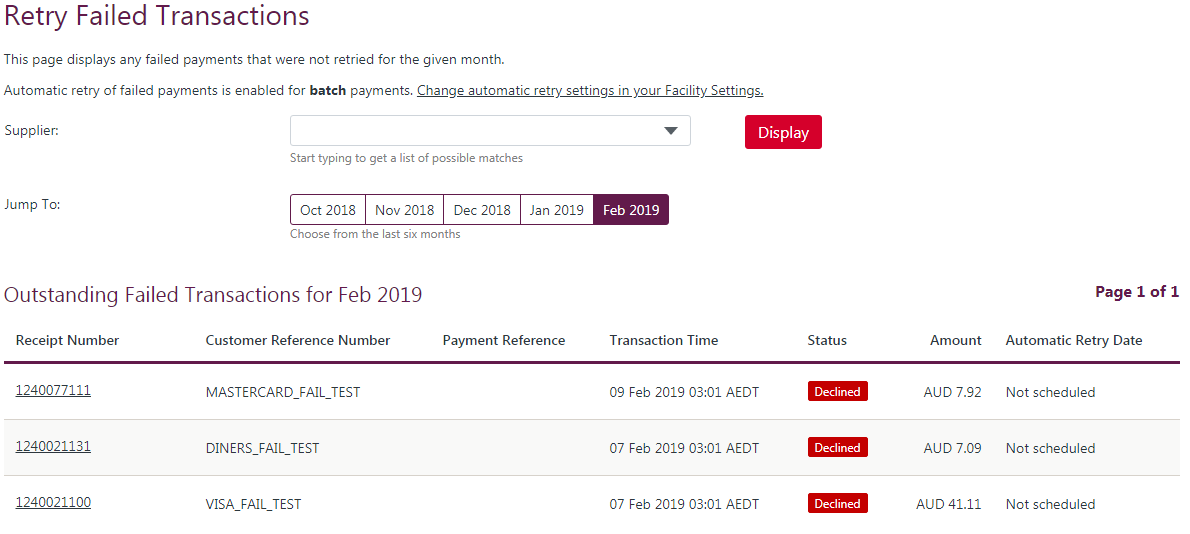
Manually retrying payments
QuickStream Portal has a function to list any recurring payments that were soft declined and can be retired.
- Sign into QuickStream Portal
- Click Transactions and Reports -> Retry Failed Payments
- Choose a payment to retry. Either select the receipt number or an option from the context menu to proceed.
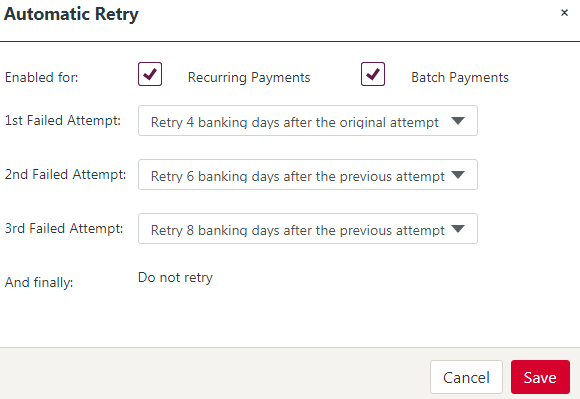
Automatically retrying payments
QuickStream Portal allows you to set up a schedule to automatically retry any soft declined payments.
- Sign into QuickStream Portal
- Click Administration -> Facility Settings -> Automatic Retry of Failed Payments
- Choose to automatically retry recurring payments.
- Select the 1st, 2nd and 3rd failed attempt options to automatically retry 4, 6 or 8 days after each attempt.