QuickVault batch registration
QuickVault Batch registration is a file based solution that allows you to preregister customer account details with Westpac. These account details can then be used by any of your Westpac payment solutions.
This document describes the QuickVault solution and explains how to register accounts using the batch registration method. High level requirements as well as detailed step-by-step instructions are included to help with the implementation process.
The intended audience for this document is the software development team responsible for integrating their systems with QuickVault.
What is QuickVault?
QuickVault is a Westpac service that allows you to store a customer's card details or bank account details securely outside of your system. This process is commonly referred to as preregistering customer account details with Westpac.
The primary purpose of QuickVault is to help your card solution become PCI DSS compliant. The term PCI DSS stands for Payment Card Industry Data Security Standard. It is a security standard that has a number of requirements for processing, transmitting and storing card details. QuickVault has attained Level 1 PCI DSS compliance - the highest level achievable. To learn more about PCI DSS visit https://www.pcisecuritystandards.org/security_standards/pci_dss.shtml.
Westpac offers a range of solutions for capturing account details and transmitting account details to QuickVault. The range includes:
-
A variety of web based registration solutions
-
An API registration solution
-
A file based registration solution
This document focuses on the file based registration solution, called batch registration. For information about the other solutions please read the QuickVault Summary Guide.
What is batch registration?
Batch registration is a file based solution that allows you to preregister customer account details with Westpac. These account details can then be used by any of your Westpac payment solutions.
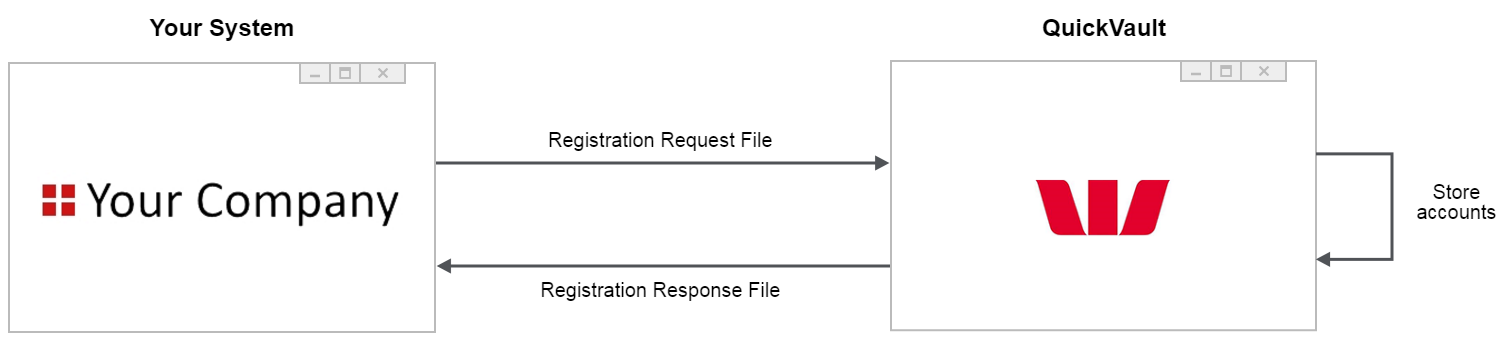
The key feature of batch registration is its ability to register a large number of accounts at once. This makes it an ideal solution if you need to migrate existing accounts from your system.
To register account details, your system will provide a Registration Request File to QuickVault. This file contains details about every card or bank account you wish to register. QuickVault will process the file and store the account details. Once all the accounts have been processed a Registration Response File will be provided to your system. This file will contain a summary of all the registration attempts. You will then process this file and remove the customers' account details from your system.
How does the registration process work?
There are two areas to consider when thinking about registering accounts. They are:
-
Migrating your existing accounts
-
Registering new accounts
Your solution may require both procedures or just one.
Migrating your existing accounts
Migrating existing accounts is necessary if you currently have customer account details stored in your system. The purpose of account migration is to move these account details out of your system and into QuickVault. This is a once off process that is performed before any new accounts are registered.
Batch registration is the quickest and most efficient way to migrate accounts. It allows you to migrate all of your accounts using just one file. The diagram below shows the high level steps involved. These steps take approximately 3-5 minutes to complete for a standard file containing 10,000 accounts.
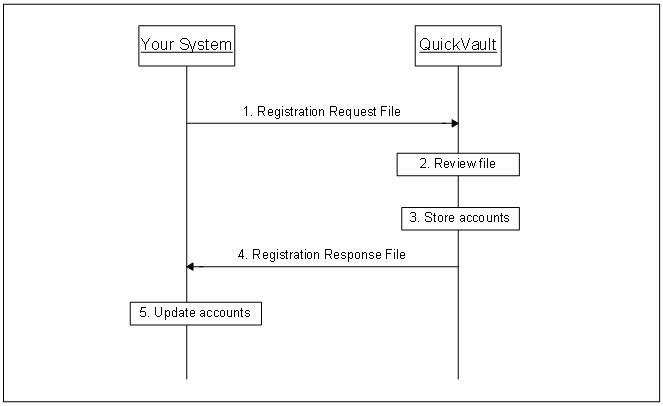
The steps for the batch registration process are:
- Your system sends a Registration Request File to QuickVault. This file contains details about each account you wish to migrate to QuickVault. The file can include card details and/or bank account details.
- See Registration Request File format For more information about the format.
- For more information about sending files to QuickVault see section Sending and retrieving files.
-
QuickVault reviews the file to make sure it is formatted correctly.
-
QuickVault stores the valid accounts. A unique token is also stored against each account for future reference. For more information about account tokens see Generating the account token.
-
Once all the accounts have been processed QuickVault sends a Registration Response File to your system. This file lists each account and states whether or not it was successfully registered. It also includes the unique token registered against each account.
- For more information about the Registration Response File format see Registration Response File format.
- For more information about the different ways to receive files see Sending and retrieving files.
- Your system uses the data provided in the Registration Response File to update your customers' details. For every account successfully registered within QuickVault you will:
- Find the account in your system
- Remove the account details from your system
- Store the account summary if necessary
- Store the account token if necessary
Registering new accounts
New accounts are not usually registered via batch registration. In fact we generally recommend against using this solution for new accounts, mainly because it requires account details to be stored in your system before being sent to QuickVault. This increases your system's exposure to card details and makes it more difficult to become PCI DSS compliant.
There are a number of other solutions that are more suitable for registering new accounts. These solutions are described in the QuickVault Summary Guide. If however your system is structured in a way that requires you to use batch registration for new accounts please talk to your implementation manager.
Implementation process
There are a number of tasks involved in the implementation process. Each task is described in detail in the following sections of this document. A summary of the tasks and their corresponding section is listed in the table below.
| Step | Description | Document Reference |
|---|---|---|
| Step 1 | Kick-off meeting | See Kick-off meeting |
| Step 2 | Identifying the account model | See Identifying the account model |
| Step 3 | Generating the account token | See Generating the account token |
| Step 4 | Registration Request File | See Registration Request File |
| Step 5 | Registration Response File | See Registration Response File |
| Step 6 | Sending and retrieving files | See Sending and retrieving files |
| Step 7 | Testing | See Testing |
| Step 8 | Sign off | See Sign off |
| Step 9 | Production lodgement | See Production lodgement |
| Step 10 | Go live | See Go live |
| Step 11 | Post implementation | See Post implementation |
To help with the implementation process, we have included a requirements checklist for you to complete as you work on each task. The purpose of the requirements checklist is to help identify and keep track of your requirements.
If you require further assistance, please contact your Westpac Implementation Manager or your Qvalent implementation manager.
Kick-off meeting
The kick-off meeting is the first meeting between your organisation and Qvalent. This typically consists of a telephone conference with the relevant people from your organisation, Westpac and Qvalent.
The purpose of this meeting is to, introduce the team members from each organisation, discuss the implementation process and discuss your requirements.
Identifying the account model
One of the first tasks in the implementation process is to identify what type of account model you have. The account model identifies the number of accounts a customer is allowed to have. There are two options available. You can choose either:
Single account model
The single account model allows a customer to have one account registered. This account will be used every time the customer makes a payment. The account details can be replaced, but there can never be more than one account active.
The following diagram shows an example of the single account model.
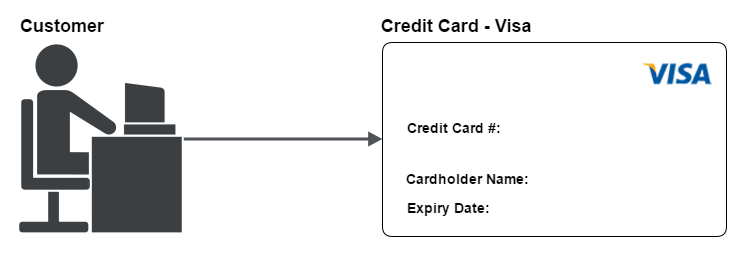
In order for your solution to use the single account model all of your customers must be structured this way. If any of your customers have more than one active account you must use the multiple account model instead.
Multiple account model
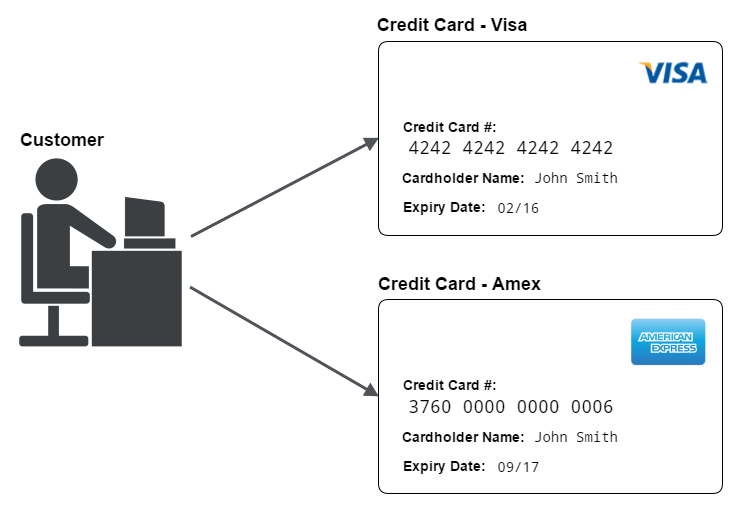
The multiple account model allows a customer to have more than one account registered at the same time. This allows the customer to use different accounts for different situations.
For example, a customer may have two policies - policy1 and policy2. The customer may wish to pay for policy1 with a Visa card then pay for policy2 with an Amex card. Using the multiple account model you can register both cards in QuickVault. Then later, when it is time to make a payment, the appropriate card can be used.
Generating the account token
A token is a unique identifier for a particular account. It is a shared identifier, meaning your system and QuickVault will both agree to use this value when referring to the account. At the time of registration QuickVault will store the token alongside the account details. Then at the time of payment your system will provide this token to your Westpac payment solution so it can lookup the corresponding account details.
This section describes the different options available for generating the account token. These options vary based on the customer account model you chose in the previous section.
If you chose the single account model, see Tokens for the single account model. If you chose the multiple account model, see Tokens for the multiple account model.
Tokens for the single account model
QuickVault generated token
A QuickVault generated token is a value that is created by QuickVault at the time of registration. It uniquely identifies a particular account. We recommend using this type of token rather than a client generated token if:
- Your system doesn't have a unique ID currently stored against each account, or
- Your system does have a unique ID, but it can only be provided at the time of registration - it cannot be provided at the time of payment. For example, you cannot change the software that is responsible for the payment process.
QuickVault can format the token in a number of ways. During the implementation process you will select your preferred format. This will be discussed in more detail in Formats for the QuickVault generated token.
Once the token is generated QuickVault will store it alongside the account details. A copy of the token will also be given to your system to store. Then at the time of payment your system will provide the token to your Westpac payment solution so that the corresponding account details can be used.
The diagram below shows the process for registering an account using a QuickVault generated token.
Registering with a QuickVault generated token (for the multiple account model)
The steps for registering an account with this type of token are as follows:
-
Your system sends the customer ID and the account details to QuickVault. This is done via the Registration Request File. The customer ID is a value that represents the owner of the account. For example the customer's reference number or member ID. This value should be placed in the 'Customer Number' field. For more information about the file format see Registration Request File Format.
-
QuickVault creates the account token. This token uniquely identifies the account. There are a number of ways the token can be formatted. For more information see Formats for the QuickVault generated token..
-
QuickVault stores the account token, account details and customer ID.
-
QuickVault sends the customer ID, registration summary and account token to your system. This is done via the Registration Response File. The customer ID is the same value you provided in step 1. The registration summary includes account details and a response code to indicate whether the account was successfully registered. For information about the file see Registration Response File Format.
-
Your system will retrieve the customer ID, account details, response code and account token from the file. If the response code indicates the account was successfully registered you will:
- Use the customer ID and account details to locate the account in your system. For a credit card registration the cardholder name, expiry date and masked credit card number will be included in the response file. For a bank account the BSB, account number and account name will be included.
- Store the account token
- Remove the customer's account details from your system
**Registration is now complete. **
When it is time to make a payment there are two options:
-
Your system can provide the account token to your Westpac payment solution.
-
If you are using QuickTerminal to make payments a staff member can search for all the accounts associated with a particular customer ID, then select the appropriate account.
Tokens for the multiple account model
A QuickVault generated token is a value that is created by QuickVault at the time of registration. It uniquely identifies a particular account.
QuickVault can format the token in a number of ways. During the implementation process you will select your preferred format. This will be discussed in more detail in Formats for the QuickVault generated token.
Once the token is generated QuickVault will store it alongside the account details. A copy of the token will also be given to your system to store. Then at the time of payment your system will provide the token to your Westpac payment solution so that the corresponding account details can be used.
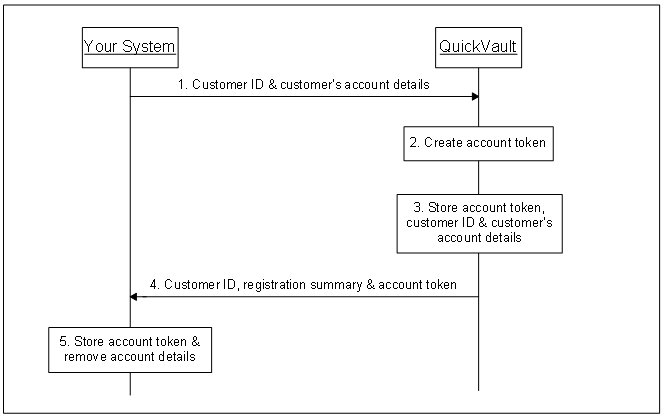
The diagram below shows the process for registering an account using a QuickVault generated token.
Registering with a QuickVault generated token (for the multiple account model)
The steps for registering an account with this type of token are as follows:
-
Your system sends the customer ID and the account details to QuickVault. This is done via the Registration Request File. The customer ID is a value that represents the owner of the account. For example the customer's reference number or member ID. This value should be placed in the 'Customer Number' field. For more information about the file format see Registration Request File Format.
-
QuickVault creates the account token. This token uniquely identifies the account. There are a number of ways the token can be formatted. For more information see Formats for the QuickVault generated token.
-
QuickVault stores the account token, account details and customer ID.
-
QuickVault sends the customer ID, registration summary and account token to your system. This is done via the Registration Response File. The customer ID is the same value you provided in step 1. The registration summary includes account details and a response code to indicate whether the account was successfully registered. For information about the file see Registration Response File Format.
-
Your system will retrieve the customer ID, account details, response code and account token from the file. If the response code indicates the account was successfully registered you will:
- Use the customer ID and account details to locate the account in your system. For a credit card registration the cardholder name, expiry date and masked credit card number will be included in the response file. For a bank account the BSB, account number and account name will be included.
- Store the account token
- Remove the customer's account details from your system
**Registration is now complete. **
When it is time to make a payment there are two options:
- Your system can provide the account token to your Westpac payment solution.
- If you are using QuickTerminal to make payments a staff member can search for all the accounts associated with a particular customer ID, then select the appropriate account.
Registration request file
This section describes the different ways you can format your Registration Request File. As outlined earlier the Registration Request File is a file that your system will send to QuickVault. It contains details about all the cards and/or bank accounts you would like to register with Westpac.
CSV file format
The CSV (Comma Separated Value) file is the standard format for the Registration Request File. The file format varies slightly depending on the type of accounts you are registering. You can choose either:
Registration response file
This section describes the different ways we can format your Registration Response File. The Registration Response File is a file that is generated by QuickBatch Vault and given to your system. The purpose of the file is to let you know which accounts were successfully registered and provide you with the tokens that were stored alongside these accounts.
CSV file format
The CSV file is the standard format for the Registration Response File. The file format varies slightly depending on the type of accounts you are registering. You can choose either:
Sending and retrieving files
This section describes the different ways you can send and retrieve your files. There are two options for you to choose from:
Manually send and retrieve files using iLink
iLink is a web based service that allows you to securely send and retrieve files. It has a simple user interface that is similar to web based mail systems.
The benefit of using iLink is that it is quick and easy to setup connectivity. If you are only using batch registration to migrate existing accounts we recommend using this option.
For more information about iLink please read the iLink User Guide.
Sending files using iLink
The high level steps for manually sending a Registration Request File are as follows:
-
Your system will generate the file
-
An employee from your organisation will log on to iLink and upload the file
-
iLink will send the file to QuickVault
-
QuickVault will process the file
Retrieving files using iLink
The high level steps for manually retrieving a Registration Response File are as follows:
-
QuickVault will generate the file
-
QuickVault will send the file to iLink
-
iLink will store the file
-
An employee from your organisation will log on to iLink and download the file
-
The employee will then upload the file into your system
Automatically send and retrieve files using iLink
iLink allows your system to automatically send and retrieve files. These files can be delivered via a number of different technologies including HTTPS, XCom and SFTP.
The benefit of using iLink is that it provides a fast and reliable way to send and retrieve files. It does not rely on people to upload or retrieve files. The downside however is it is a more technically complex solution to implement and therefore will require more effort on your part to set up. We only recommend using this option if you intend to use batch registration to register new accounts on an ongoing basis.
For information about the different iLink connectivity methods please contact your Westpac implementation manager.
Sending files using iLink
The high level steps to automatically send a Registration Request File are as follows:
-
Your system will generate the file
-
Your system will automatically send the file to QuickVault
-
QuickVault will process the file
Retrieving files using iLink
The high level steps to automatically retrieve a Registration Response File are as follows:
-
QuickVault will generate a Registration Response File
-
Your system will automatically retrieve the file from QuickVault
-
Your system will process the file
Registered accounts report
At the end of each day QuickVault can provide you with a Registered Accounts Report. The report lists all the accounts that have been registered throughout the day. It can be provided for any of the registration solutions, however it is mainly used for Web registration, QuickConnect registration and Portal registration.
QuickVault will generate the report at 12am each night. You can then upload the report into your system and reconcile the data against notifications you received earlier in the day.
QuickVault offers a standard file format. See Registered accounts report.
Identifying expiring cards
QuickVault's Expiring Cards Report provides you with a list of cards that are due to expire. QuickVault will generate the report at the start of each month. You can then upload the report into your system and notify your customers about their expiring cards.
QuickVault offers a CSV file format containing the expiring card details and account token. See Expiring cards report.
Testing
See Testing.
Test URLs and IP addresses
See Test URLs and IP addresses.
Test account numbers
See Test card and bank account numbers.
Sign off
After you have completed your user acceptance testing you must send a 'sign off' email to your Qvalent implementation manager. The email will state that you have successfully tested all aspects of the solution and you are ready for it to be moved into production. A sample email is included below.
To: Qvalent implementation manager
Cc: Westpac implementation manager
Subject: QuickVault batch registration sign off
We have successfully completed user acceptance testing. Our tests covered all areas of the solution.
Our card registration tests covered:
- Registering an account for a particular customer
- Replacing that registered account with a new account
- Attempting to register an account with invalid details
- Attempting to register an account that is already registered
Our bank account tests covered:
- Registering an account for a particular customer
- Replacing that registered account with a new account
- Attempting to register an account with invalid details
- Attempting to register an account that is already registered
Our connectivity tests covered:
- Sending Registration Request Files to QuickVault using iLink.
- Retrieving Registration Response Files from iLink or QuickStream portal.
- Uploading the Registration Response File into our system
Our QuickStream admin tests covered:
- Creating users
- Assigning roles to users
- Searching for accounts
We are satisfied with the results of these tests and we are ready for the solution to be moved into production.
Regards,
Allan Smith
Production lodgement
See Production lodgement.
Production URLs and IP addresses
See Production URLs and IP addresses.
Go live
Once production lodgement is complete and you are satisfied with the results of your low value tests in production you are ready to go live. The term "go live" represents the date you will make the solution available to your customers.
At this stage of the implementation process there are only a few tasks left to complete. They are:
-
Before the go live date, communicate with your customers to inform them about the new payment process.
-
On the go live date, update the appropriate page (or pages) on your website to make the new solution available to your customers.
After you go live, Qvalent and Westpac will closely monitor the solution. This is known as the "monitoring phase" and lasts for two weeks. During this time, if you have any questions or concerns about the solution you should communicate directly with your Qvalent implementation manager.
Post implementation
Once the two week monitoring phase is over the implementation process is officially complete. Your Qvalent implementation manager will hand the solution over to the Qvalent helpdesk. The helpdesk will be responsible for day to day monitoring of the solution and resolving any issues that occur.
If you have any questions or concerns about the solution at this point contact the helpdesk: QuickStream Technical Support.
Registration request file format
This section describes the standard CSV format for the Registration Request File. There are two types of records in this file - a File Header record and an Account Detail record. These records are described in the table below.
| Record Type | Description |
|---|---|
| File Header | One record at the start of the Registration Request File. It contains the file headings. This record should be followed immediately by an Account Detail record. |
| Account Detail | One record for each account you want to register. There may be many Account Detail records in the file. |
The file format varies slightly depending on the type of accounts you would like to register.
If you would like to register card accounts only, you will use the format described in Cards only
If you would like to register bank accounts only, you will use the format described in Bank accounts only
If you would like to register both card and bank accounts, you will use the format described in Cards and bank accounts
Cards only
The following table explains how to populate the Registration Request File if you wish to register cards only.
| Column | Column Heading | Required | Description |
|---|---|---|---|
| 1 | Customer Number | Yes | For the single account model:
|
| 2 | Customer Name | Yes | The name of the customer that uses the card. For example Steve Smith |
| 3 | Cardholder Name | Yes | The name printed on the card. For example Steven Smith |
| 4 | Card Number | Yes | The card number printed on the card. Spaces are not allowed in this field. For example 4242424242424242 |
| 5 | Expiry Date | Yes | The date the card expires. Formatted as MMYY. For example 0914 |
| 6 | Email Address | No | The customer's contact email address. For example steve@stevescakes.biz.au Note: let your Westpac contact know if you wish to provide this field |
| 7 | Phone Number | No | The customer's contact phone number. For example 0412345678, +61421559774 Note: let your Westpac contact know if you wish to provide this field |
| 8 | Legacy Token | No | A pre-existing account token from the customer's existing vault. By default, QuickStream generates the account token value. If this field is provided, your facility must be configured to accept customer provided account tokens. For example 123456789, abc-123, ABC_123 Note: let your Westpac contact know if you wish to provide this field |
Sample file content:
"Customer Number", "Customer Name", "Cardholder Name", "Card Number", "Expiry Date"
"100001", "Steve Smith", "Steven Smith", "4242424242424242", "0914"
"100002", "Ava Trundle", "Ava J Trundle", "376000000000006", "0314"
"100003", "Tim Johnson", "Tim Johnson", "5163200000000008", "0115"
Including contact information and account token:
"Customer Number", "Customer Name", "Cardholder Name", "Card Number", "Expiry Date", "Email Address", "Phone Number", "Legacy Token"
"100001", "Steve Smith", "Steven Smith", "4242424242424242", "0914", "steve@email.com", "+61421559774", "123456789"
"100002", "Ava Trundle", "Ava J Trundle", "376000000000006", "0314", "ava@email.com", "61421559774", "abc-123"
"100003", "Tim Johnson", "Tim Johnson", "5163200000000008", "0115", "tim@email.com", "0412345678", "ABC_123"
Bank accounts only
The following table explains how to populate the Registration Request File if you wish to register bank accounts only.
| Column | Column Heading | Required | Description |
|---|---|---|---|
| 1 | Customer Number | Yes | For the single account model:
|
| 2 | Customer Name | Yes | The name of the customer that uses this bank account. For example Sarah Latham |
| 3 | Account Name | Yes | The account name associated with this bank account. For example Sarah J Latham |
| 4 | Account Number | Yes | The account number associated with this bank account. Spaces are not allowed in this field. For example 12345678 |
| 5 | BSB Number | Yes | The BSB associated with this bank account. For example 650000 |
| 6 | Email Address | No | The customer's contact email address. For example steve@stevescakes.biz.au Note: let your Westpac contact know if you wish to provide this field |
| 7 | Phone Number | No | The customer's contact phone number. For example 0412345678, +61421559774 Note: let your Westpac contact know if you wish to provide this field |
| 8 | Legacy Token | No | A pre-existing account token from the customer's existing vault. By default, QuickStream generates the account token value. If this field is provided, your facility must be configured to accept customer provided account tokens. For example 123456789, abc-123, ABC_123 Note: let your Westpac contact know if you wish to provide this field |
Sample file content:
"Customer Number", "Customer Name", "Account Name", "Account Number", "BSB Number"
"100004", "Anna Johns", "Anna Johns", "11110000", "650000"
"100005", "Sarah Latham", "Sarah J Latham", "12345678", "650000"
"100006", "Mike Teo", "Michael Teo", "111111", "032050"
Including contact information and account token:
"Customer Number", "Customer Name", "Account Name", "Account Number", "BSB Number", "Email Address", "Phone Number", "Legacy Token"
"100004", "Anna Johns", "Anna Johns", "11110000", "650000", "anna@email.com", "+61421559774", "123456789"
"100005", "Sarah Latham", "Sarah J Latham", "12345678", "650000", "sarah@email.com", "61421559774", "abc-123"
"100006", "Mike Teo", "Michael Teo", "111111", "032050", "mike@email.com", "0412345678", "ABC_123"
Cards and bank accounts
The following table explains how to populate the Registration Request File if you wish to register cards and bank accounts.
| Column | Column Heading | Required | Description |
|---|---|---|---|
| 1 | Customer Number | Yes | For the single account model:
|
| 2 | Customer Name | Required for cards | The name of the customer that uses the card. For example Steve Smith |
| 3 | Cardholder Name | Required for cards | The name printed on the card. For example Steven Smith |
| 4 | Card Number | Required for cards | The card number printed on the card. Spaces are not allowed in this field. For example 4242424242424242 |
| 5 | Expiry Date | Required for cards | The date the card expires. Formatted as MMYY. For example 0914 |
| 6 | Account Name | Required for bank accounts | The account name associated with this bank account. For example Sarah J Latham |
| 7 | Account Number | Required for bank accounts | The account number associated with this bank account. Spaces are not allowed in this field. For example 12345678 |
| 8 | BSB Number | Required for bank accounts | The BSB associated with this bank account. For example 650000 |
| 9 | Email Address | No | The customer's contact email address. For example steve@stevescakes.biz.au Note: let your Westpac contact know if you wish to provide this field |
| 10 | Phone Number | No | The customer's contact phone number. For example 0412345678, +61421559774 Note: let your Westpac contact know if you wish to provide this field |
| 11 | Legacy Token | No | A pre-existing account token from the customer's existing vault. By default, QuickStream generates the account token value. If this field is provided, your facility must be configured to accept customer provided account tokens. For example 123456789, abc-123, ABC_123 Note: let your Westpac contact know if you wish to provide this field |
Sample file content:
"Customer Number", "Customer Name", "Cardholder Name", "Card Number", "Expiry Date", "Account Name", "Account Number", "BSB Number"
"100001", "Steve Smith", "Steven Smith", "4242424242424242", "0914", , ,
"100002", "Ava Trundle", "Ava J Trundle", "376000000000006", "0314", , ,
"100003", "Tim Johnson", "Tim Johnson", "5163200000000008", "0115", , ,
"100004", "Anna Johns", , , , "Anna Johns", "11110000", "650000"
"100005", "Sarah Latham", , , , "Sarah J Latham", "12345678", "650000"
"100006", "Mike Teo", , , , "Michael Teo", "111111", "032050"
Including contact information and account token:
"Customer Number", "Customer Name", "Cardholder Name", "Card Number", "Expiry Date", "Account Name", "Account Number", "BSB Number", "Email Address", "Phone Number", "Legacy Token"
"100001", "Steve Smith", "Steven Smith", "4242424242424242", "0914", , , , "steve@email.com", "+61421559774", "123456789"
"100002", "Ava Trundle", "Ava J Trundle", "376000000000006", "0314", , , , "ava@email.com", "61421559774", "abc-123"
"100003", "Tim Johnson", "Tim Johnson", "5163200000000008", "0115", , , , "tim@email.com", "0412345678", "ABC_123"
"100004", "Anna Johns", , , , "Anna Johns", "11110000", "650000" , "anna@email.com", "+61421559774", "11112222"
"100005", "Sarah Latham", , , , "Sarah J Latham", "12345678", "650000", "sarah@email.com", "61421559774", "xyz-456"
"100006", "Mike Teo", , , , "Michael Teo", "111111", "032050", "mike@email.com", "0412345678", "XYZ_456"
Registration response file format
This section describes the standard CSV format for the Registration Response File. QuickVault will generate this file every time it receives a Registration Request File. For every record in your Registration Request File there will be a matching record in the Registration Response File.
The format of your Registration Response File will depend on the format you used for your Registration Request File.
If you used the card accounts only format, your response file will use the format described in Cards only
If you used the bank accounts only format, your response file will use the format described in Bank accounts only
If you used the card and bank accounts format, your response file will use the format described in Cards and bank accounts
Cards only
The following table shows the format of the Registration Response File for cards only. This format is generated in response to the Registration Request File - Cards only.
| Column | Column Heading | Required | Description |
|---|---|---|---|
| 1 | Customer Number | Yes | The same value you provided in your request file. |
| 2 | Customer Name | Yes | The name of the customer that uses the card. This is the same value you provided in your request file. |
| 3 | Cardholder Name | Yes | The name printed on the card. This is the same value you provided in your request file. |
| 4 | Card Number | Yes | The masked card number. For security reasons this is not exactly the same as the value you provided in your request file. For example 424242...242 |
| 5 | Expiry Date | Yes | The date the card expires. Formatted as YYYY-MM. This is the same value you provided in your request file. |
| 6 | Response Code | Yes | This field will indicate whether the account was successfully registered. There are two possible values:
|
| 7 | QuickVault Token | No | For the single account model:
For the multiple account model:
|
Sample file content:
"Customer Number", "Customer Name", "Cardholder Name", "Card Number", "Expiry Date", "Response Code", "QuickVault Token"
"100001", "Steve Smith", "Steven Smith", "424242...242", "201409", "00",
"100002", "Ava Trundle", "Ava J Trundle", "376000...006", "201403", "14",
"100003", "Tim Johnson", "Tim Johnson", "516320...008", "201505", "00",
Bank accounts only
The following table shows the format of the Registration Response File for bank accounts only. This format is generated in response to the Registration Request File - Bank accounts only.
| Column | Column Heading | Required | Description |
|---|---|---|---|
| 1 | Customer Number | Yes | The same value you provided in your request file. |
| 2 | Customer Name | Yes | The name of the customer that uses this bank account. This is the same value you provided in your request file. |
| 3 | Account Name | Yes | The account name associated with this bank account. This is the same value you provided in your request file. |
| 4 | Account Number | Yes | The account number associated with this bank account. This is the same value you provided in your request file. |
| 5 | BSB Number | Yes | The BSB associated with this bank account. This is the same value you provided in your request file. |
| 6 | Response Code | Yes | This field will indicate whether the account was successfully registered. There are four possible values:
|
| 7 | QuickVault Token | No | For the single account model:
For the multiple account model:
|
Sample file content:
"Customer Number", "Customer Name", "Account Name", "Account Number", "BSB Number", "Response Code", "QuickVault Token"
"100004", "Anna Johns", "Anna Johns", "11110000", "650000", "00",
"100005", "Sarah Latham", "Sarah J Latham", "12345678", "650000", "00",
"100006", "Mike Teo", "Michael Teo", "111111", "032050", "00",
Cards and bank accounts
The following table shows the format of the Registration Response File for both cards and bank accounts. This format is generated in response to the Registration Request File - Cards and bank accounts.
| Column | Column Heading | Required | Description |
|---|---|---|---|
| 1 | Customer Number | Yes | The same value you provided in your request file. |
| 2 | Customer Name | Yes | The name of the customer that uses the card. This is the same value you provided in your request file. |
| 3 | Cardholder Name | Yes | The name printed on the card. This is the same value you provided in your request file. |
| 4 | Card Number | Yes | The masked card number. For security reasons this is not exactly the same as the value you provided in your request file. For example 424242...242 |
| 5 | Expiry Date | Yes | The date the card expires. Formatted as MMYY. This is the same value you provided in your request file. |
| 6 | Account Name | Yes | The account name associated with this bank account. This is the same value you provided in your request file. |
| 7 | Account Number | Yes | The account number associated with this bank account. This is the same value you provided in your request file. |
| 8 | BSB Number | Yes | The BSB associated with this bank account. This is the same value you provided in your request file. |
| 9 | Response Code | Yes | This field will indicate whether the account was successfully registered. For cards there are two possible values:
For bank accounts There are four possible values:
|
| 10 | QuickVault Token | No | For the single account model:
For the multiple account model:
|
Sample file content:
"Customer Number", "Customer Name", "Cardholder Name", "Card Number", "Expiry Date", "Account Name", "Account Number", "BSB Number", "Response Code", "QuickVault Token"
"100001", "Steve Smith", "Steven Smith", "424242...242", "0914", , , , "00",
"100002", "Ava Trundle", "Ava J Trundle", "376000...006", "0314", , , , "14",
"100003", "Tim Johnson", "Tim Johnson", "516320...008", "0115", , , , "00",
"100004", "Anna Johns", , , , "Anna Johns", "11110000", "650000", "00",
"100005", "Sarah Latham", , , , "Sarah J Latham", "12345678", "650000", "00",
"100006", "Mike Teo", , , , "Michael Teo", "111111", "032050", "00",
Requirements checklist
The purpose of this section is to help identify your requirements. Use the checklist as follows:
- Download the requirements checklist and rename it with your company name.
- Complete as much of the checklist as you can before your first meeting with Westpac.
- Use the checklist to understand the steps required to implement this product.