QuickVault Web Registration
QuickVault Web registration is a Westpac hosted service that captures customer account details and stores them securely inside QuickVault. These account details can then be used by any of your Westpac payment solutions.
This document describes the QuickVault solution and explains how to register accounts using the web registration option. High level requirements as well as detailed step-by-step instructions are included to help with the implementation process.
The intended audience for this document is the software development team responsible for integrating their systems with QuickVault.
What is QuickVault?
QuickVault is a Westpac service that allows you to store a customer's card details or bank account details securely outside of your system. This process is commonly referred to as preregistering customer account details with Westpac.
The primary purpose of QuickVault is to help your card solution become PCI DSS compliant. The term PCI DSS stands for Payment Card Industry Data Security Standard. It is a security standard that has a number of requirements for processing, transmitting and storing card details. QuickVault has attained Level 1 PCI DSS compliance - the highest level achievable. To learn more about PCI DSS visit https://www.pcisecuritystandards.org/security_standards/pci_dss.shtml.
Westpac offers a range of solutions for capturing account details and transmitting account details to QuickVault. The range includes:
- A variety of web based registration solutions
- An API registration solution
- A file based registration solution
This document focuses on the registration solution called web registration. For information about the other solutions please read the QuickVault Summary Guide.
What is web registration?
Web registration is a Westpac hosted service that captures customer account details and stores them securely inside QuickVault. These account details can then be used by any of your Westpac payment solutions.
To register an account, the customer will first log on to your website. Then at the appropriate time, your website will redirect the customer's browser to a QuickVault webpage. The customer will enter their account details and the account will be stored securely within QuickVault. Once registration is complete QuickVault will redirect the customer's browser back to your website.
The key features of web registration are:
- QuickVault produces the webpage that asks for the customer's account details.
- QuickVault's webpages are customised to look like your website, meaning most customers won't notice the transition from your website to QuickVault.
- Account details are submitted directly to QuickVault, meaning sensitive card details never enter your system.
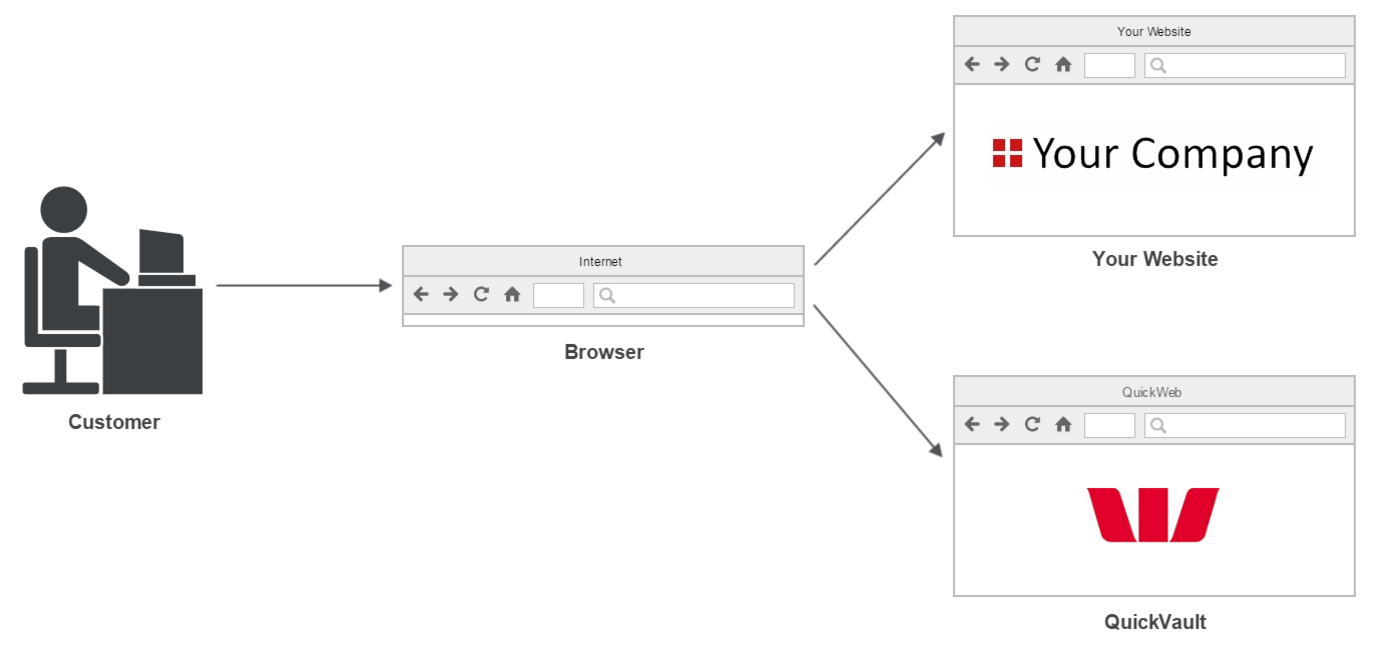
How does the registration process work?
The following diagram shows the sequence of events that take place when a customer wants to register an account.
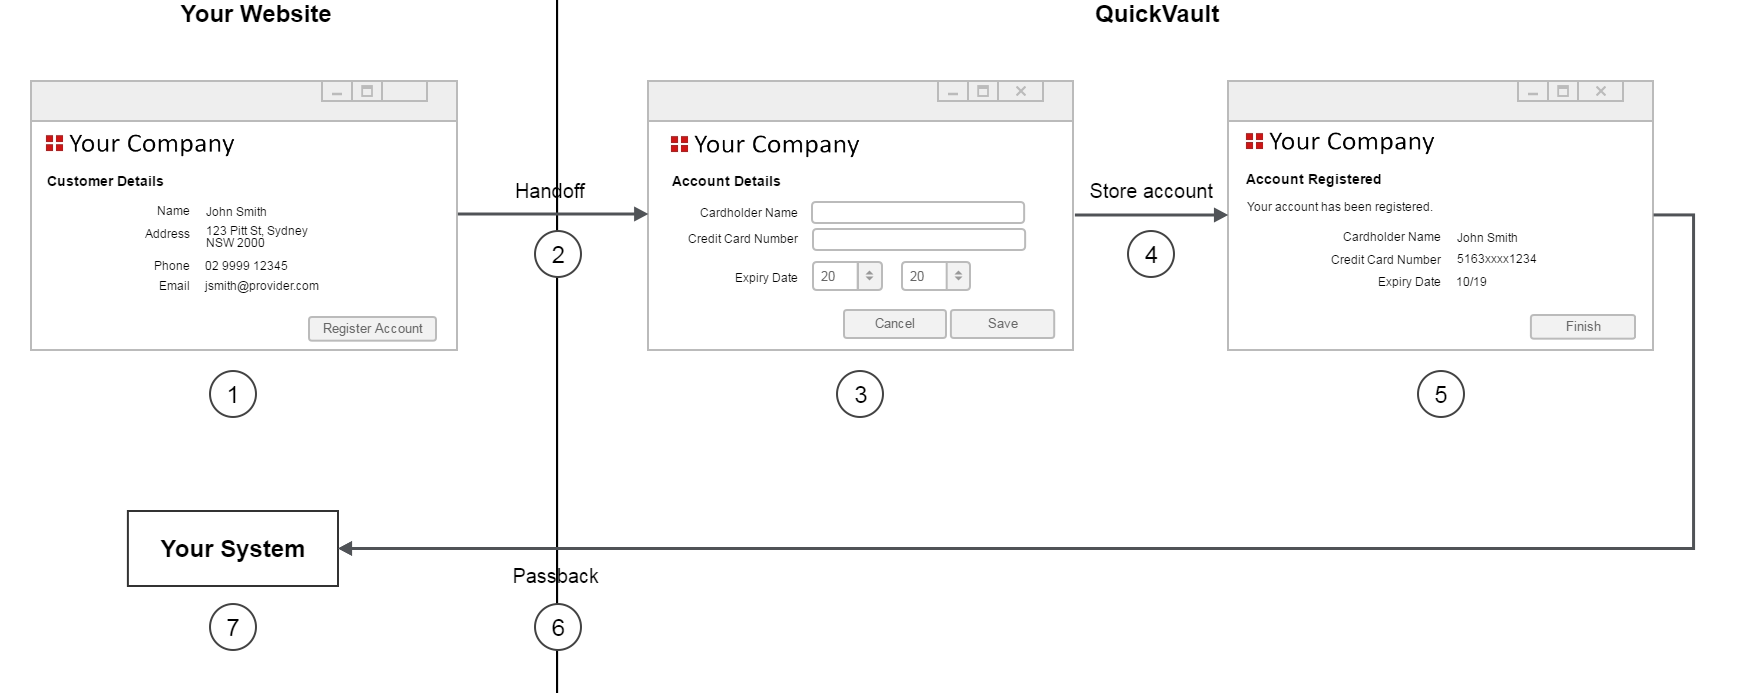
The steps for the above diagram are as follows:
| Step | Description |
|---|---|
| 1 | The customer visits your website. One of your webpages will include a button or a link to begin the registration process. |
| 2 | When the customer clicks the button your website will redirect the browser to QuickVault. This transition is known as the 'handoff'. Technical details for this process will be discussed in Linking from your website to QuickVault. |
| 3 | QuickVault displays the 'Account Details' page. This page asks the customer to enter their card details or bank account details. The content and branding of this page will be discussed in Branding QuickVault Web - Account Details Page |
| 4 | QuickVault stores the account. |
| 5 | QuickVault displays the 'Account Registered' page. This page includes a button linking back to your website. Note, it is not mandatory for QuickVault to show the 'Account Registered' page. If you prefer, you can display your own version of the page (or some other page). This option will be discussed further in Branding QuickVault Web - Account Registered Page. QuickVault can also provide a registration notification directly to your server at this point. This is known as the server-to-server postback and is discussed further in Receiving registration details. |
| 6 | QuickVault returns the customer back to your website. This is known as the 'passback'. Technical details for this process will be discussed in Linking from QuickVault back to your website. |
| 7 | Your website displays the appropriate page to the customer. |
Implementation process overview
There are a number of tasks involved in the implementation process:
- Kick-off meeting
- Identifying the account model
- Generating the account token
- Branding QuickVault
- Linking from your website to QuickVault
- Linking from QuickVault back to your website
- Receiving registration details
- Identifying expiring cards
- Testing
- Sign-off
- Production lodgement
- Go live
- Post implementation
To help with the implementation process, we have included a requirements checklist for you to complete as you work on each task.
The kick-off meeting is the first meeting between your organisation and Qvalent. This typically consists of a telephone conference with the relevant people from your organisation, Westpac and Qvalent. The purpose of this meeting is to, introduce the team members from each organisation, discuss the implementation process and discuss your requirements.
During testing, refer to:
After you have completed testing you must send a sign off email to your Westpac contacts. The email will state that you have successfully tested all aspects of the solution and you are ready for it to be moved into production. See a sample sign-off email.
During production lodgement:
Once production lodgement is complete and you are satisfied with the results of your low value tests in production you are ready to go live. The term "go live" represents the date you will make the solution available to your customers.
At this stage of the implementation process there are only a few tasks left to complete. They are:
- Before the go live date, communicate with your customers to inform them about the new payment process.
- On the go live date, update the appropriate page (or pages) on your website to make the new solution available to your customers.
After you go live, Qvalent and Westpac will closely monitor the solution. This is known as the "monitoring phase" and lasts for two weeks. During this time, if you have any questions or concerns about the solution you should communicate directly with your Qvalent implementation manager.
Once the two week monitoring phase is over the implementation process is officially complete. This is the post implementation period. Your Qvalent implementation manager will hand the solution over to the Qvalent helpdesk. The helpdesk will be responsible for day to day monitoring of the solution and resolving any issues that occur.
If you have any questions or concerns about the solution at this point contact the helpdesk: Technical support and system health.
See also:
Identifying the account model
One of the first tasks in the implementation process is to identify what type of account model you have. The account model identifies the number of accounts a customer is allowed to have. There are two options available. You can choose either:
Single account model
The single account model allows a customer to have one account registered. This account will be used every time the customer makes a payment. The account details can be replaced, but there can never be more than one account active.
The following diagram shows an example of the single account model.
In order for your solution to use the single account model all of your customers must be structured this way. If any of your customers have more than one active account you must use the multiple account model instead.
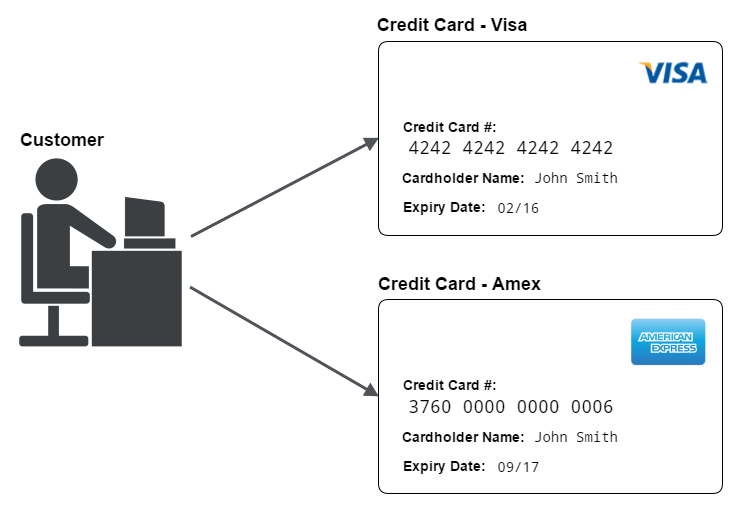
Multiple account model
The multiple account model allows a customer to have more than one account registered at the same time. This allows the customer to use different accounts for different situations.
For example, a customer may have two policies - policy1 and policy2. The customer may wish to pay for policy1 with a Visa card then pay for policy2 with an Amex card. Using the multiple account model you can register both cards in QuickVault. Then later, when it is time to make a payment, the appropriate card can be used.
Generating the account token
A token is a unique identifier for a particular account. It is a shared identifier, meaning your system and QuickVault will both agree to use this value when referring to the account. At the time of registration QuickVault will store the token alongside the account details. Then at the time of payment your system will provide this token to your Westpac payment solution so it can lookup the corresponding account details.
This section describes the different options available for generating the account token. These options vary based on the customer account model you chose in the previous section.
If you chose the single account model, see Tokens for the single account model. If you chose the multiple account model, see Tokens for the multiple account model.
Tokens for the single account model
In the single account model there are two ways to generate the account token. You can choose either:
- Client generated token
- QuickVault generated token
Client generated token
A client generated token is a value created by your system. It uniquely identifies a customer's account. For example, the account token may be the customer's reference number or member ID.
At the time of registration your system will provide the token to QuickVault so it can be stored alongside the account details. Then at the time of payment your system will provide the token to your Westpac payment solution so that the corresponding account details can be used.
The diagram below shows the high level steps involved when registering an account.

Registering with a client generated token (for single account model)
The steps for registering an account with a client generated token are as follows:
- The customer visits your website.
- When it is time to register an account, your system will handoff to QuickVault. During this step you will provide your account token to QuickVault (via the 'customerReferenceNumber' parameter). This token is a value that uniquely identifies the customer. For example, the customer reference number or member ID. Note, this diagram shows a simplified view of the handoff process. The actual handoff is more complex and involves a number of sub-steps. This will be discussed further below.
- The customer enters their account details into the QuickVault webpage.
- QuickVault stores the account token and account details.
- QuickVault sends the account token and a registration summary to your system. This is done via a server-to-server postback. The registration summary includes account details and a response code to indicate whether the account was successfully registered.
- Your system will retrieve the account token and response code from the registration summary. If the response code indicates the account was successfully registered you will:
- Use the account token to locate the customer in your system.
- Update the customer's details to indicate the account has been registered in QuickVault.
- Store some of the account details if necessary. For example, you should consider storing the card scheme if your system is going to calculate the card surcharge.
Registration is now complete. When it is time to make a payment, your system will provide the account token to your Westpac payment solution.
QuickVault generated token
A QuickVault generated token is a value that is created by QuickVault at the time of registration. It uniquely identifies a particular account. We recommend using this type of token rather than a client generated token if:
- Your system doesn't have a unique ID currently stored against each account, or
- Your system does have a unique ID, but it can only be provided at the time of registration - it cannot be provided at the time of payment. For example, you cannot change the software that is responsible for the payment process.
QuickVault can format the token in a number of ways. During the implementation process you will select your preferred format. This will be discussed in more detail in Formats for the QuickVault generated token.
Once the token is generated QuickVault will store it alongside the account details. A copy of the token will also be given to your system to store. Then at the time of payment your system will provide the token to your Westpac payment solution so that the corresponding account details can be used.
The diagram below shows the process for registering an account using a QuickVault generated token.
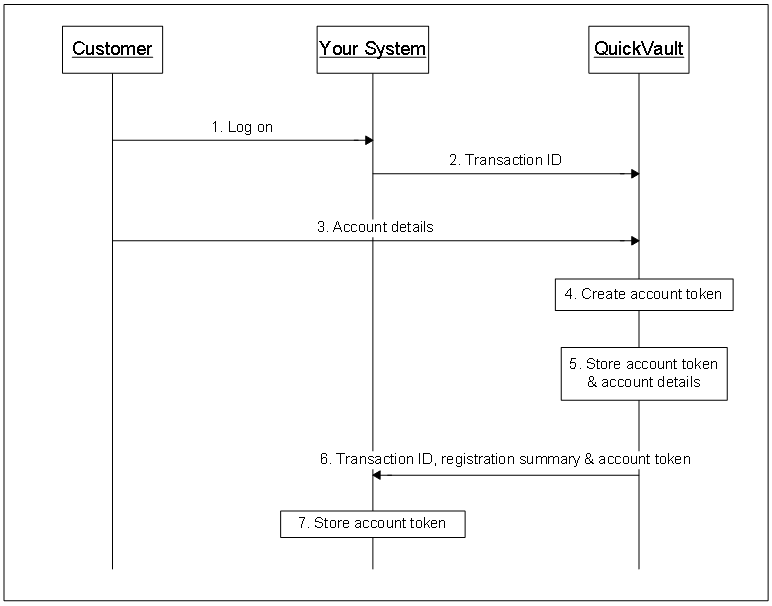
Registering with a QuickVault generated token (for single account model)
The steps for registering an account with a QuickVault generated token are as follows:
- The customer visits your website.
- When it is time to register an account, your system will handoff to QuickVault. During this step your system will provide a transaction ID to QuickVault (via the 'customerReferenceNumber' parameter). The transaction ID is a value that will allow you to match the response later in step 7. It is not the account token. QuickVault will not require this value in the payment process. The transaction ID may be any unique value, however we recommend providing a customer reference number if you can. Note, this diagram shows a simplified view of the handoff process. The actual handoff is more complex and involves a number of sub-steps. This is discussed further below.
- The customer enters their account details into the QuickVault webpage.
- QuickVault creates the account token. There are a number of ways this token can be formatted.
- QuickVault stores the account token and account details.
- QuickVault sends a registration notification to your system. The notification includes the transaction ID from step 2, a response code to indicate whether the account was successfully registered and the account token generated by QuickVault.
- Your system retrieves the transaction ID and response code from the registration notification. If the response code indicates the account was successfully registered you will:
- Use the transaction ID to locate the customer's account in your system.
- Store the account token
- Store some of the account details if necessary. For example, the card scheme (if your system is going to calculate the card surcharge).
Registration is now complete. When it is time to make a payment, your system will provide this account token to your Westpac payment solution.
Tokens for the multiple account model
A QuickVault generated token is a value that is created by QuickVault at the time of registration. It uniquely identifies a particular account. We recommend using this type of token rather than a client generated token if:
- Your system doesn't have a unique ID currently stored against each account, or
- Your system does have a unique ID, but it can only be provided at the time of registration - it cannot be provided at the time of payment. For example, you cannot change the software that is responsible for the payment process.
QuickVault can format the token in a number of ways. During the implementation process you will select your preferred format. This will be discussed in more detail in Formats for the QuickVault generated token.
Once the token is generated QuickVault will store it alongside the account details. A copy of the token will also be given to your system to store. Then at the time of payment your system will provide the token to your Westpac payment solution so that the corresponding account details can be used.
The diagram below shows the process for registering an account using a QuickVault generated token.
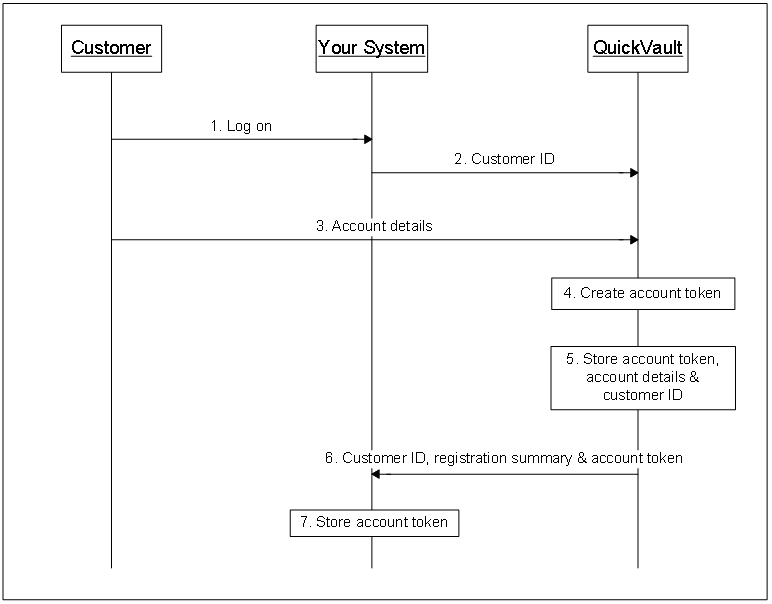
The steps for registering an account with this type of token are as follows:
- The customer visits your website.
- When it is time to register an account, your system will handoff to QuickVault. During this step your system will provide a customer ID (via the 'customerReferenceNumber' parameter). The customer ID is a value that represents the owner of the account. For example, a customer's reference number or member ID. Technical details for the handoff will be discussed further below.
- The customer enters their account details into the QuickVault webpage.
- QuickVault creates an account token. There are a number of ways the token can be formatted.
- QuickVault stores the account token, account details and customer ID.
- QuickVault sends a registration notification to your system. The notification includes the customer ID, a response code to indicate whether the account was successfully registered and the account token that was generated by QuickVault.
- Your system will retrieve the response code from the registration summary. If the response code indicates the account was successfully registered you will:
- Store the account token
- Store some of the account details if necessary. For example you may need to store the card scheme if your system is going to calculate a card surcharge.
Registration is now complete. When it is time to make a payment there are two options:
- Your system can provide a particular account token to your Westpac payment solution.
- If you are using QuickTerminal to make payments, a staff member can enter a customer ID to search for all the accounts associated with that customer, then select the appropriate account to use.
Branding QuickVault Web
This section describes the QuickVault webpages that are involved in the registration process and explains how we can tailor their appearance and behaviour to meet your needs. This process is referred to as 'branding QuickVault'.
Branding is a task we like to complete in the early stages of the implementation. It allows us to identify your needs and develop a working set of webpages for you to examine in our test environment. This will then allow you to quickly identify any issues and provide us with feedback.
In general it takes 6 weeks to develop a branded set of QuickVault webpages. This will vary depending on your requirements. We also expect there will be 2-3 iterations before the final release.
Defining requirements
There are a number of decisions that need to be made during the branding process. These include:
- The layout of the page
- The size and location of images
- The name and position of buttons and links
- The size and font of the text
- The data you want your customer to enter in QuickVault
- The data you want your customer to enter in your website rather than QuickVault
- Whether there is additional data you want to pass from your website and have QuickVault display
- Whether QuickVault is to display the Account Registered page or your system is to display its own version of the page
There are three ways you can provide us with your branding information:
-
Provide the URL of your existing website for us to copy
If you would like to have the same look and feel as your existing website, you can provide us with the URL of your website. We will then use your website as our branding guideline for developing your QuickVault pages.
-
Provide a branding guide for us to use
If your business has a branding guide or a style guide for website development and you would like us to follow that guide, send us a copy of your branding guide. We will then use this as our branding guideline for developing your QuickVault pages.
-
Provide a branded version of the QuickVault click-through
QuickVault webpages
This section describes the QuickVault webpages that are involved when registering a card or bank account. Sample screenshots have been included to help describe each page. These are example screenshots only, as part of the branding process we can change the look and feel of the page, the data we show to the customer and the data we request from the customer.
The basic QuickVault webpages are:
Account details page
This is the first page QuickVault will display to the customer.
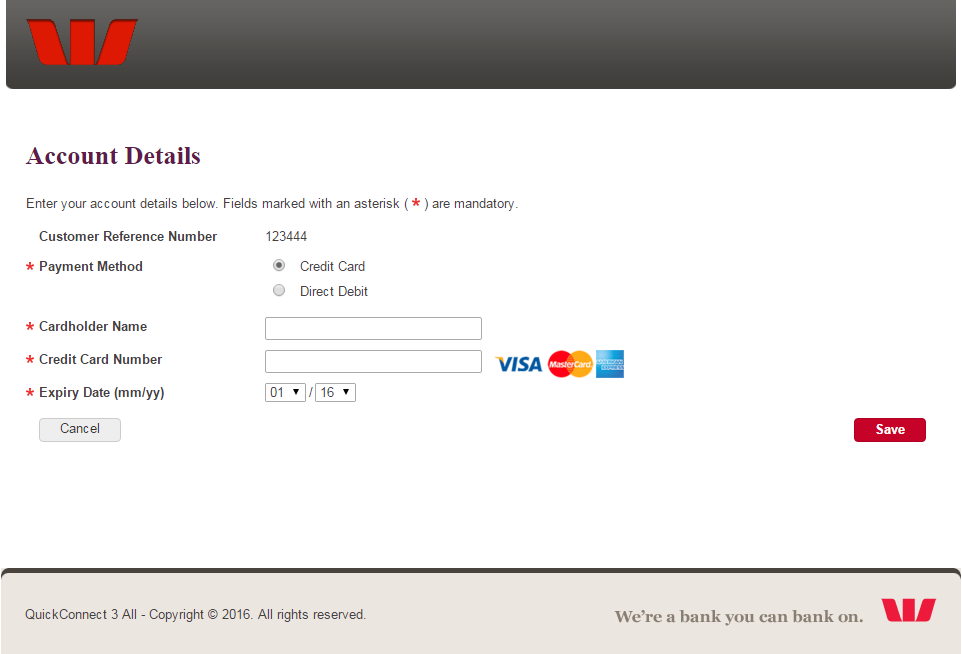
Account Details Page - Cards
The fields for the 'Account Details' page are described in the following table:
| Field | Details |
|---|---|
| Customer Reference Number | The customer reference number as provided in during the handoff. |
| Cardholder Name | The name on the front of the card. |
| Card Number | The number on the front of the card. We also recommend having the list of accepted cards displayed on this page. This is particularly useful if certain cards are not accepted (for example Amex). |
| Expiry Date | The expiry date printed on the customer's card. A date format of (mm/yy) is shown with this field. |
Additional information:
- The 'Cancel' button will take the customer back to your website.
- The 'Save' button will instruct QuickVault to attempt the registration.
- If the registration is unsuccessful an error message will be displayed.
- If the registration is successful the Account Registered page will be displayed. You can choose to have QuickVault display this page or you can display your own version of the page.
- QuickVault can provide your server with a registration summary at this point. See Server to server notification.
Account registered page
This page is shown after the card is registered. You can choose to have QuickVault display the page or if you prefer you can display your own version of this page.
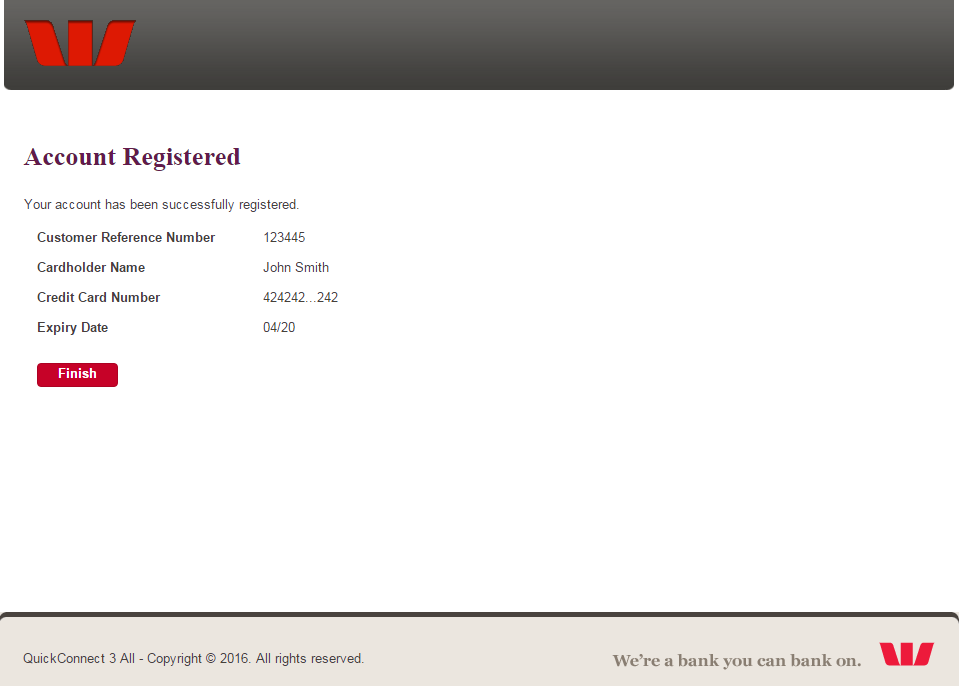
Account Registered Page - Cards
The data on this page is described in the following table:
| Field | Details |
|---|---|
| Customer Reference Number | The customer reference number as provided in during the handoff. |
| Cardholder Name | The cardholder name the customer entered on the Account Details page. |
| Card Number | The card number the customer entered on the Account Details page. For security reasons we do not display the entire card number. |
| Expiry Date | The expiry date the customer entered on the Account Details page. |
Additional information:
- The 'Finish' button will take the customer back to your website.
QuickVault webpages for bank accounts
This section describes the webpages responsible for bank account registrations. Similar to card registrations, these pages can be branded to match your existing website.
There are 2 QuickVault webpages that take part in the registration process. They are:
- Account Details page
- Account Registered page
Account details page
This is the first page displayed to the customer when registering a bank account.
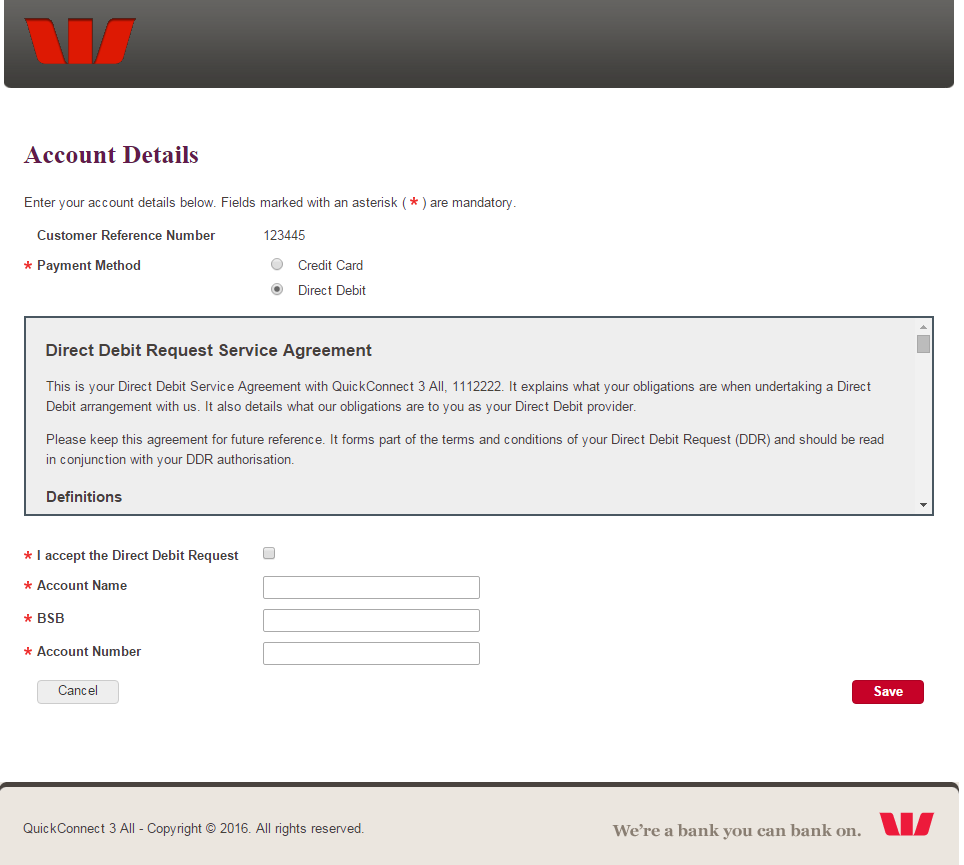
Account Details Page - Bank Accounts
The fields for the 'Account Details' page are described in the following table:
| Field | Details |
|---|---|
| Customer Reference Number | The customer reference number as provided in during the handoff. |
| Account Name | The name associated with the customer's bank account. |
| BSB | The BSB associated with the bank account. |
| Account Number | The account number associated with the bank account. |
Additional information:
- A Direct Debit Request (DDR) Service Agreement is required for bank account registrations. It is written by your organisation and outlines the terms and conditions for making direct debit payments.
- The customer must agree to the terms and conditions before saving their account details. This is done by ticking the checkbox that is positioned under the service agreement.
- The 'Cancel' button will take the customer back to your website.
- The 'Save' button will instruct QuickVault to attempt the registration.
- If the registration is unsuccessful an error message will appear.
- If the registration is successful the Account Registered page will be displayed. You can choose to have QuickVault display this page or you can display your own version of the page.
- QuickVault can provide your server with a registration summary at this point. This feature is discussed in Receiving registration details from QuickVault.
Account registered page
This page is shown after the bank account is registered. You can choose to have QuickVault display the page or if you prefer you can display your own version of this page.
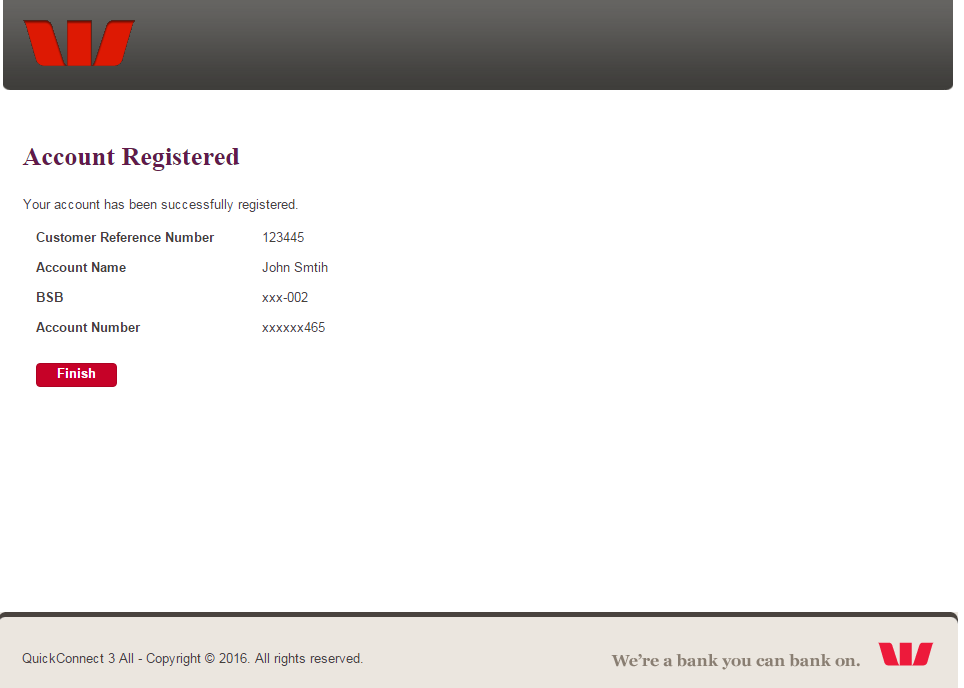
Account Registered Page - Bank Accounts
The data on this page is described in the following table:
| Field | Details |
|---|---|
| Customer Reference Number | The customer reference number as provided in during the handoff. |
| Account Name | The account name the customer entered on the Account Details page. |
| BSB | The BSB number entered on the Account Details page. For security reasons we do not display the full BSB number. |
| Account Number | The account number entered on the Account Details page. For security reasons we do not display the full account number. |
Additional information:
- The 'Finish' button will take the customer back to your website.
QuickVault test poster
The test poster is a webpage that allows you to easily access the QuickVault registration pages in our test environment. The test poster is for the test environment only. It will not exist in the live production environment. The purpose of this webpage is to simulate the handoff from your website to QuickVault. This means you can review the branded QuickVault pages before you implement your handoff.
The following screenshot is an example of a test poster.

QuickVault Web Test Poster
The test poster is divided into two sections:
-
The top section lists the parameters we expect your server to pass to QuickVault in the first part of the handoff (ie the secure token request. See Linking from your website to QuickVault).
When the 'Generate Token' button is clicked the webpage will generate a session token and place it in the 'token' field (shown in the bottom section).
-
The bottom section lists the parameters we expect the customer's browser to pass to QuickVault in the second part of the handoff (i.e. the browser redirect. See Linking from your website to QuickVault). After you click the 'Submit' button the QuickVault 'Account Details' page will appear.
Note, this is an example test poster only. The list of parameters in your test poster may vary depending on your requirements.
Linking from your website to QuickVault
The purpose of this section is to explain in detail how to link your website to QuickVault. This process is known as the 'handoff'. A high level description of the handoff can be seen in How does the registration process work.
As part of the handoff your system will send a list of parameters to QuickVault. This is done via a secure token request.
Sending parameters via secure token request
The secure token request allows parameters to be sent directly from your server to QuickVault. This prevents parameters from being tampered with before being sent to QuickVault.
In order to use the secure token request your website must have:
- a dynamic backend which can send a HTTPS POST directly to the QuickVault server
- the ability to make an outbound HTTPS connection to QuickVault through your proxy and firewall
The parameters for this handoff are listed in Handoff parameters.
To help explain the handoff two diagrams have been included:
The first shows the handoff from your customer's point of view.
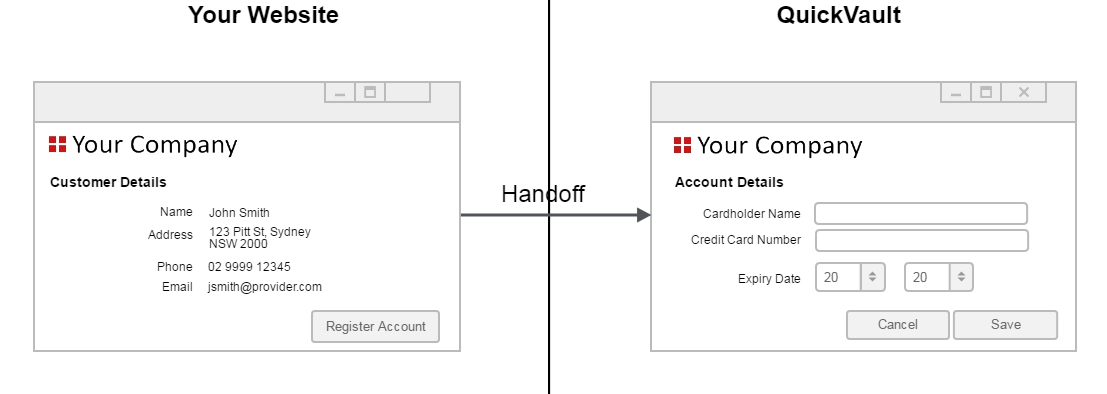
The second is a sequence diagram showing each of the technical steps involved in the handoff process.
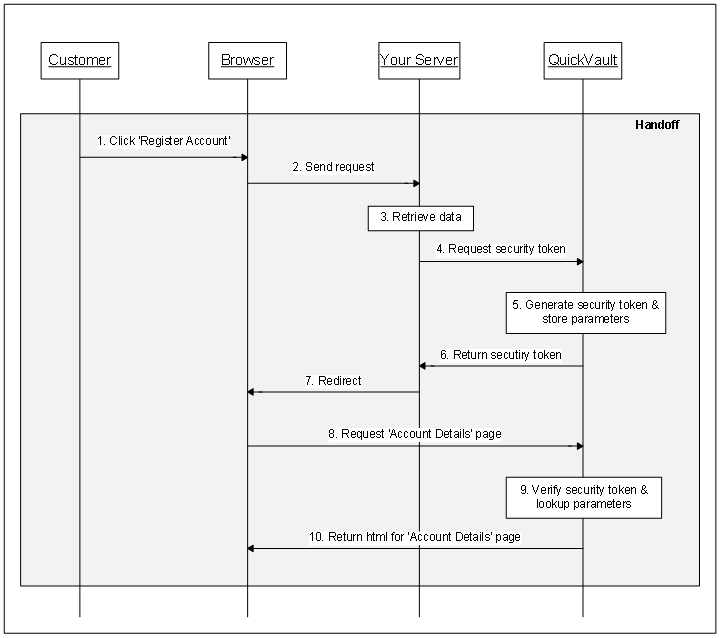
The steps for the handoff are as follows:
-
Click 'Register account'
After your website displays the 'Customer Details' page the customer clicks the 'Register account' button. The handoff begins here.
-
Send request
The customer's browser sends a request to your server to initiate the handoff.
-
Retrieve data
Your server retrieves all the data that needs to be passed to QuickVault. It then builds a parameter list that will be sent to QuickVault as part of the secure token request. For more detail see Parameters for the secure token request.
-
Request security token
Your server makes an outbound HTTPS connection to the QuickVault server. The parameter list from the previous step is included in the request.
-
Generate security token & store parameters
QuickVault generates a security token and stores your parameter list. A unique security token is created for every request. For example:
token=m378813qtvOtylVTvVvpWA7PT14QHltr-AqX2gZ-RFMThe security token is valid for 1 hour after it is created and can only be used once.
-
Return security token
QuickVault returns the security token to your sever.
-
Redirect
Your server tells the customer's browser to redirect to QuickVault. A list of parameters is included in the redirect. For details see Passback parameters.
-
Request 'Account Details' page
The customer's browser redirects to QuickVault. The list of parameters from the previous step is included in the redirect.
-
Verify security token & lookup parameters
QuickVault checks the security token to make sure it hasn't been tampered with. It then uses this token to lookup the parameters that your server passed to QuickVault during the token request (see steps 4 and 5). The token is then destroyed.
-
Return html for 'Account Details' page
QuickVault produces html for the 'Account Details' page and sends it to the customer's browser.The handoff ends here.
Linking from QuickVault back to your website
This section explains how the customer can return to your website after registering an account with QuickVault. This process is known as the 'passback'. A high level description of the passback can be seen in How does the registration process work?.
There are two ways the customer can return to your website. Once the account is registered you can have either a:
QuickVault webpage with a link to your website
With this option, QuickVault will display an 'Account Registered' page after the account is registered. This page tells the customer the account has been successfully registered and includes a button that links back to your website. The passback occurs when the customer clicks that button.
The diagram below is an example of what QuickVault will display to the customer.
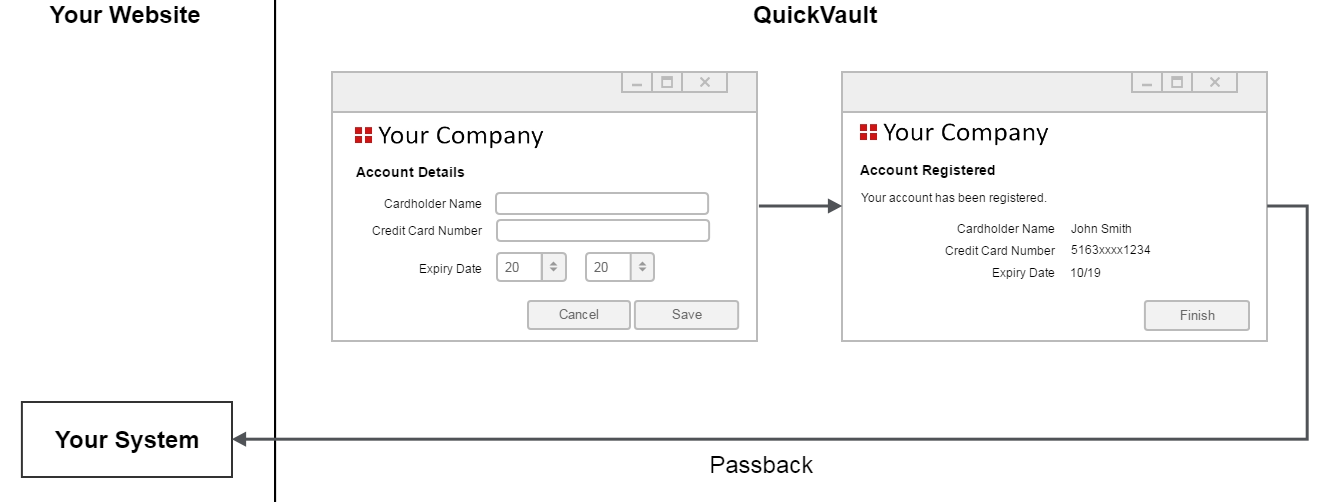
The sequence diagram below shows the technical steps that take place during the passback.
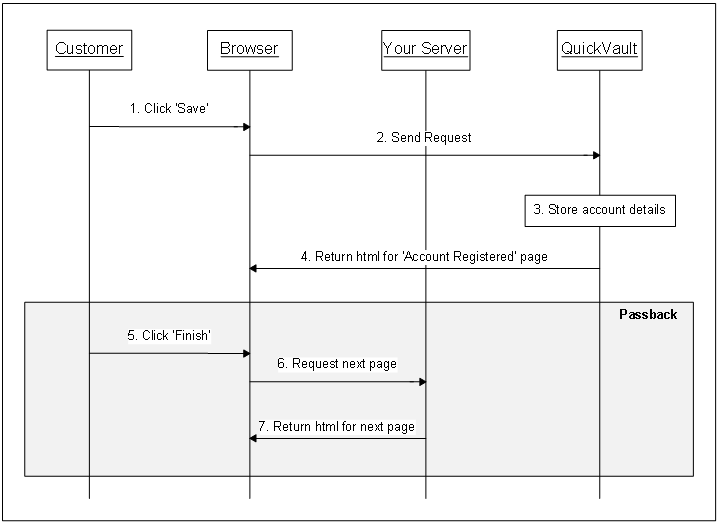
The steps for the above sequence diagram are:
-
Click 'Save'
The customer enters their account details into the 'Account Details' page then clicks 'Save'.
-
Send request
The customer's browser sends the request to QuickVault.
-
Store account details
QuickVault stores the customer's account details.
-
Return html for 'Account Registered' page
QuickVault builds the html for the 'Account Registered' page. The page includes a button that links back to your website. The button will link to the
returnUrlyou provided in the handoff (see Linking from QuickVault back to your website for details about the handoff). QuickVault returns the html to the customer's browser. -
Click 'Finish'
The customer views QuickVault's 'Account Registered' page. When they have finished reading the details they click the 'Finish' button. The passback begins here.
-
Request next page
The customer's browser asks your server for the next page.
-
Return html for next page
Your server returns the html for the next page. The passback ends here.
QuickVault redirect immediately to your website
With this option, QuickVault will return the customer to your website immediately after the account is registered. Your website will then show its own 'Account Registered' page (or your preferred page). QuickVault will include a number of parameters in the redirect. They will be included as a list of ampersand delimited parameters.
The parameters that QuickVault will return in the passback are listed in Passback parameters.
Important
These parameters are for display purpose only. Do not use them as a method to track registrations. Reasons for this include:
- The redirect is unreliable. It involves the customer's browser therefore anything that causes the browser not to redirect would prevent your website from receiving the parameters.
- The browser could potentially send more than one request to your website.
The diagram below is an example of what QuickVault will display to the customer if you choose this option.
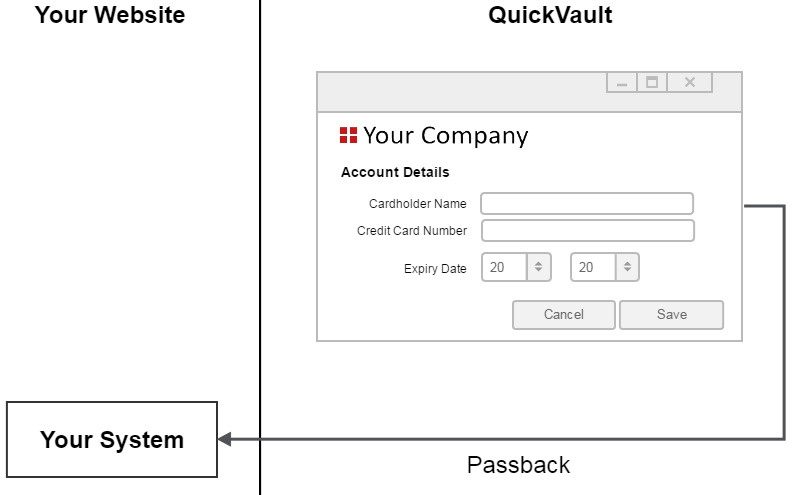
The sequence diagram below shows the technical steps that take place during the passback.
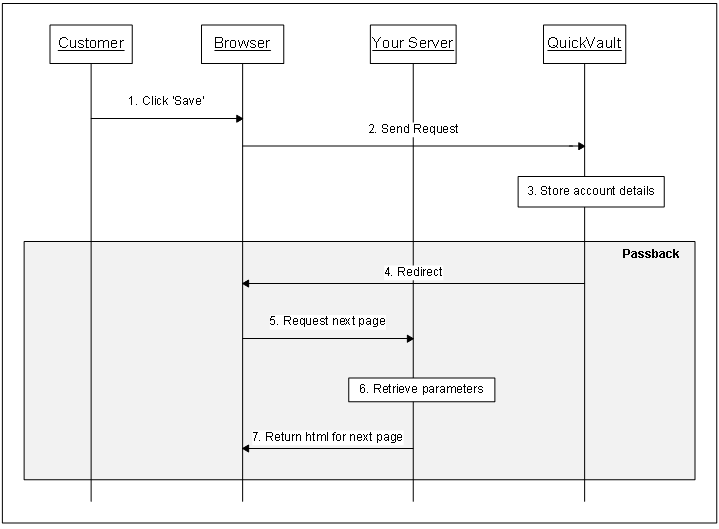
The steps for the above sequence diagram are:
-
Click 'Save'
The customer enters their account details into the 'Account Details' page then clicks 'Save'.
-
Send request
The customer's browser sends the request to QuickVault to register the account.
-
Store account details
QuickVault stores the account details.
-
Redirect
The passback begins here.
QuickVault builds a list of parameters to include in the redirect. They are included as a list of ampersand delimited parameters. For example:
CommunityCode=ACOMPANY&SupplierBusinessCode=ACOMPANY&...For the full list of parameters see Passback parameters.
QuickVault then instructs the customer's browser to redirect to the returnUrl (a value provided earlier in the handoff). Our default method for sending data is via HTTP get. If you prefer a HTTP post please advise your implementation manager.
-
Request next page
The customer's browser redirects to your server's returnUrl.
-
Retrieve parameters
Your server retrieves the parameters from the request. It then uses this data to build the html for the 'Account Registered' page (or a different page if you prefer).
-
Return html for next page
Your server returns the html for the 'Account Registered' page to the customer's browser.
The passback ends here.
Receiving registration details
QuickStream provides two ways to receive registration details:
Server to server notification
This option is also known as the server-to-server postback. It allows you to receive registration summary details immediately after each registration is made. This is done via a HTTPS POST from QuickStream to your server. QuickStream can post the details as form parameters or as XML.
Refer to Server to server notification.
Parameters in the server to server notification
These parameters are passed from QuickStream to your server in the Server to server notification:
product=QUICKVAULTcommunityCodesupplierBusinessCodeconnectionType=QUICKWEBcustomerReferenceNumbercardholderNamemaskedCardNumberexpiryDateMonthexpiryDateYearcardSchemebsbaccountNumberaccountNamepreregistrationCode- Custom fields
Registered accounts report
At the end of each day QuickVault can provide you with a Registered Accounts Report. The report lists all the accounts that have been registered throughout the day. It can be provided for any of the registration solutions, however it is mainly used for Web registration, QuickConnect registration and Portal registration.
QuickVault will generate the report at 12am each night. You can then upload the report into your system and reconcile the data against notifications you received earlier in the day.
QuickVault offers a standard file format. See Registered accounts report.
Manage your security settings
Refer to QuickStream user guide - Security settings to manage the following security settings in QuickStream:
- Whitelist the IP addresses for the Secure Token Requests
- Whitelist the domain addresses for the Server to server notification
- View your connection details, including your credentials for authentication with QuickStream.
Identifying expiring cards
QuickVault's Expiring Cards Report provides you with a list of cards that are due to expire. QuickVault will generate the report at the start of each month. You can then upload the report into your system and notify your customers about their expiring cards.
QuickVault offers a CSV file format containing the expiring card details and account token. See Expiring cards report.
Handoff parameters
This section lists the parameters you can pass to QuickVault during the handoff. Parameters are sent to QuickVault in two separate calls. There are:
Parameters for the secure token request
The following table lists the parameters that can be passed to QuickVault during the secure token request. See Linking from QuickVault back to your website.
These parameters are passed to QuickVault in a Secure token request. Sign in to QuickStream to get these values and URLs in each environment. See View your connection details.
Mandatory parameters
usernamepasswordsupplierBusinessCodeconnectionType=QUICKWEBproduct=QUICKVAULT
Optional parameters
customerReferenceNumberaccountTypereturnUrlcancelUrlserverReturnUrlerrorEmailToAddresscustom<Custom name>
Refer to Secure token request for the full specification.
Parameters for the redirect
These parameters are passed to QuickWeb in the redirect after receiving a token from the Secure token request. Sign in to QuickStream to get the communityCode value and URL in each environment. See View your connection details.
communityCodetoken
Refer to Parameters for the handoff for the full specification.
Passback parameters
The following table lists the parameters that QuickVault will return in the passback. You can then present this data to your customer. For more details about the passback see Linking from QuickVault back to your website.
These parameters are passed back from the system when the process is completed.
communityCodesupplierBusinessCodeactioncustomerReferenceNumbermaskedCardNumbercardholderNamecardSchemeexpiryDateMonthexpiryDateYearaccountNameaccountNumberbsbpreregistrationCodehmac- Refer to Validating the HMAC.custom<Custom name>
Refer to Passback for the full specification.