QuickConnect
QuickConnect is a Westpac hosted service that enables your website to offer secure online payments.
The key features of the QuickConnect solution are:
Your system displays all the web pages (unlike QuickWeb which requires card details to be entered into a Westpac hosted web page).
The customer's browser sends the payment details directly to QuickConnect. This means sensitive card details never enter your system (unlike QuickGateway which requires card details to enter your system before being sent to Westpac).
To make a payment, the customer will visit your website and enter their card details into one of your web pages. When the page is submitted, the customer's browser will send the card details directly to QuickConnect. QuickConnect will make the payment using Westpac's payment processor, then redirect the customer's browser back to your website to display the receipt page.
This document describes the QuickConnect solution and explains how it can integrate with your existing website to make payments. High-level requirements, as well as detailed step-by-step instructions, are included to help with the implementation process.
The intended audience for this document is the software development team responsible for integrating your systems with QuickConnect.
Payment process
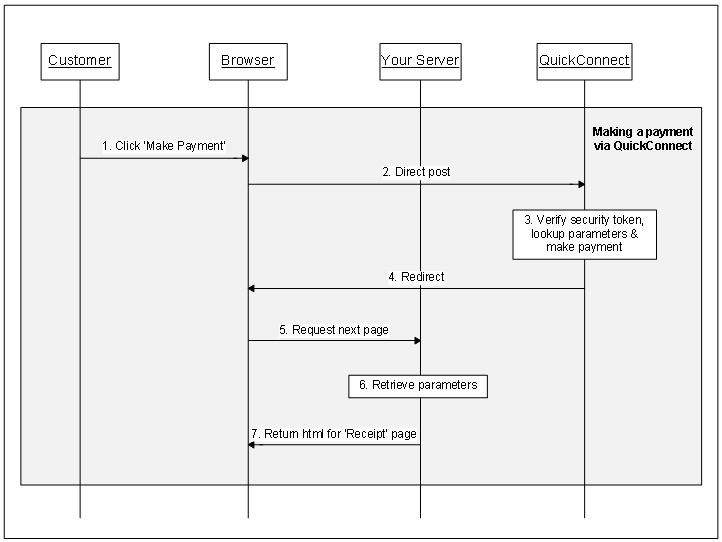
The following diagram shows the sequence of events that take place when a customer makes a payment.
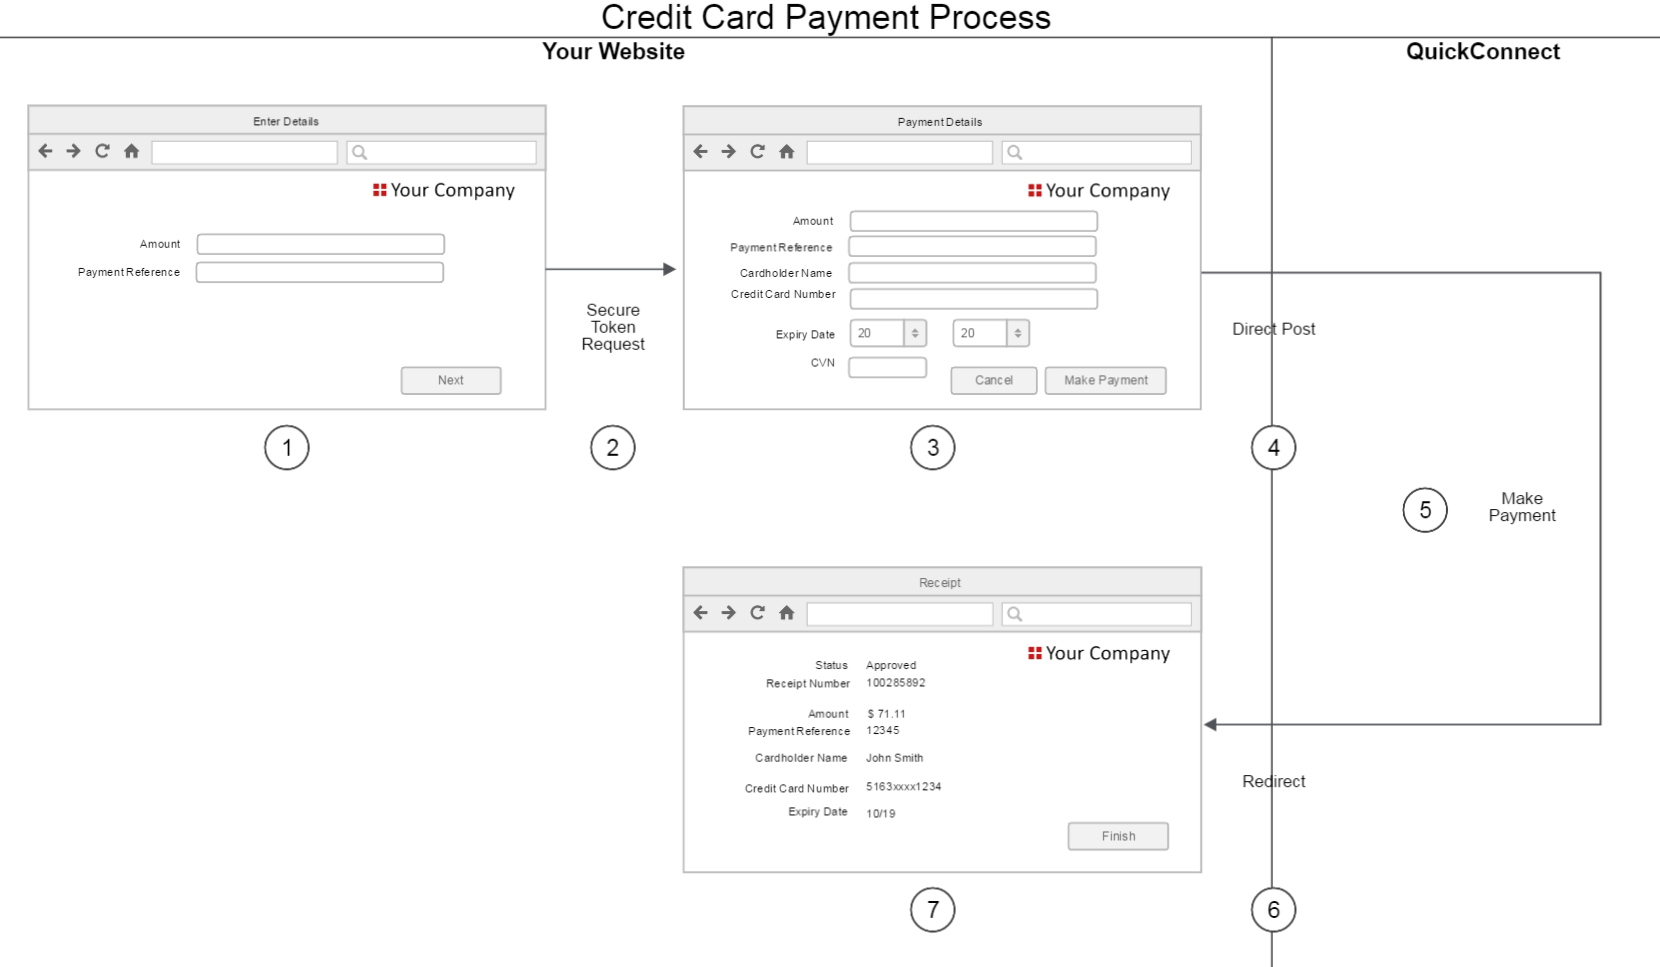
The steps for the above diagram are:
| Step | Description |
|---|---|
| 1 | The customer visits your website. One of your web pages will include a button to begin the payment process. |
| 2 | When the customer clicks the button your system will prepare the 'Payment Details' page. To do this you must first retrieve a security token from QuickConnect. You will then include this security token in a hidden field within the 'Payment Details' page. Technical details for this process will be discussed in Parameters for the direct post. |
| 3 | The customer enters their account information into the 'Payment Details' page. |
| 4 | When the 'Make Payment' button is clicked the customer's browser will post the account details directly to QuickConnect. The account details will not enter your system. This process is discussed in Making a payment. |
| 5 | The payment is attempted. Refer to Transaction processing and settlement and Transaction Response Codes. |
| 6 | QuickConnect redirects the customer's browser back to your website. This process is discussed in Making a payment. QuickConnect can also provide a notification directly to your server at this point. The purpose of this message is to let you know the payment was successful and provide you with a summary of the payment. |
| 7 | Your website displays the 'Receipt' page to the customer. |
Implementation process
There are a number of tasks involved in implementing a QuickConnect solution during a project.
- Kick-off meeting
- Displaying the 'Payment Details' page
- Making a payment
- Receiving payment details from QuickConnect
- Testing
- Sign off
- Production lodgement
- Go live
- Post implementation
The kick-off meeting is the first meeting between your organisation and Qvalent. This typically consists of a telephone conference with the relevant people from your organisation, Westpac and Qvalent.
The purpose of this meeting is to, introduce the team members from each organisation, discuss the implementation process and discuss your requirements.
During testing, refer to:
After you have completed testing you must send a sign off email to your Westpac contacts. The email will state that you have successfully tested all aspects of the solution and you are ready for it to be moved into production. See a sample sign-off email.
During production lodgement:
Once production lodgement is complete and you are satisfied with the results of your low value tests in production you are ready to go live. The term "go live" represents the date you will make the solution available to your customers.
At this stage of the implementation process there are only a few tasks left to complete. They are:
- Before the go live date, communicate with your customers to inform them about the new payment process.
- On the go live date, update the appropriate page (or pages) on your website to make the new solution available to your customers.
After you go live, Qvalent and Westpac will closely monitor the solution. This is known as the "monitoring phase" and lasts for two weeks. During this time, if you have any questions or concerns about the solution you should communicate directly with your Qvalent implementation manager.
Once the two week monitoring phase is over the implementation process is officially complete. This is the post implementation period. Your Qvalent implementation manager will hand the solution over to the Qvalent helpdesk. The helpdesk will be responsible for day to day monitoring of the solution and resolving any issues that occur.
If you have any questions or concerns about the solution at this point contact the helpdesk: Technical support and system health.
See also:
Displaying the payment details page
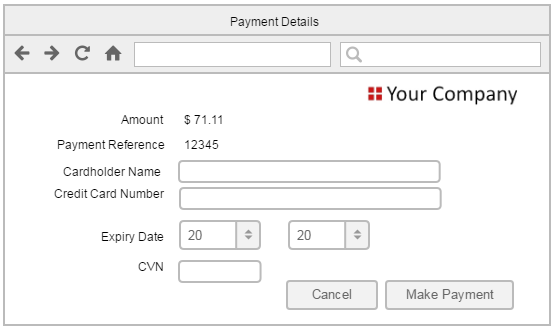
The 'Payment Details' page is a webpage generated by your system. The purpose of the page is to capture your customer's card details and submit them securely to QuickConnect.
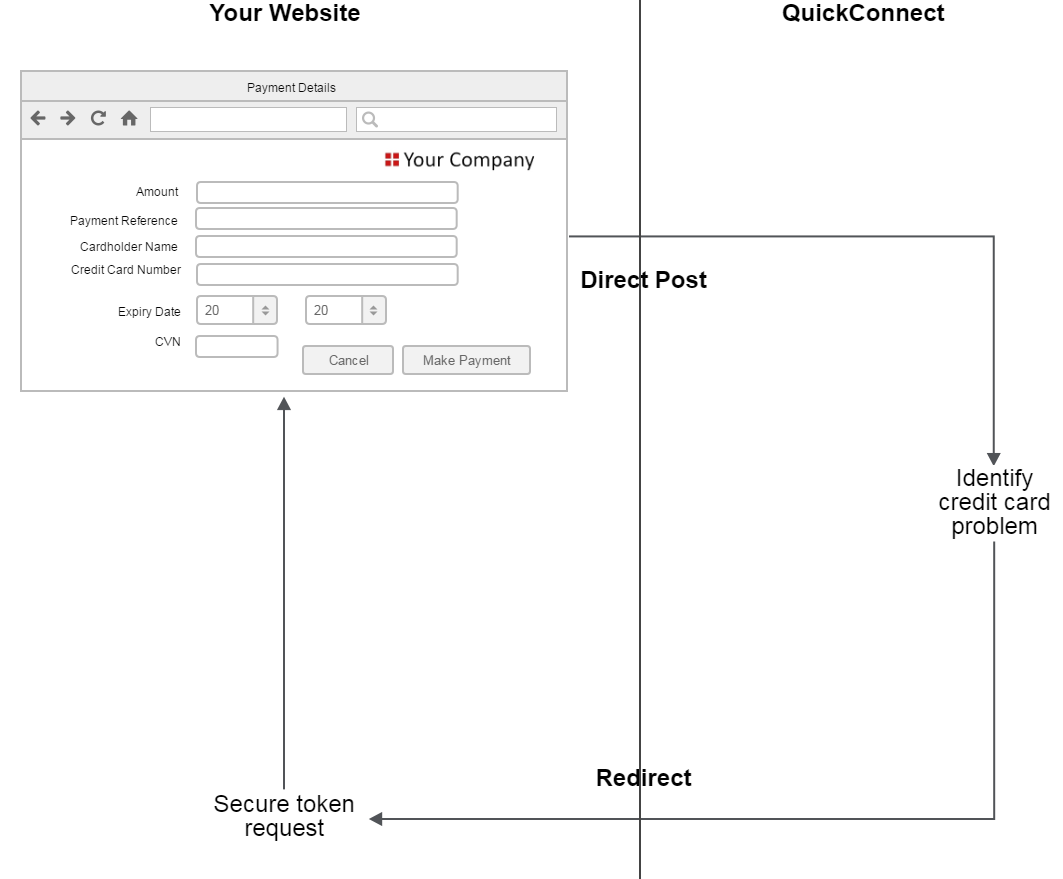
Credit card payments The 'Payment Details' page for cards will include fields for:
- Cardholder name
- Credit card number
- Expiry date
- CVN
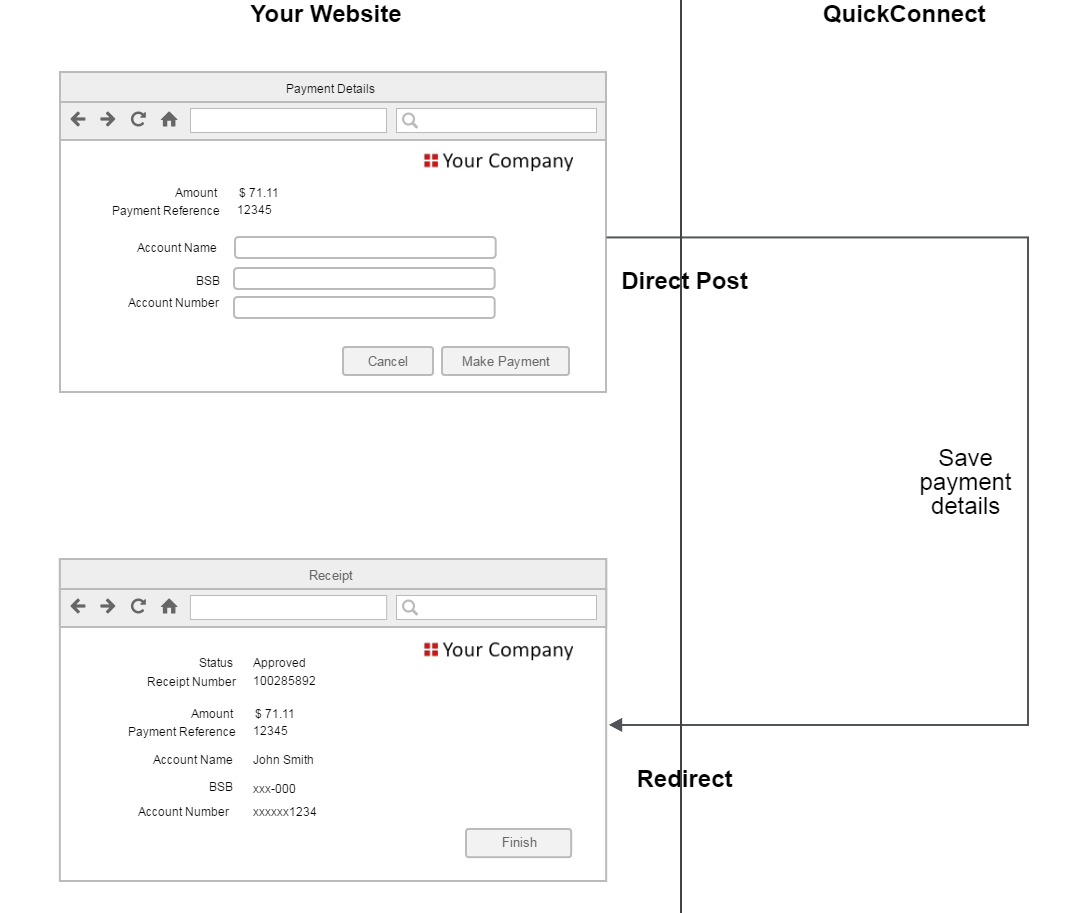
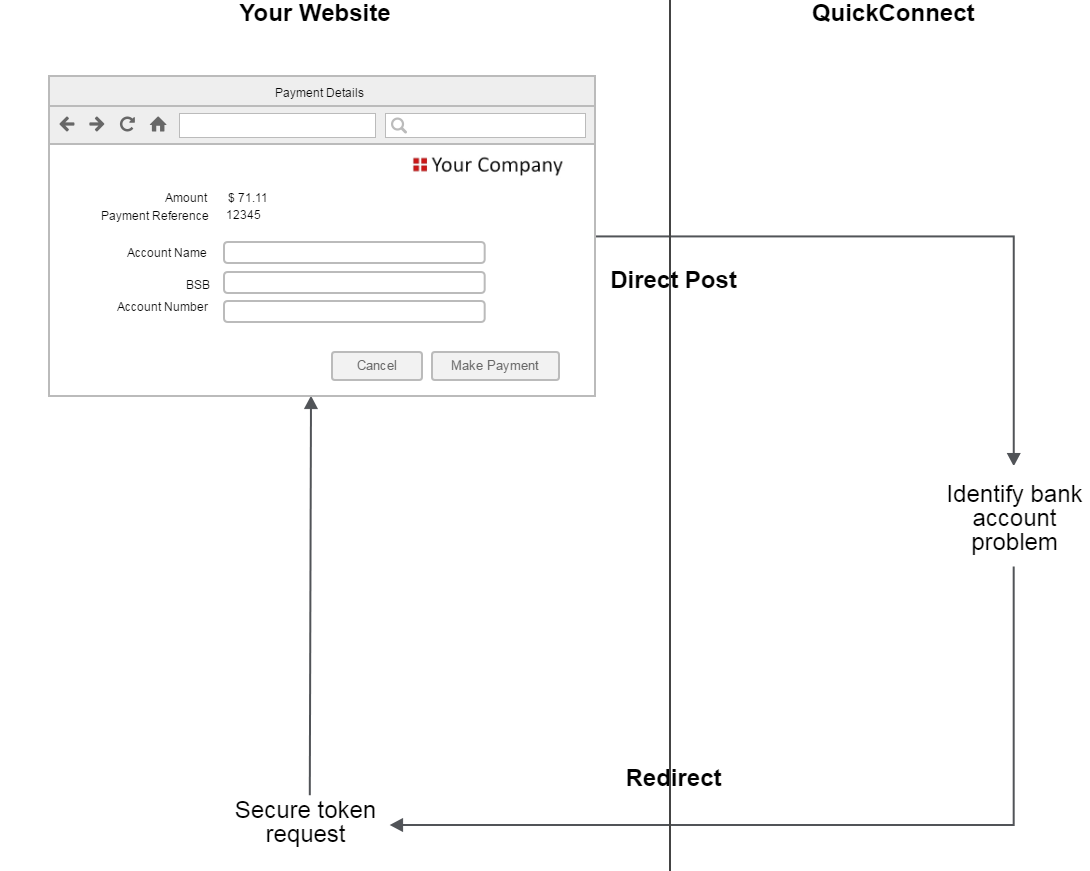
Bank account payments The 'Payment Details' page for bank accounts will include fields for:
- Account name
- BSB
- Account number

There are a number of steps involved in displaying the 'Payment Details' page. The QuickConnect payment solution requires parameters to be sent to QuickConnect in two separate calls. There are:
Send parameters via secure token request
The secure token request is a message sent directly from your server to QuickConnect. It occurs immediately before you display the 'Payment Details' page (shown earlier in Figure 2 step 2). The purpose of the secure token request is to prevent parameters from being tampered with. Most parameters will be sent to QuickConnect using the secure token request. See Secure token request parameters.
In order to use the secure token request your website must have:
- a dynamic backend which can send a HTTPS POST directly to the QuickConnect server
- the ability to make an outbound HTTPS connection to QuickConnect through your proxy and firewall
Parameters for the direct post
The direct post is a message sent directly from the customer's browser to QuickConnect. It occurs after the customer clicks the 'Make Payment' button on the 'Payment Details' page (shown earlier in Figure 2 step 4). The purpose of the message is to send the customer's card details to QuickConnect without entering your system.
There are a number of parameters included in the direct post. They relate to either:
- Input fields are shown on the 'Payment Details' page (for example the cardholder name, card number, expiry date and CVN)
- Hidden fields included within the 'Payment Details' page (for example the secure token)
See Direct post parameters for the full list of parameters that need to be included on the 'Payment Details' page.
The following sequence diagram shows all the steps required to display the 'Payment Details' page (shown in Figure 2).
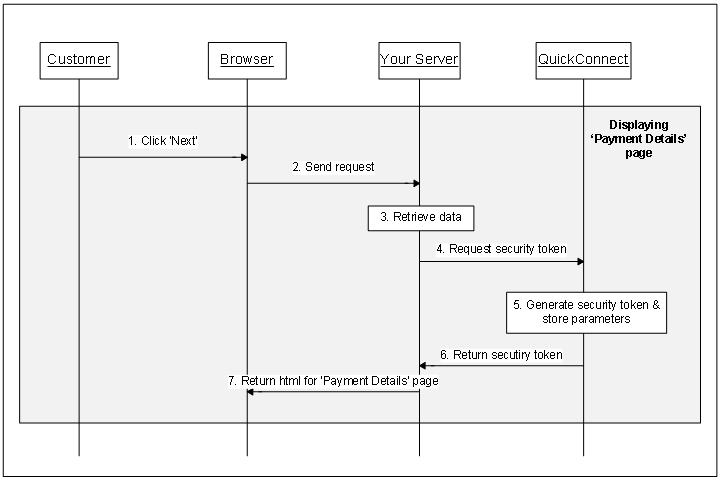
Figure 4 Sequence diagram for displaying the 'Payment Details' page
The steps for displaying the Payment Details page are as follows:
- Click 'Next'
- On the 'Enter Details' page (see Figure 2) the customer clicks the 'Next' button.
- Send request
- The customer's browser sends a request to your server to display the 'Payment Details' page.
- Retrieve data
- Your server retrieves all the data that is required for the secure token request. It then builds a parameter list that will be sent to QuickConnect as part of the request. For more details see Secure token request parameters.
- Request security token
- Your server makes an outbound HTTPS connection to the QuickConnect server. The parameter list from the previous step is included in the request.
- Generate security token & store parameters
- QuickConnect generates a security token and stores your parameter list. A security token is a randomly generated, base 64 encoded string of characters.
- For example:
token=m378813qtvOtylVTvVvpWA7PT14QHltr-AqX2gZ-RFM - A unique security token is created for every request. The token is valid for 1 hour after it is created and can only be used once.
- Return security token
- QuickConnect returns the security token to your server.
- Return html for 'Payment Details' page.
- Your server produces HTML for the 'Payment Details' page and sends it to the customer's browser. The page includes:
- Input fields for the customer to enter their account details
- Hidden fields that are required for the direct post to QuickConnect
For more details see Direct post parameters.
Making a payment
This section explains the process for making a payment. It includes information about submitting payment details to QuickConnect as well as suggestions for presenting a results page to your customer.
There are two flows that may occur when a customer submits their payment details. They are:
Your system must correctly handle both flows.
Typical payment flow
The typical payment flow consists of:
- The customer submitting their payment details to QuickConnect.
- QuickConnect performing high-level checks on the payment data, then making the payment attempt.
- QuickConnect returning the results to your system.
- Your system displaying the 'Receipt' page.
The diagram shown in Figure 5 provides a high-level overview of the typical payment flow.
The sequence diagram in Figure 6 shows the individual steps involved.

The steps for the above sequence diagram are:
- Click 'Make Payment'
- The customer enters their card details into the 'Payment Details' page then clicks 'Save'.
- Direct post
- The customer's browser submits the card details directly to QuickConnect.
- Verify security token, lookup parameters and make payment.
- QuickConnect checks the security token to ensure it matches the token generated earlier in Figure 4. It then retrieves the other parameters, validates the data and makes the payment.Credit card payments are processed immediately. Bank account payments are not processed immediately. Instead, they are stored temporarily by QuickStream, then batched and sent to the customer's bank at the end of the day. The customer's bank then has 3 banking days to decline the payment request. This is discussed in detail in [Payment procedure - Bank account transactions](#payment-procedure).
- Redirect
- QuickConnect builds a list of parameters to include in the redirect. They are included as a list of ampersand-delimited parameters. For example: communityCode=ACOMPANY&supplierBusinessCode=ACOMPANY&...
- See Redirect parameters for the full list of parameters.
- QuickConnect then instructs the customer's browser to redirect to your returnUrl via HTTP get.
- Request next page
- The customer's browser redirects to your server's returnUrl.
- Retrieve parameters
- Your server retrieves the parameters from the request. It then uses this data to build the HTML for the 'Receipt' page.
- Return HTML for next page
- Your server returns the HTML for the 'Receipt' page to the customer's browser.
Error flow
This section explains the sequence of events that take place when QuickConnect identifies a problem with the customer's payment details. There are a number of reasons why the error flow may occur:
- The customer has entered invalid card details. For example, the card number is too short or the expiry date is in the past. See Error descriptions for the list of errors that may be identified.
- The customer has entered invalid bank account details. For example, the BSB is not valid. See Error descriptions for the list of errors that may be identified.
- The payment includes a surcharge (calculated by QuickConnect) without the
acceptSurchargeflag set. See Surcharge flow for information on payments with surcharges. - The payment is suspected to be a duplicate payment. A 'duplicate payment' is a payment that has the same card number (for card payments) or BSB and account number (for bank account payments) and payment amount as another payment made in the past 24 hours. See Duplicate payment flow for information on handling potential duplicates.
If QuickConnect identifies a problem with the payment data, it will not attempt to make the payment. Instead, it will return an error summary to your system for you to display to the customer. During this process, QuickConnect will:
- Redirect to your errorUrl
- Include a parameter called 'action' with a value of 'Error'
When you receive error information from QuickConnect we recommend you redisplay the 'Payment Details' page, present an error message and ask the customer to re-enter their details. As part of this process, you will need to request a new security token.
The diagram in Figure 7 provides a high-level overview of the error flow.
The sequence diagram in Figure 8 shows the individual steps involved.
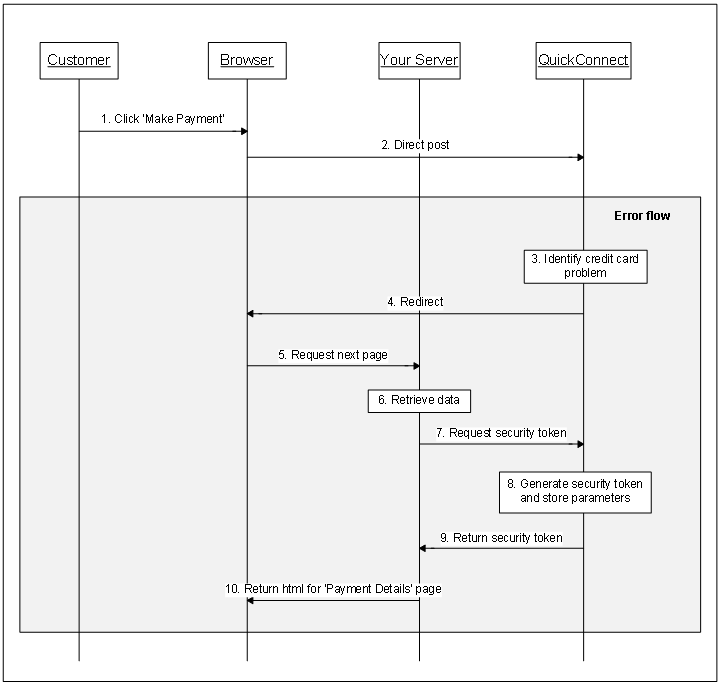
The steps for the above sequence diagram are:
- Click 'Make Payment'
- The customer enters their card details into the 'Payment Details' page then clicks 'Save'. For this particular example assume the customer has entered an invalid card number.
- Direct post
- The customer's browser submits the card details directly to QuickConnect.
- Identify card or bank account problem
QuickConnect identifies a problem with the card or bank account details. The payment is not attempted.
- Redirect
- QuickConnect builds a list of parameters to include in the redirect. These parameters are specific to the error flow. They are included as a list of ampersand-delimited parameters.
- For example: action=Error&communityCode=ACOMPANY&supplierBusinessCode=ACOMPANY&...
- See Redirect parameters for the full list of parameters.
- QuickConnect then instructs the customer's browser to redirect to the errorUrl you provided in the secure token request. Note, if you did not provide an errorUrl, QuickConnect will instead redirect to your returnUrl.
- Request next page
- The customer's browser redirects to your server's errorUrl.
- Retrieve data
- Your server retrieves the error parameters from the request.
- Request security token
- Your server requests a new security token from QuickConnect. Your request will include a new parameter list. See Secure token request parameters for details.
- Generate security token & store parameters
- QuickConnect generates a new security token and stores your parameter list.
- Return security token
- QuickConnect returns the security token to your server.
- Return html for 'Payment Details' page
Your server produces HTML for the 'Payment Details' page and sends it to the customer's browser. The page includes:
- An error message to explain why the previous account details were rejected
- Input fields for the customer to re-enter their account details
- Hidden fields for the direct post to QuickConnect
Surcharge flow
This section explains the sequence of events that take place when QuickConnect is used to calculate and apply card surcharges. Please note that this flow is similar to the Duplicate payment flow and you may be required to handle surcharges as well as duplicate payments.
The typical surcharge flow consists of:
- The customer submitting their payment details to QuickConnect.
- QuickConnect performing high-level checks on the payment data, then calculating the surcharge amount
- QuickConnect returning the results to your system
- Your system displaying the calculated total, principal and surcharge amounts with an "Accept Surcharge" control.
- The customer submitting the confirmation to QuickConnect and QuickConnect attempting the payment.
- QuickConnect returning the results to your system.
- Your system displaying the 'Receipt' page.
The surcharge flow differs from the Typical payment flow in points 3-5 where an additional confirmation step is required.
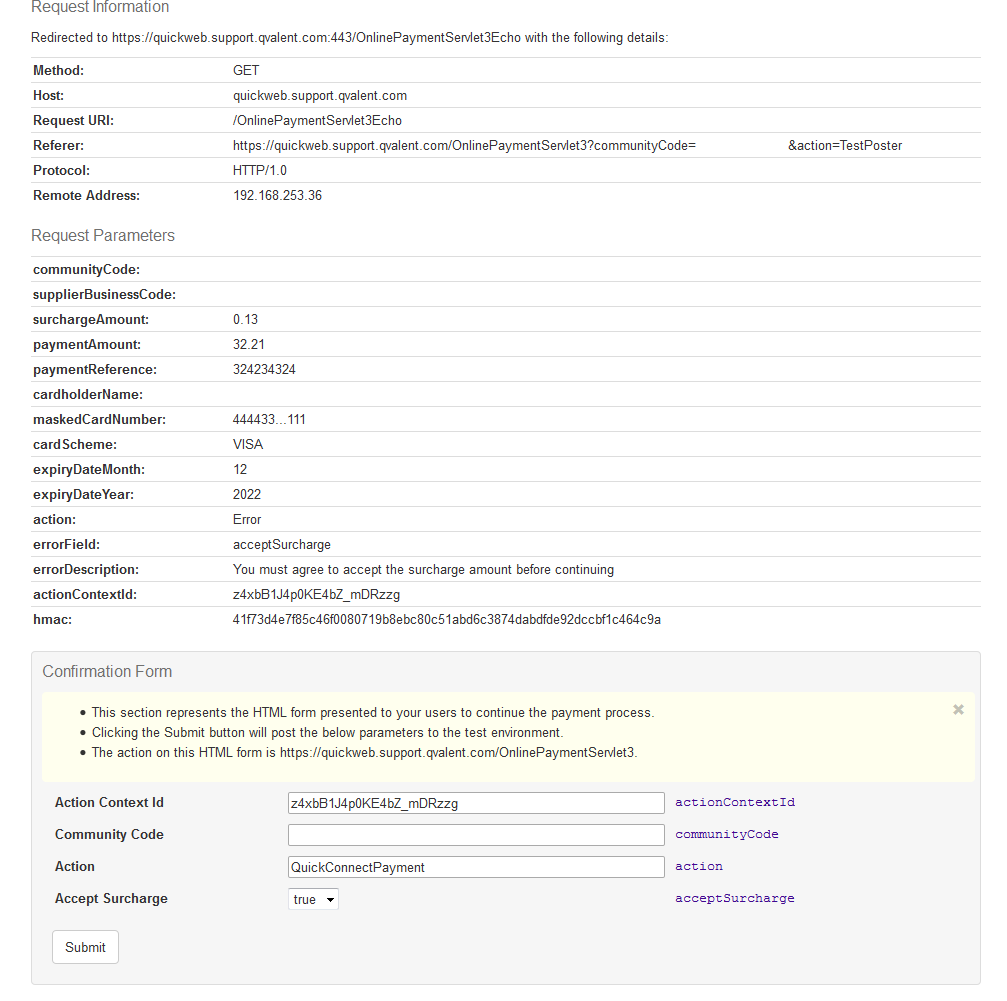
In step 3, QuickConnect returns the details of the payment, including the total, principal and surcharge amounts back to your system. It also includes the following additional fields:
action=ErrorerrorField=acceptSurchargeerrorDescription=You must agree to accept the surcharge amount before continuingactionContextId= A string of characters, for example,z4cbB4K1HKEm1Z_mDRzzg
QuickConnect expects a confirmation of the surcharge amount to be sent back before the payment is attempted. In step 4, you may display an "Accept Surcharge" control to post the required parameters to QuickConnect. The customer will submit the form and post the following parameters to QuickConnect:
actionContextId= The action context Id that was returned in the previous step.communityCode= Your QuickStream community codeaction=QuickConnectPaymentacceptSurcharge=trueorfalse
To understand the process better, you can use the test poster to simulate this process. Your test poster is located at https://quickweb.support.qvalent.com/test/YOURCOMMUNITYCODE or https://quickapi-test.paymentsonline.co.nz/test/YOURCOMMUNITYCODE (New Zealand).
Duplicate payment flow
This section explains the sequence of events that take place when QuickConnect identifies a duplicate payment. Please note that this flow is similar to the Surcharge flow and you may be required to a handle duplicate payments as well as surcharges.
The typical duplicate payment flow consists of:
- The customer submitting their payment details to QuickConnect.
- QuickConnect performing high-level checks on the payment data, and determining it is a duplicate payment.
- QuickConnect returning the results to your system
- Your system displaying a Duplicate Payment notice.
- The customer submitting the confirmation to QuickConnect and QuickConnect attempting the payment.
- QuickConnect returning the results to your system.
- Your system displaying the 'Receipt' page.
The duplicate payment flow differs from the Typical payment flow in points 3-5 where an additional confirmation step is required.
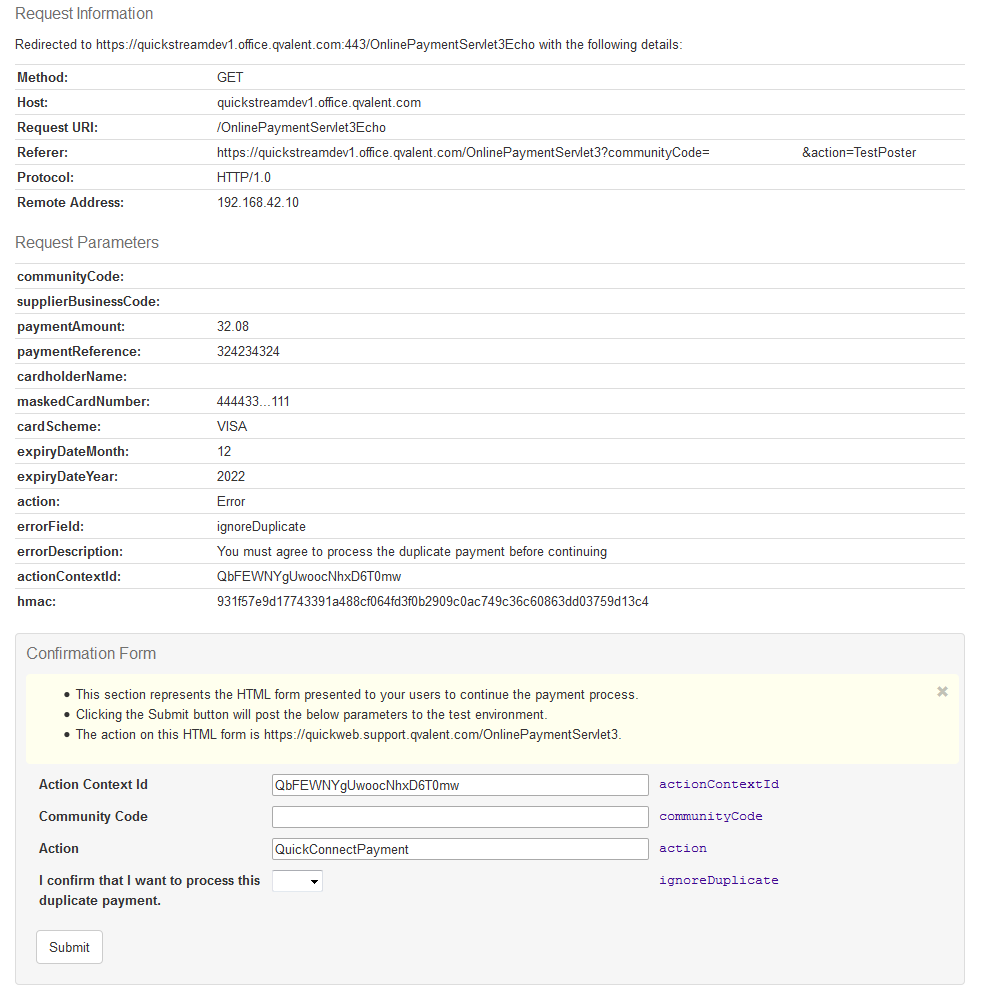
In step 3, QuickConnect returns the details of the payment back to your system. It also includes the following additional fields:
action=ErrorerrorField=ignoreDuplicateerrorDescription=You must agree to process the duplicate payment before continuingactionContextId= A string of characters, for example,Qb3is8yHS8ehkS9hjks_sh22Sc
QuickConnect expects a confirmation of the duplicate payment to be sent back before the payment is attempted. In step 4, you may display an "Ignore Duplicate Payment" control to post the required parameters to QuickConnect. The customer will submit the form and post the following parameters to QuickConnect:
actionContextId= The action context Id that was returned in the previous step.communityCode= Your QuickStream community codeaction=QuickConnectPaymentignoreDuplicate=trueorfalse
To understand the process better, you can use the test poster to simulate this process. Your test poster is located at https://quickweb.support.qvalent.com/test/YOURCOMMUNITYCODE or https://quickapi-test.paymentsonline.co.nz/test/YOURCOMMUNITYCODE (New Zealand).
Receiving payment details
There are two ways to receive payment details:
Server to server notification
This option is also known as the server-to-server postback. It allows you to receive payment summary details after each card payment is made. This is done via a HTTPS POST to your server. The payment details are posted as form parameters or as XML.
Refer to Server to server notification
Parameters in the server to server notification
These parameters are passed from QuickConnect to your server in the Server to server notification:
sourceCodereceiptNumbercommunityCodesupplierBusinessCodepaymentReferencecustomerReferenceNumberpaymentAmountsurchargeAmountcardSchemesettlementDatecreatedDateTimeresponseCoderesponseDescriptionsummaryCodesuccessFlag- Custom fields
Refer to Server to server notification for the full specification.
Cash applied file
See Cash applied file.
The file may be retrieved using iLink or available for download in QuickStream Portal.
To download a Cash Applied File from QuickStream Portal:
- Sign into QuickStream Portal
- Click Administration -> Transactions and Reports -> Facility Reports
- Your report will appear on this page.
- Select the download icon to retrieve a Cash Applied File.
- Use the date filters to find older files.
Manage security settings
Refer to QuickStream user guide - Security settings. to manage the following security settings in QuickStream:
- Whitelist the IP addresses for the Secure Token Requests
- Whitelist the domain addresses for the Server to server notification
- View your connection details, including your credentials for authentication with QuickStream.
Secure token request parameters
These parameters are passed to QuickConnect in a Secure token request. Sign in to QuickStream to get these values and URLs in each environment. See View your connection details.
Mandatory parameters
usernamepasswordsupplierBusinessCodereturnUrlprincipalAmountconnectionType=QUICKCONNECTproduct=QUICKWEB
Optional parameters
currencyCodepaymentReferencecustomerReferenceNumbererrorUrlserverReturnUrlerrorEmailToAddressaccountTyperegisterPaymentAccountcustom<Custom name>
Refer to Secure token request for the full specification.
Direct post parameters
The following table lists the parameters that can be included in the direct post from the 'Payment Details' page to QuickConnect.
These parameters are passed to QuickConnect from the 'Payment Details' after receiving a token from the Secure token request. Sign in to QuickStream to get the communityCode value and URL in each environment. See View your connection details.
Mandatory parameters These are provided as hidden input fields on the 'Payment Details' page.
communityCodetoken
Refer to Parameters for the handoff for the full specification.
Additional mandatory parameters
These are provided as input fields on the 'Payment Details' page.
| Parameter name | Format | Description |
|---|---|---|
cardholderName |
string |
The cardholder name as it appears on the customer's card. When accountType is CREDIT_CARD only. |
creditCardNumber |
string |
The card number. When accountType is CREDIT_CARD only. |
expiryDateMonth |
Date in MM |
The month the card expires. For example: 01 (for January). When accountType is CREDIT_CARD only. |
expiryDateYear |
Date in YY |
The year the card expires. For example: 18 (for the year 2018). When accountType is CREDIT_CARD only. |
cvn |
string |
The card verification number (CVN). This is also known as the card verification value (CVV). When accountType is CREDIT_CARD only. |
accountName |
string |
The account name associated with the customer's bank account. When accountType is DIRECT_DEBIT_NZ or DIRECT_DEBIT only. |
accountNumber |
string |
The card number associated with the customer's bank account. When accountType is DIRECT_DEBIT_NZ or DIRECT_DEBIT only. |
bsb |
string |
The BSB associated with the customer's bank account. When accountType is DIRECT_DEBIT only. |
bankCode |
string |
The bank code associated with the customer's bank account. When accountType is DIRECT_DEBIT_NZ only. |
branchCode |
string |
The branch code associated with the customer's bank account. When accountType is DIRECT_DEBIT_NZ only. |
accountSuffix |
string |
The account suffix associated with the customer's bank account. When accountType is DIRECT_DEBIT_NZ only. |
accountType |
string |
The type of payment the customer is going to make. Specify either: DIRECT_DEBIT (to restrict to Australian bank account payments), DIRECT_DEBIT_NZ (to restrict to New Zealand bank account payments) or CREDIT_CARD (to restrict to card payments). Do not send this parameter if your payer can choose either in your solution. |
ignoreDuplicate |
boolean |
If this parameter is set to 'true' QuickConnect will not perform a 'duplicate payment check'. A duplicate payment is an identical payment that has already been made that day. If a duplicate payment is found, QuickConnect usually rejects the current payment request. Please note that an error will occur and the payment will not proceed if ignoreDuplicate is not set to 'true'. |
acceptSurcharge |
boolean |
If this parameter is set to 'true' QuickConnect will process the payment. You must accept the surcharge to continue with the payment. Please note that an error will occur and the payment will not proceed if acceptSurcharge is not set to 'true'. |
actionContextId |
string |
This parameter is required for the Surcharge flow and the Duplicate payment flow. You must provide the value of actionContextId that was returned to you by QuickConnect to accept surcharge or ignore a duplicate payment. |
Optional parameters
custom<Custom name>
Redirect parameters
This section lists the parameters QuickConnect may return in the redirect. There are two flows that can occur. QuickConnect will return either:
- Parameters for the typical payment flow
- Parameters for the error flow
Parameters for the typical payment flow
These parameters are passed back from the system when the process is completed.
communityCodesupplierBusinessCodepaymentAmountsurchargeAmountreceiptNumberpaymentReferencecustomerReferenceNumberresponseCoderesponseDescriptionsummaryCodecreatedDateTimesettlementDatecardholderNamecardSchemeexpiryDateMonthexpiryDateYearaccountNameaccountNumberbsbhmac- Refer to Validating the HMAC.custom<Custom name>
Refer to Passback for the full specification.
Parameters for the error flow
The following table lists the parameters that QuickConnect will return during the error flow. Your system can then display the error information on your 'Payment Details' page (see Figure 8 step 10).
For more information see Error flow.
| Parameter name | Format | Description |
|---|---|---|
action |
string |
'Error' |
communityCode |
string |
This is the same value that you passed to QuickConnect in the secure token request. |
supplierBusinessCode |
string |
This is the same value that you passed to QuickConnect in the secure token request. |
paymentAmount |
string |
This is the total amount that will be charged to your customers card. It is the principalAmount passed in the secure token request plus (when applicable) the surchargeAmount calculated by QuickStream. |
errorDescription |
string |
A description of the error. See Error descriptions for the list of errors that may be provided by QuickStream. For example: Card type not accepted |
errorField |
string |
The name of the parameter that generated the error. For example: creditCardNumber. This parameter can be provided more than once. See Error descriptions for the list of errors that may be provided by QuickStream. |
surchargeAmount |
string |
This is the surcharge amount calculated by QuickStream based on the surcharge percentage configured for a particular card scheme. This field is only applicable when QuickStream has calculated a surcharge, otherwise it will be omitted. |
customerReferenceNumber |
string |
This will be included if you provided the customerReferenceNumber parameter in the secure token request. See Secure token request parameter for details. |
paymentReference |
string |
This will be included if you provided the paymentReference parameter in the secure token request. See Secure token request parameter for details. |
actionContextId |
string |
This parameter is required for the Surcharge flow and the Duplicate payment flow. You must provide this value to accept surcharge or ignore a duplicate payment. |
Error descriptions
This table lists the values that QuickConnect may return for the errorField and errorDescription parameters. These are returned as part of the error flow (see Figure 8 step 4).
| Error field | Error description |
|---|---|
acceptSurcharge |
'You must agree to accept the surcharge amount before continuing.5' |
ignoreDuplicate |
'You must agree to process the duplicate payment before continuing.' |
cardholderName |
'The value contains illegal characters. Please use only English letters and symbols.' |
creditCardNumber |
'A value is required for this field.' |
creditCardNumber |
'The value you have entered is too short. Please enter at least 13 characters.' |
creditCardNumber |
'The value you have entered is too long. Please enter at most 16 characters.' |
creditCardNumber |
'Invalid card number.' |
creditCardNumber |
'Card type not accepted.' |
expiryDateMonth |
'A value is required for this field.' |
expiryDateMonth |
'The value you have entered is too short. Please enter at least 4 characters.' |
expiryDateMonth |
'The value you have entered is too long. Please enter at most 4 characters.' |
expiryDateYear |
'A value is required for this field.' |
expiryDateYear |
'The value you have entered is too short. Please enter at least 4 characters.' |
expiryDateYear |
'The value you have entered is too long. Please enter at most 4 characters.' |
expiryDateYear |
'Expiry date must be in the future.' |
cvn |
'A value is required for this field.' |
cvn |
'The value you have entered is too short. Please enter at least 3 characters.' |
cvn |
'The value you have entered is too long. Please enter at most 4 characters.' |
cvn |
'Invalid number.' |
cvn |
'Invalid value for card type.' |
bsb |
'A value is required for this field' |
bsb |
'Invalid BSB' |
bsb |
'BSB is not valid for direct debit' |
bsb |
'Not a valid settlement account BSB' |
accountNumber |
'A value is required for this field' |
accountNumber |
'Invalid Account Number' |
accountName |
'A value is required for this field' |
accountName |
'The value you have entered is too long. Please enter at most 200 characters.' |
accountName |
'The value contains illegal characters. Please use only English letters and symbols.' |
acceptDDR |
'You must accept the Direct Debit Request before continuing' |