Customers
QuickStream uses customers to store account and payment information and contact details. Usually, a customer in QuickStream represents a person making payments to your facility.
Search for customers
This page allows you to search for customers in your facility. By default, the page will list all customers in the system in pages of 10.
To find a specific customer you can filter the list by:
| Filter Type | Description |
|---|---|
| Show All | List all the customers in the system. |
| Customer Details | Enter the customer number, name or email address to find a specific customer. |
| Account Details | Enter the card details, bank account details, or Account Token to find a specific customer. |
| Schedule ID | Each recurring payment schedule you created will be allocated a Payment Schedule ID. Enter this number to find a customer with the specific recurring payment schedule. |

The customer search results are displayed in a table with the following columns:
| Column Name | Descripiton |
|---|---|
| Customer Number | The unique number allocated to the customer. |
| Customer Name | The customer name |
| Customer Status | The status of the customer. The customer may be Enabled or Disabled. |
| Customer Summary | A brief system generated description of the customer. |
To export a list of customers, click the 'Export Customers' button. This will generate a Comma Separated Value (CSV) file of customer details.
View customer details
This page displays the details of a customer in the system. The customer contact details and status are listed on the page.
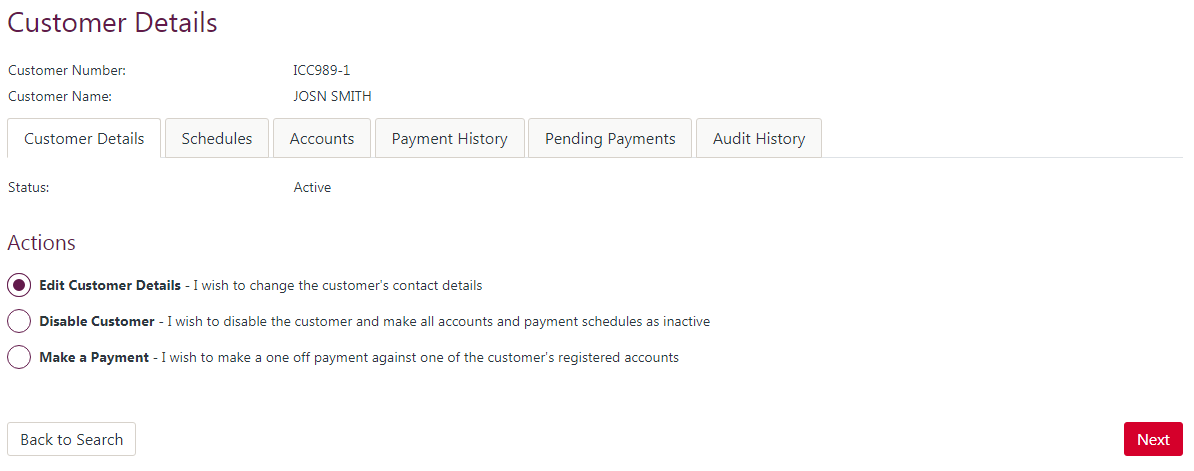
To edit the customer details, select Edit Customer Details and click the 'Next' button.
To disable the customer, select Disable Customer and click the 'Next' button. This will set the customer's status to Disabled, cancel any recurring payments (if applicable) and void any outstanding payments.
To make a payment for this customer using their registered accounts, select Make a Payment and click the 'Next' button.
Edit customer details
This page allows you to edit the details of a customer. You can edit the following fields:
| Field Name | Description |
|---|---|
| Customer Number | The unique customer number. This number identifies this customer in your facility. |
| Customer Name | The customer name. This may be the customer's full name for an individual or a business or company name. |
| Email Address | The email address for the customer. Email notifications (if applicable) for this customer will be sent to this address. |
| Phone Number | The contact phone number for the customer. SMS notifications (if applicable) for this customer will be sent to this phone number. |
| Address | The customer's address details. These details are optional. |
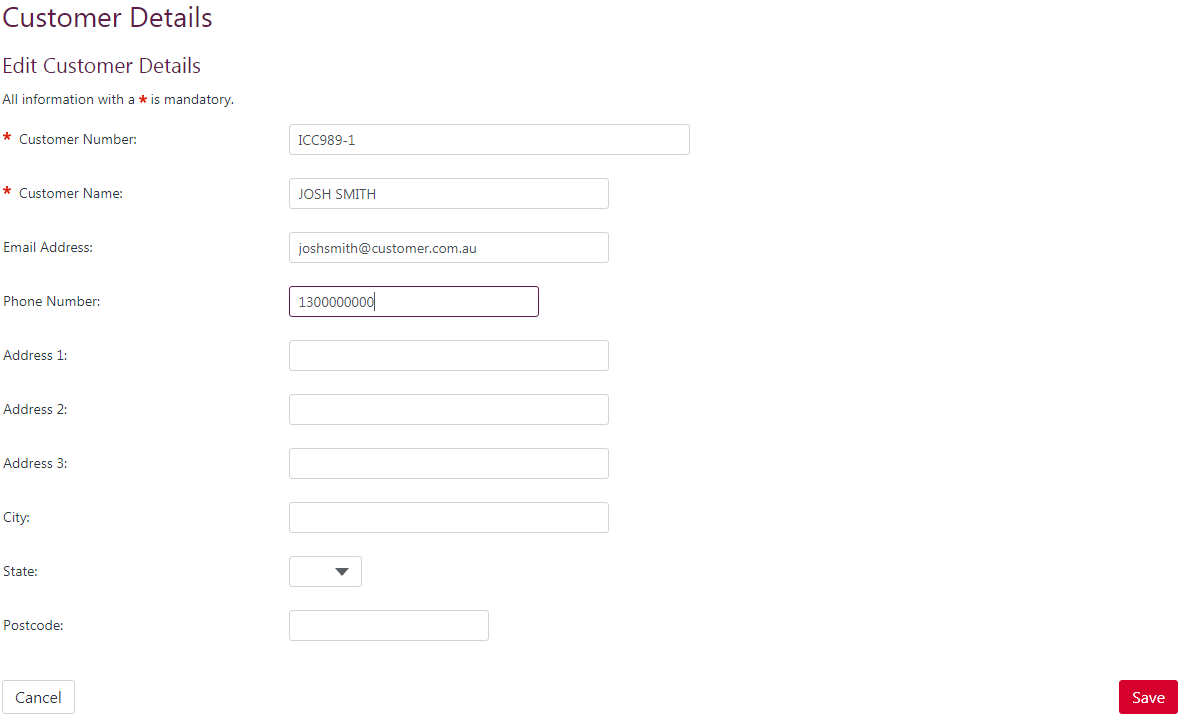
Once you have updated the details for the customer, click the 'Save' button to confirm the details.
View payment schedules
If the customer has only 1 recurring payment schedule you will be taken to the (Payment Schedule Details)[#payment-schedule-details] instead.
This page displays the recurring payments for the customer:
| Column Name | Description |
|---|---|
| Payment Schedule Code | This is a unique identifier allocated to the recurring payment for the customer. If this wasn't provided then the system will generate one. |
| Next Payment Date | When the recurring payment is active, the date that the next payment will be deducted is displayed |
| Payment Schedule Summary | A brief system generated description about the payment schedule |
| Plan Name | The name of the Payment Plan. If this recurring payment schedule was not created for a Payment Plan, this will be displayed as Not a plan |
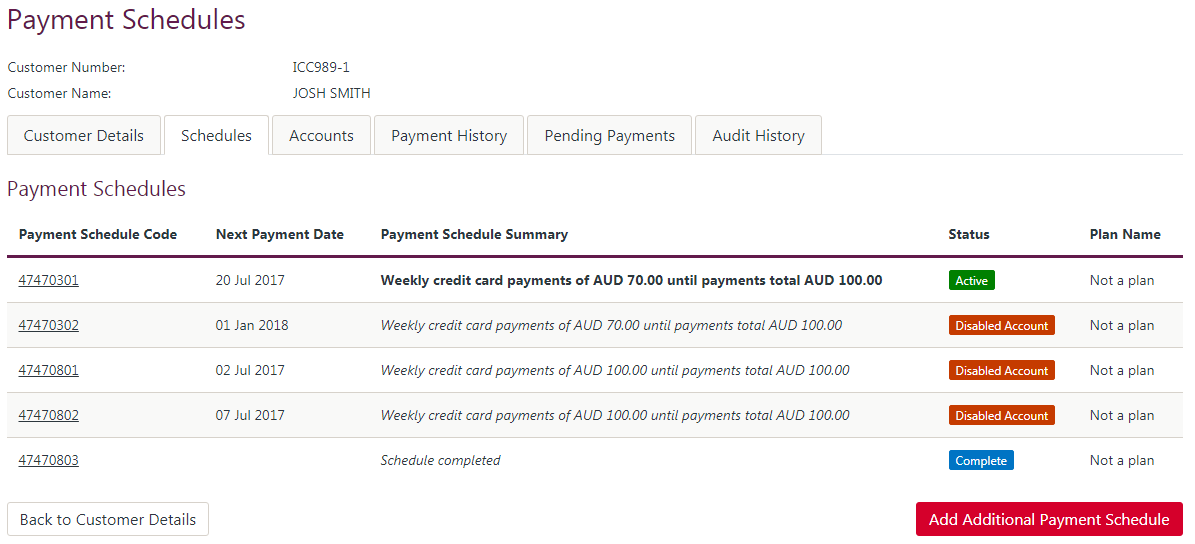
Click 'Add Additional Payment Schedule' to create a new Recurring Payment for this customer.
To view the details of a recurring payment, click the Payment Schedule Code in the list.
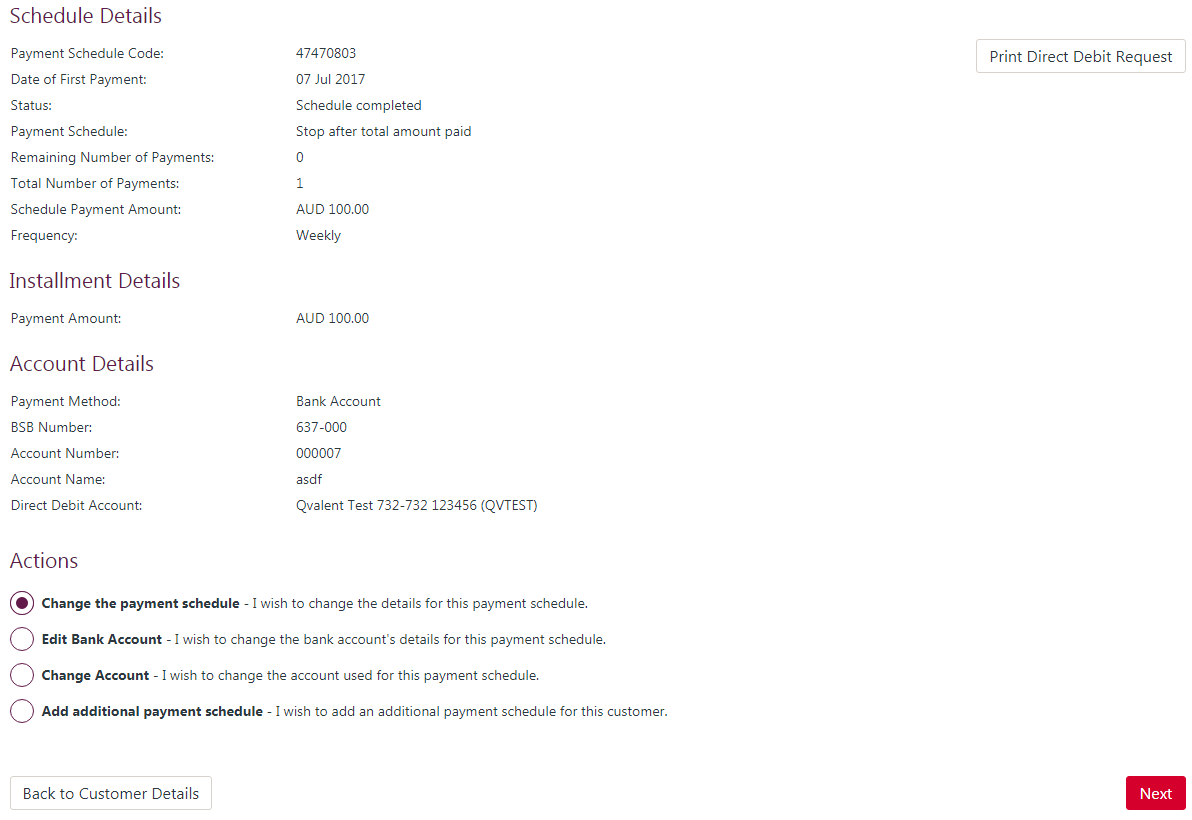
Payment schedule details
The Payment Schedule Details page displays the schedule, instalment and account details for the recurring payment. The page is split into the following sections:
- Tabs
- Schedule Details
- Instalment Details
- Account Details
- Actions
These sections are described below.
Tabs
The Payment Schedule Details page has the following tabs that provide supplementary information:
- Payment History
- Audit History
The Payment History tab displays the payments that have been attempted for this plan. You can view the transaction details by clicking on the Receipt Number. See Find or Refund a Transaction for information on these transaction details.
The Audit History tab displays the recent events for that recurring payment schedule. Events such as creating, editing or disabling the payment schedule can be seen on this list.
Schedule details
The Schedule Details section displays the general information about the recurring payment schedule. The following fields are displayed:
| Field Name | Description |
|---|---|
| Payment Schedule Code | This is a unique identifier for the recurring payment schedule. This displays in search results, reporting and files uploaded into the solution. |
| Date of First Payment | The date the first payment will be or was taken. |
| Status | The status of the recurring payment schedule. |
| Frequency | The frequency you choose determines how often the regular payment amount will be deducted on your customers recurring payment schedule. The options are Daily, Weekly, Fortnightly, Monthly, Quarterly, Six Monthly or Yearly. |
| Payment Schedule | The payment schedule determines how long the recurring payments will be deducted from your customers accounts for. The options are:
|
Instalment details
The Instalment Details section displays the information about the next instalment in the recurring payment schedule. The following fields are displayed:
| Field Name | Description |
|---|---|
| Next Payment Date | The date that the next recurring payment will be taken on. |
| Payment Amount | The payment amount that the next recurring payment will be. This may also display surcharge details where applicable. |
Account details
The Account Details section displays the information accounts the payment will be taken from and settled. The following fields are displayed:
| Field Name | Description |
|---|---|
| Payment Method | The payment method for this recurring payment. This may be
|
| Card Number | The masked card number for the customers card account. |
| Expiry Date | The expiry date for the customers card account. |
| BSB | The BSB number for the customers Australian bank account. |
| Bank Code | The bank code for customers New Zealand bank account. |
| Branch Code | The branch code for customers New Zealand bank account. |
| Account Number | The account number for the customers bank account. |
| Merchant | The card merchant facility the customer's card payments will settle to. |
| Direct Entry Facility | The direct entry facility the customer's bank account payments will settle to. |
Actions
The Actions section lists the actions that you can take on the payment schedule. The actions that are available will depend on the status of the recurring payment schedule. The following are the actions you can take:
- Change the payment schedule: This option allows to you modify the details of the payment schedule.
- Edit Card or Edit Bank Account: This option allows you to change the customer's card or bank account details (such as updating the expiry date for a card account).
- Change Account: This option allows you to change the customer's account from a card to a bank account or vice versa.
- Stop Remaining Payments: This option allows you to cancel all remaining payments on the schedule. This will change the status of the recurring payment schedule to Stopped.
- Add additional payment schedule: This option allows you to add another recurring payment schedule for the same customer. See Add Recurring Payment Schedule for details on this option.
Add recurring payment schedule
This page allows you to add a new Recurring Payment Schedule for a customer. There are four parts to this process:
- Enter the Payment Schedule Details
- Enter the Account Details
- Confirmation and Save.
These steps are described in the sections below.
Enter the payment schedule details
On this page, you enter the recurring payment instalment and schedule details. Fill out the data in the following fields:
| Field Name | Description |
|---|---|
| Payment Schedule Code | A unique identifier for the recurring payment. This displays on the QuickStream Portal pages and in reports. This value is also used in external messages to and from QuickStream. |
| Payment Plan | If a Payment Plan exists, you can choose one to prefill the data. The recurring payment for this customer will then be considered to be on that plan. Choose Not a Payment Plan to enter a custom recurring payment schedule. |
| Business | Choose the business in your facility that this recurring schedule belongs to. This also determines which settlement accounts will be available on the next page. |
| Status | Choose Active to start the recurring payment on the date of first payment. If you don't know the date it should start, choose Inactive. You can modify the recurring payment later and change the status to Active and set a date for the first payment. |
| Date of First Payment | The date the first instalment of the recurring payment schedule will be taken from the customer. If you set this in the past, then the first payment will be taken on the next settlement date. If you set this in the future, the payment will be taken on that date. |
| Frequency | The frequency you choose determines how often the regular payment amount will be deducted on your customers recurring payment schedule. The options are Daily, Weekly, Fortnightly, Monthly, Quarterly, Six Monthly or Yearly. |
| Payment Schedule | The payment schedule determines how long the recurring payments will be deducted from your customers accounts for. The options are:
|
| Payment Amount | Enter the regular payment amount. If you have a surcharge configured for card payments then QuickStream will calculate a surcharge amount on top of this payment amount. |
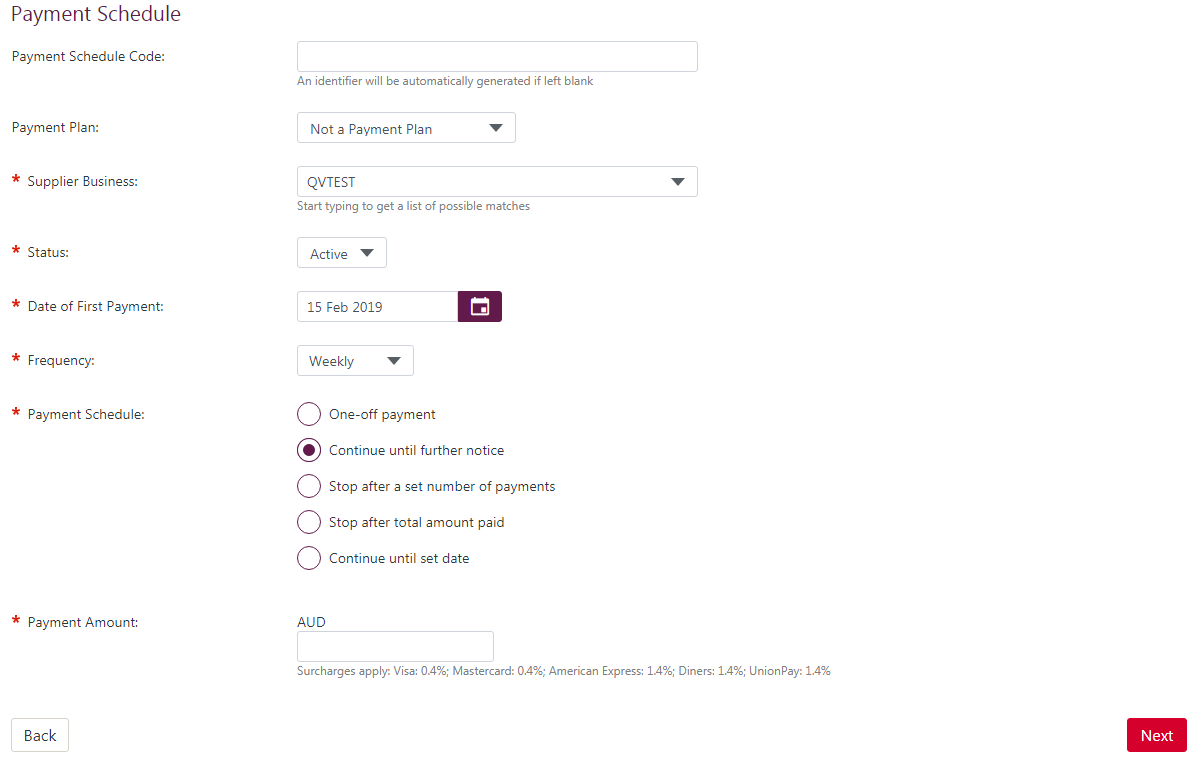
When adding a customer option existing Payment Plan, much of the detail from that plan is pre-filled for you.
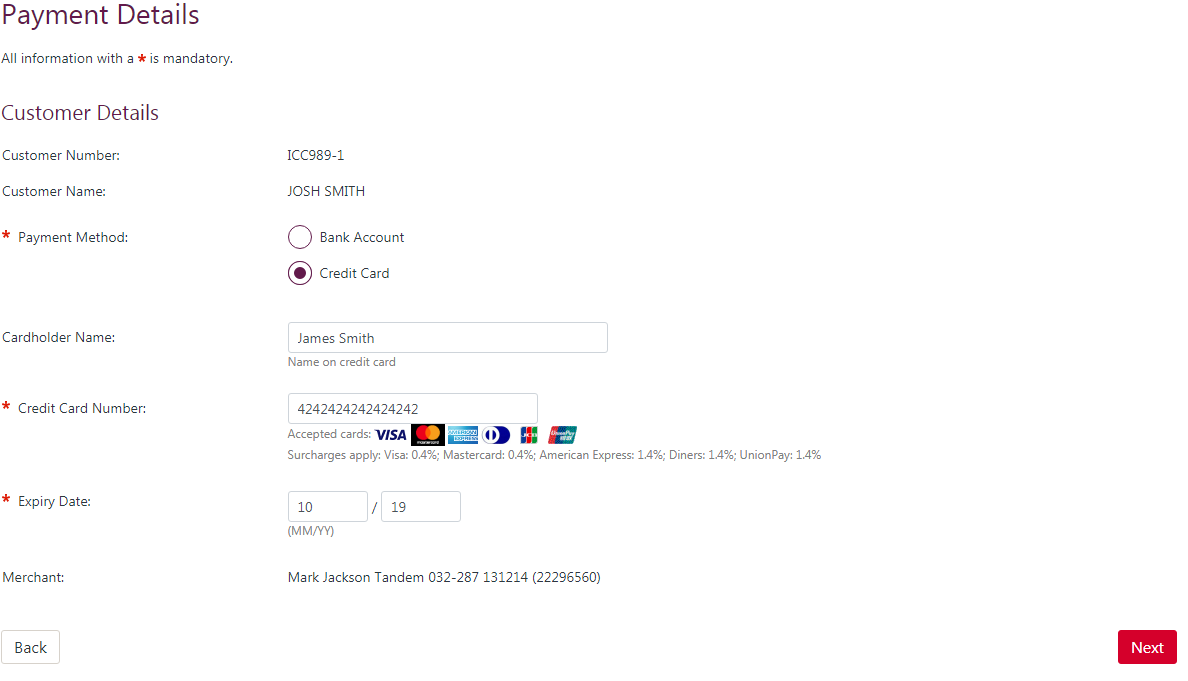
Enter the account details
This page allows you to choose the account the payments will be taken from, and the account that the payments will settle to.
First, choose the payment method - either Card or Bank Account. If this recurring payment is part of a Payment Plan, you may be restricted to only 1 payment method.
Second, choose the account the customer will pay from. If there are existing accounts registered for this customer you can choose them. You may also enter a new bank account or a card account.
Lastly, choose the account the payments will settle to. If you have multiple settlement accounts, you can choose them from the list. If you have only 1 applicable settlement account, then it will be chosen for you.
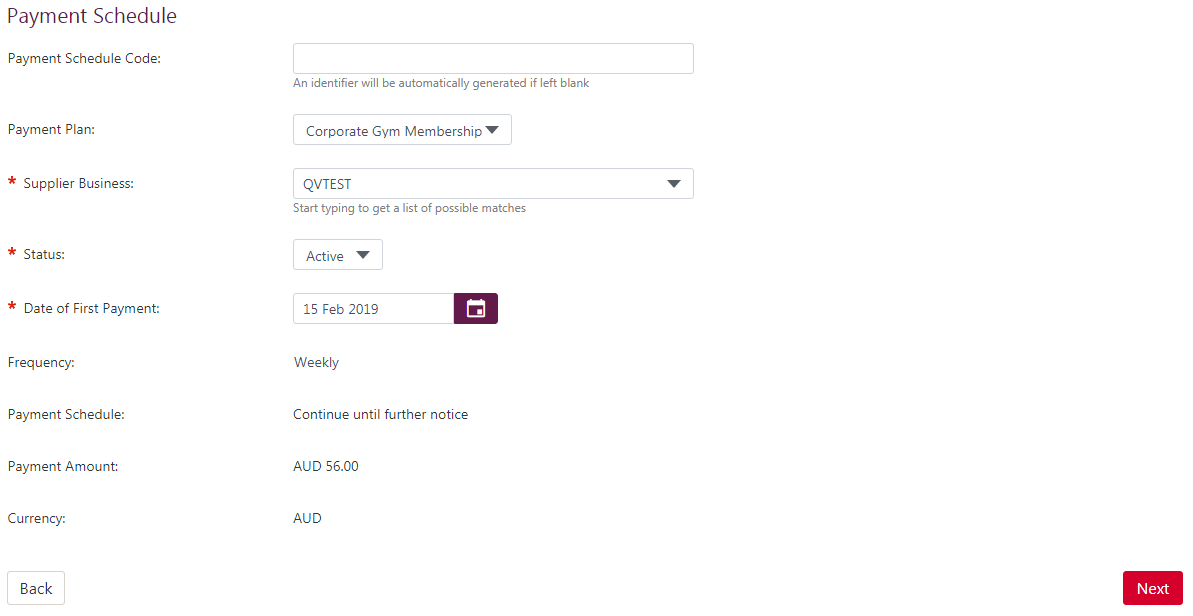
Confirmation and save
On this page, confirm that the details are correct. Click the 'Back' button to return to the previous step, or click the 'Save' button to save the recurring payment schedule.
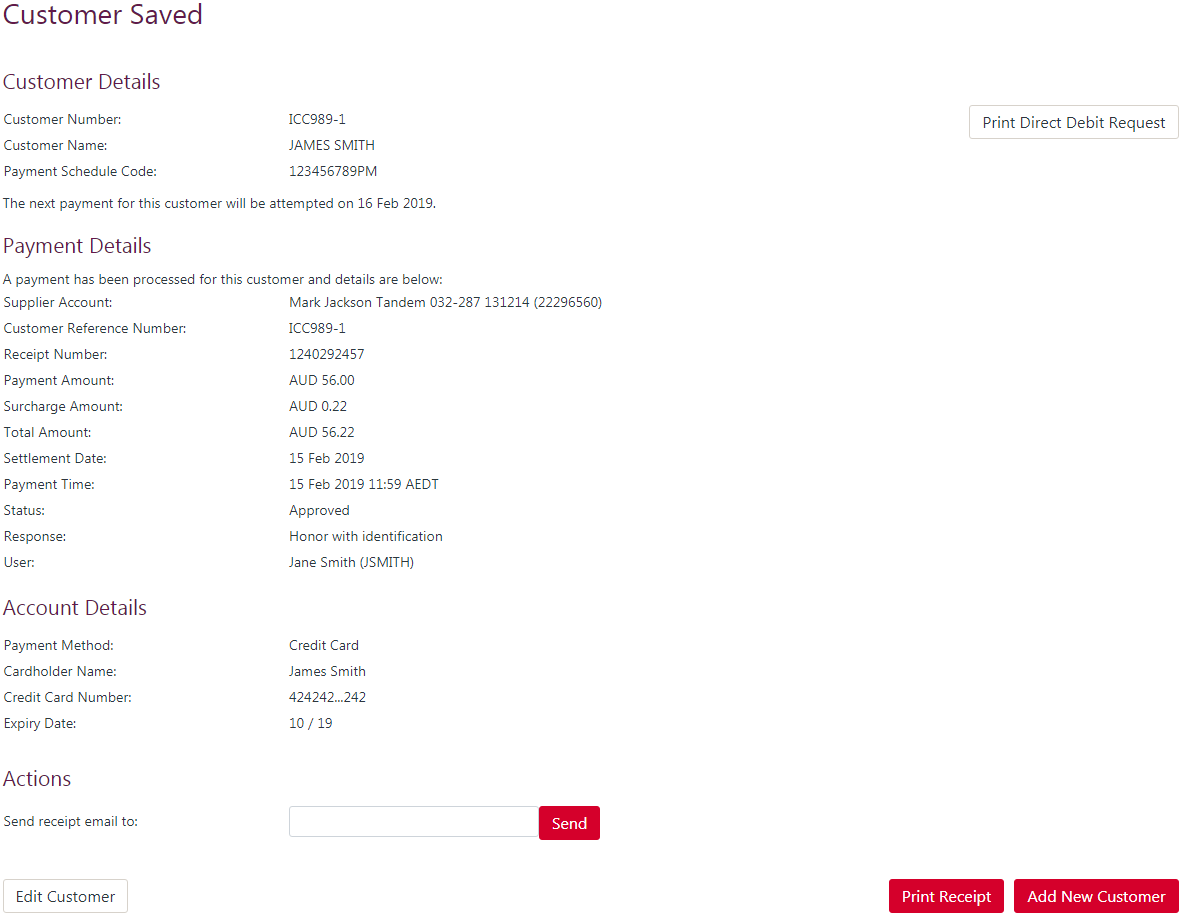
If the Date of First Payment was set to today, then the payment will be made. From here you can print a payment receipt, send the payment receipt to an email address or edit the customer details.
View customer accounts
This page lists the accounts that are registered for a customer. The customer accounts are displayed in a table with the following columns:
| Column Name | Description |
|---|---|
| Account Details | For card accounts, this is the masked card number. For bank accounts, this is the BSB and Account Number. |
| Account Type | Either Card or Bank Account |
| Account Name | The account holders name |
| Account Token | For a QuickVault solution, the Account Token is displayed. The Account Token may be sent from your systems, or generated by QuickStream. |
| Status | A status of Active means that the account may be used for payments. A status of Inactive indicates that the account can no longer by used to take a payment. |
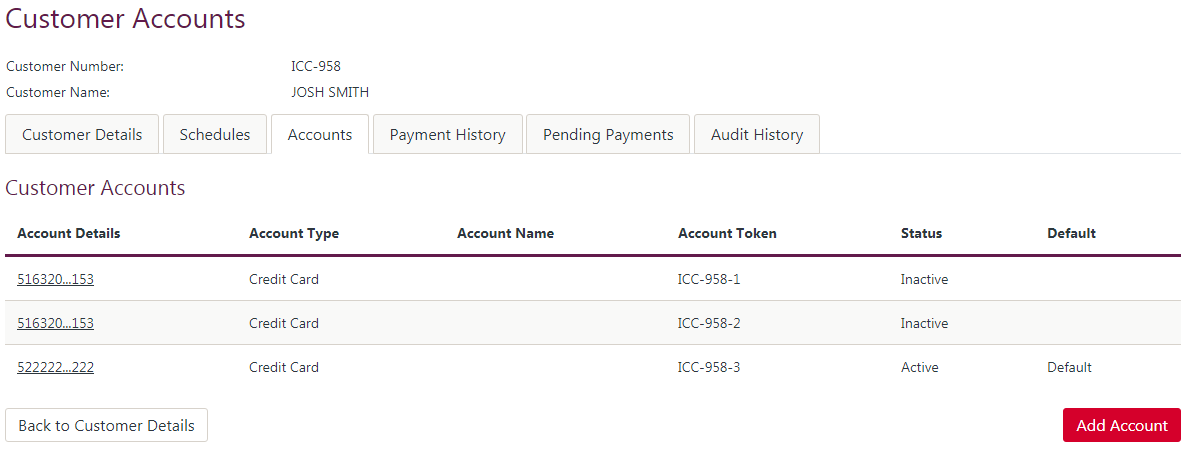
On this page you can:
- Go back to the customer details by clicking 'Back to Customer Details'
- Add a new card or bank account by clicking 'Add Account'
- View the details of an account by clicking on the Account Details. See View Customer Account Details for more information.
View customer account details
This page displays the details of a card or bank account registered for a customer. For a QuickVault solution, the Account Token is displayed on this page.
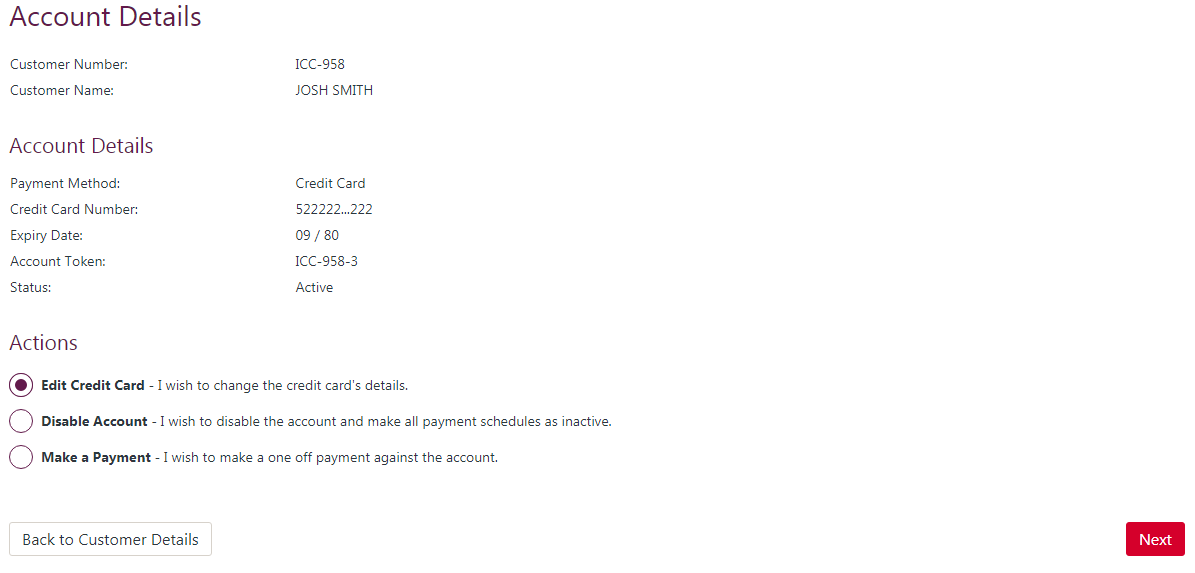
You can take the following actions on the account:
- Edit Card or Edit Bank Account: Modify the account details.
- Disable Account: Set the account to be disabled. A Disabled account can not be used to take payments.
- Make a Payment: For a QuickTerminal solution you can take a payment against this account for the customer.
Customer payment history
This page displays the payments that have been taken for a customer. The payments are displayed in a table with the following columns:
| Column Name | Description |
|---|---|
| Receipt Number | The unique reference number for the payment. Click the Receipt Number to view the details and take action against a transaction. |
| Payment Time | The date and time the payment was made. |
| Status | The status of the payment. This will be Approved or Declined. If you have Fraud Guard, a payment may have a status of Suspended |
| Payment Amount | The total amount of the transaction. |
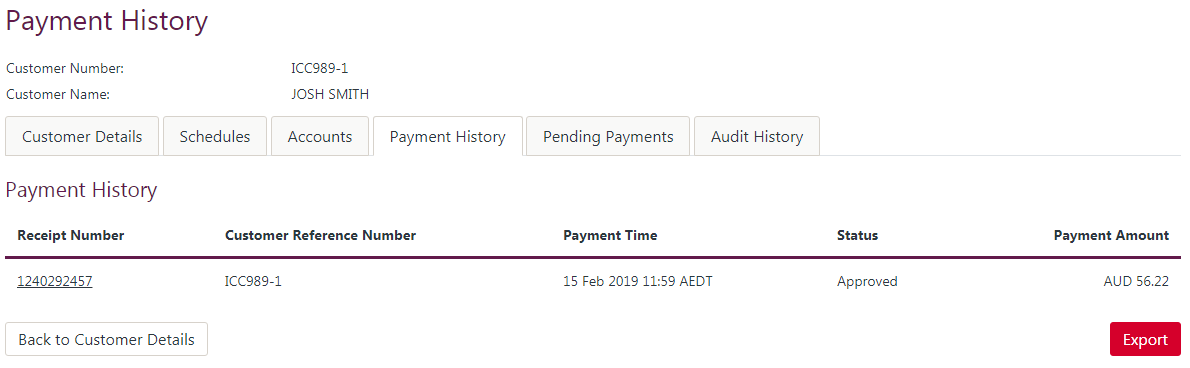
Click the Receipt Number to view the details and take action against a transaction. See Find or Refund a Transaction for details.
Customer pending payments
This page lists any payments that are pending payments for the customer. For each recurring payment schedule, this page will display the next regular instalment. The table has the following columns:
| Column Name | Description |
|---|---|
| Payment Schedule Code | The unique identifier for a customers payment schedule. Click this to view the details of the Payment Schedule. |
| Next Payment Date | The date the next payment for that recurring payment schedule will be taken |
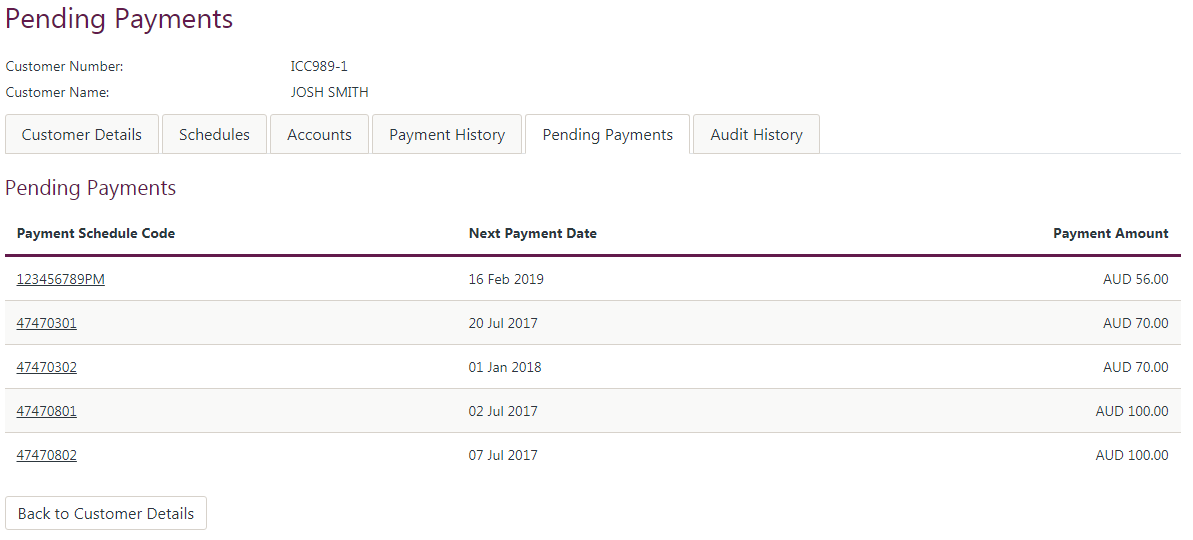
Click on the Payment Schedule Code to view the details of the recurring payment schedule. See View Payment Schedules for details.
Add a customer
This page allows you to add a customer.
To add a customer, enter the following details:
| Field Name | Description |
|---|---|
| Customer Number | The unique customer number. This number identifies this customer in your facility. |
| Customer Name | The customer name. This may be the customers full name for an individual or a business or company name. |
| Email Address | The email address for the customer. Email notifications (if applicable) for this customer will be sent to this address. |
| Phone Number | The contact phone number for the customer. SMS notifications (if applicable) for this customer will be sent to this phone number. |
| Address | The customer's address details. These details are optional. |
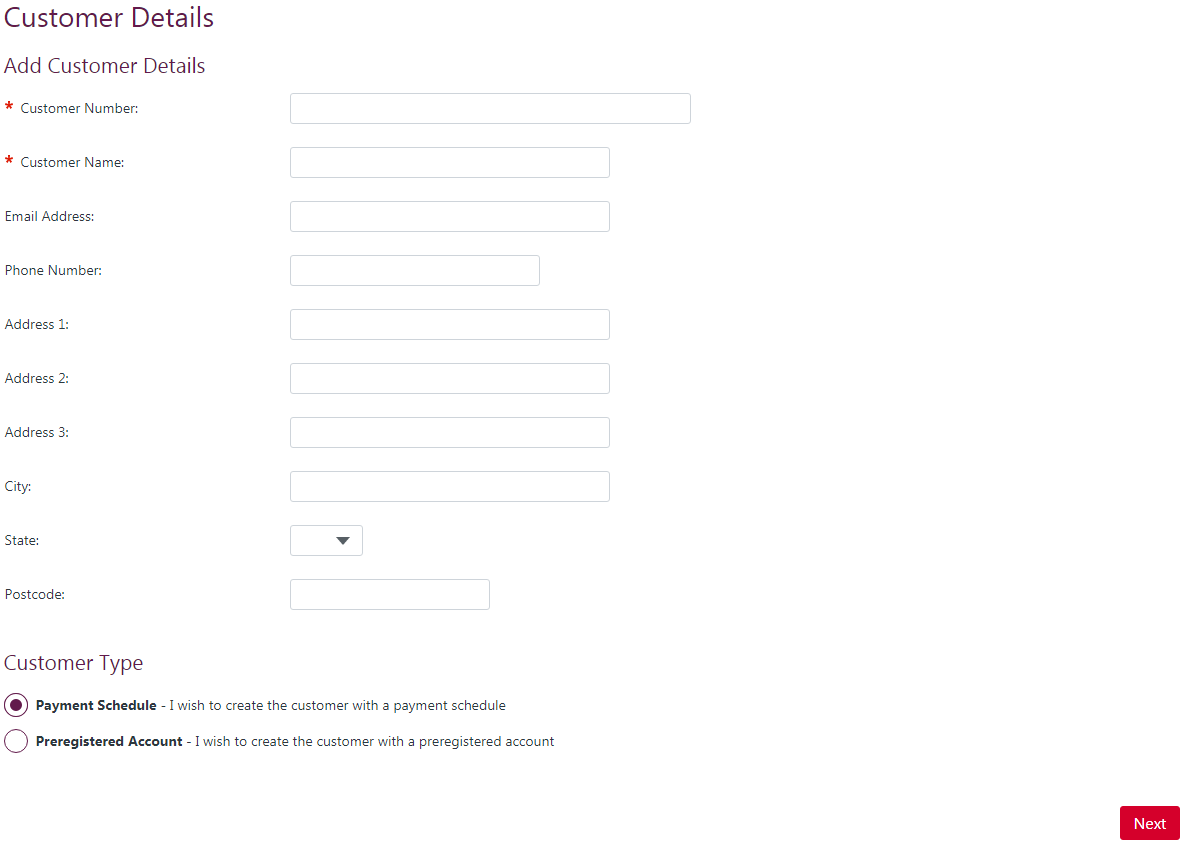
Depending on the type of solution you have, you may see extra actions you can take:
- If you have a Recurring solution you may add a customer with a Recurring Payment Schedule. See Add Recurring Payment Schedule for details.
- If you have a QuickVault solution you may add a customer with a QuickVault Account.